Dart-Platform
This is a product guide explaining basic concepts about Dart-Platform.
If you are new to Dart-Platform, read this guide to get basic understanding of the platform and learn useful tips.
Note.
To use the Dart-Platform, your device must be connected to a robot controller or a robot control simulator included in Dart-Services.
The Dart-Platform's Modules have been designed and developed for a resolution of 1280x800 which is the standard resolution for the Teach pendant. While most of these modules are responsive and can adjust to the screen resolution automatically, some devices with noticeably different resolutions from the default one may not display these modules properly.
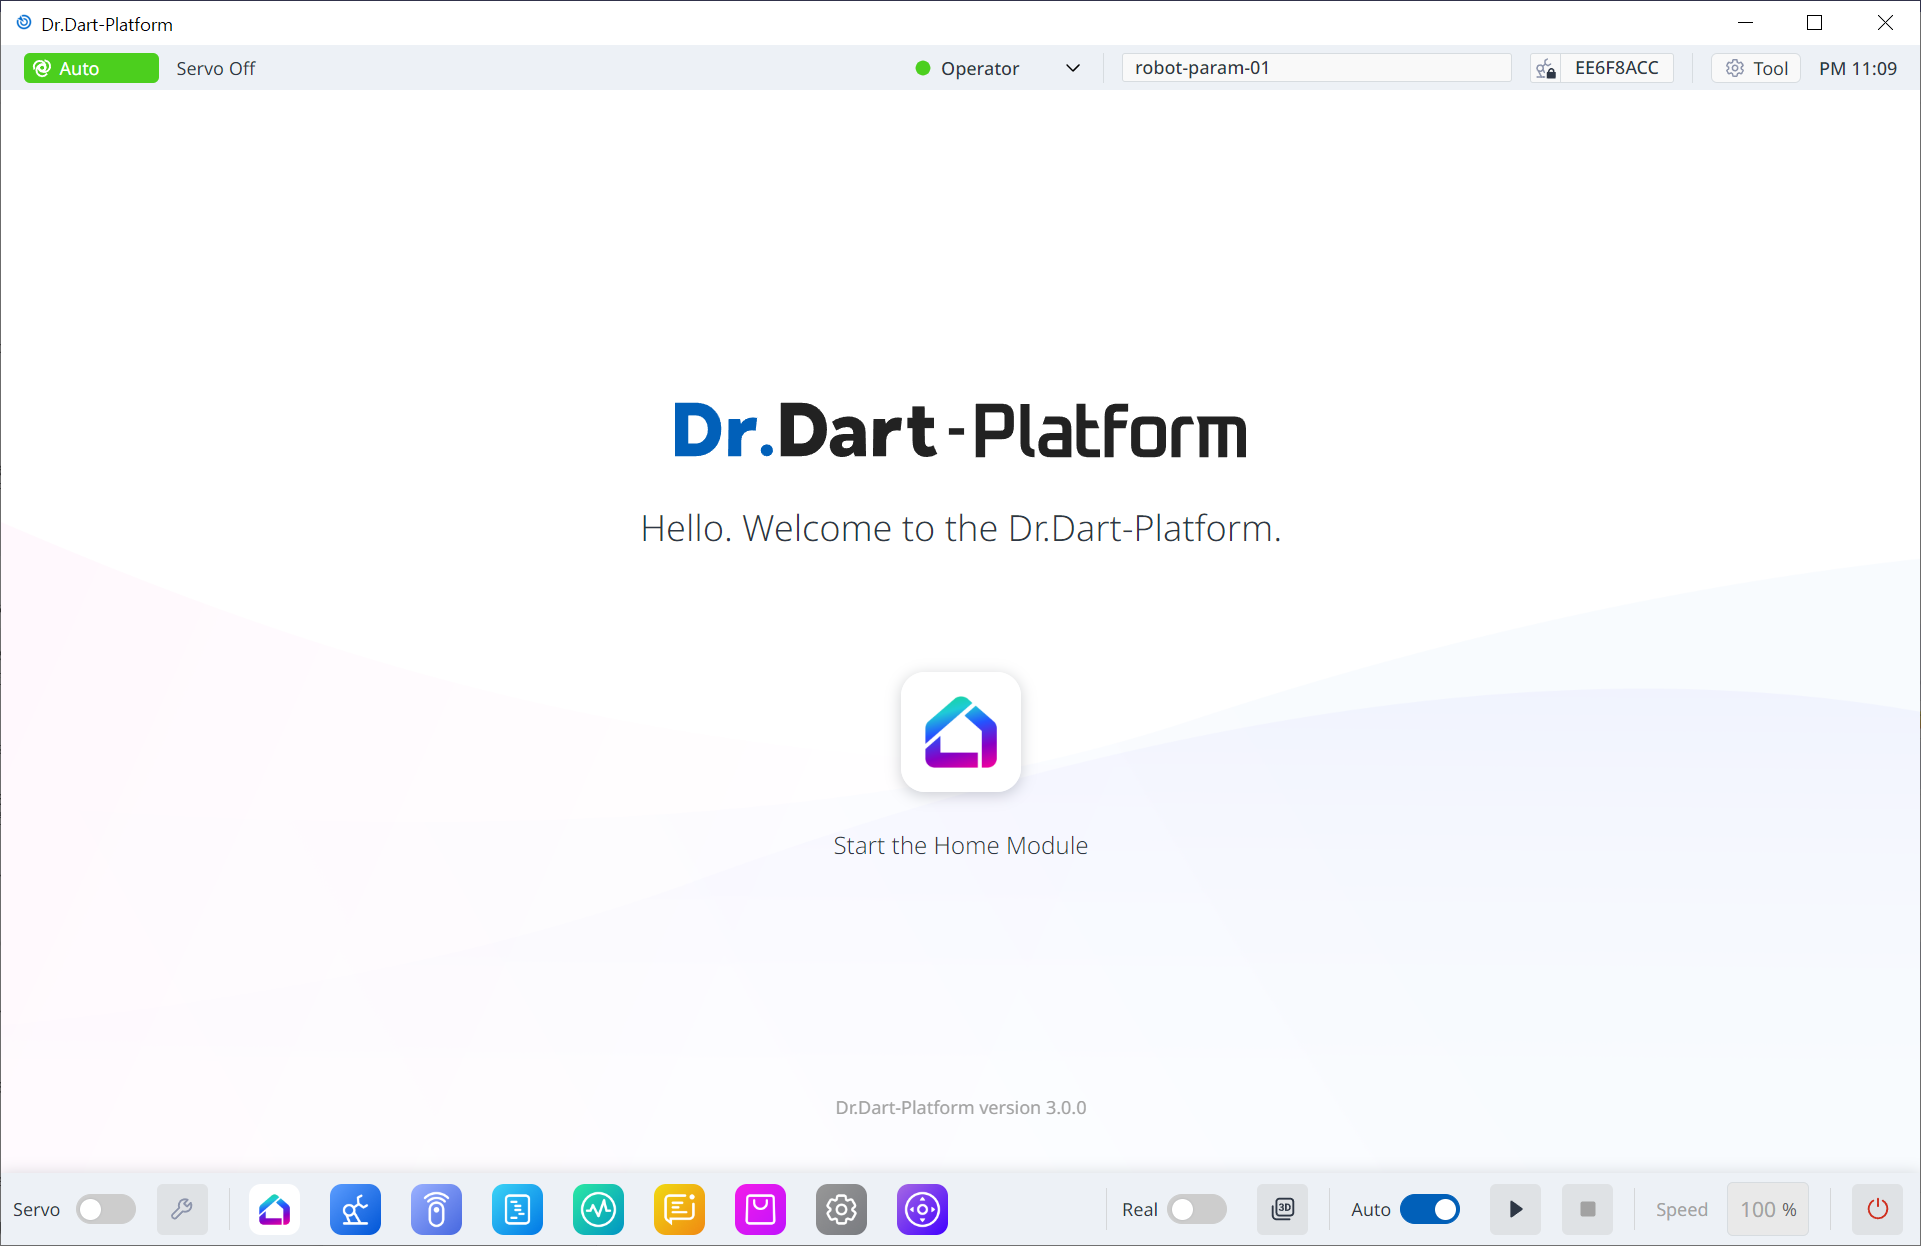
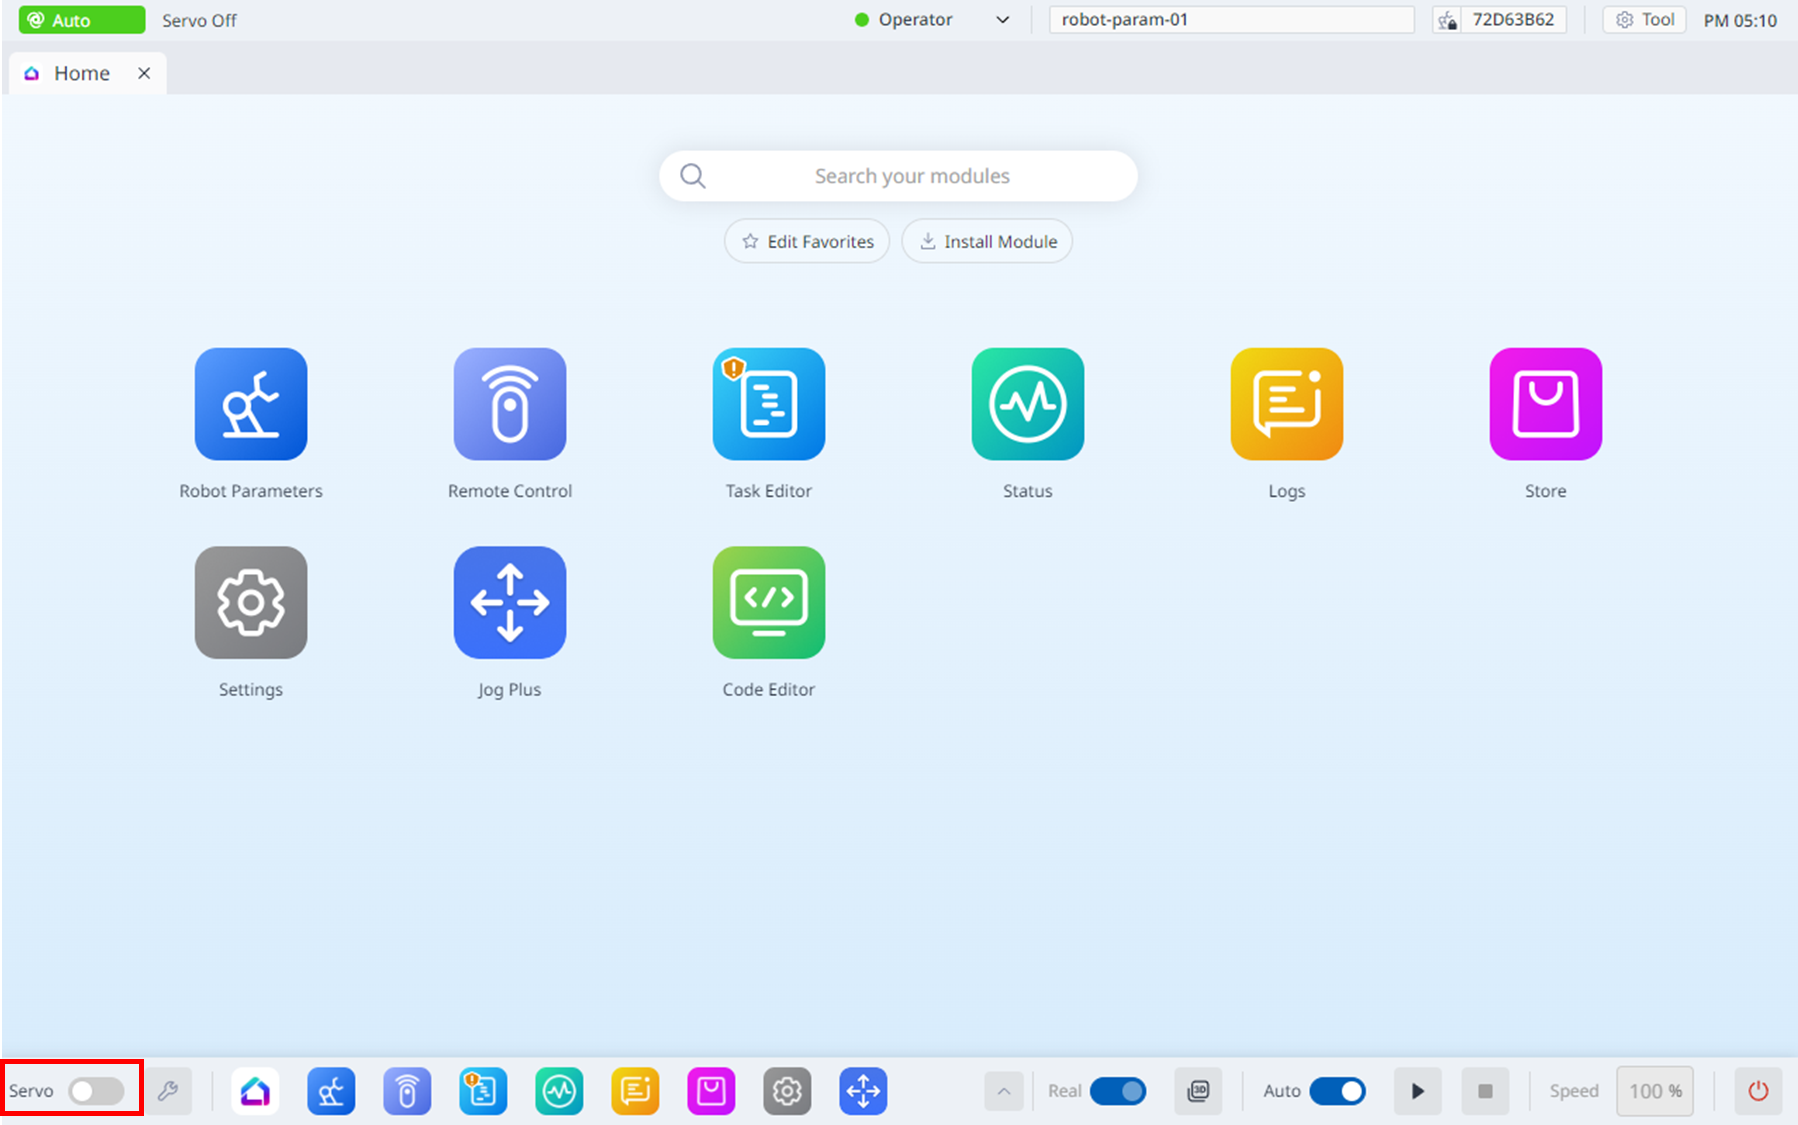
1. Home screen
When you enter Dart-Platform, the Home module will appear. Tab the Home module button so that you can run the platform.
To execute the module you want, tab either the Home screen or the main menu which is on the bottom of the Platform screen.
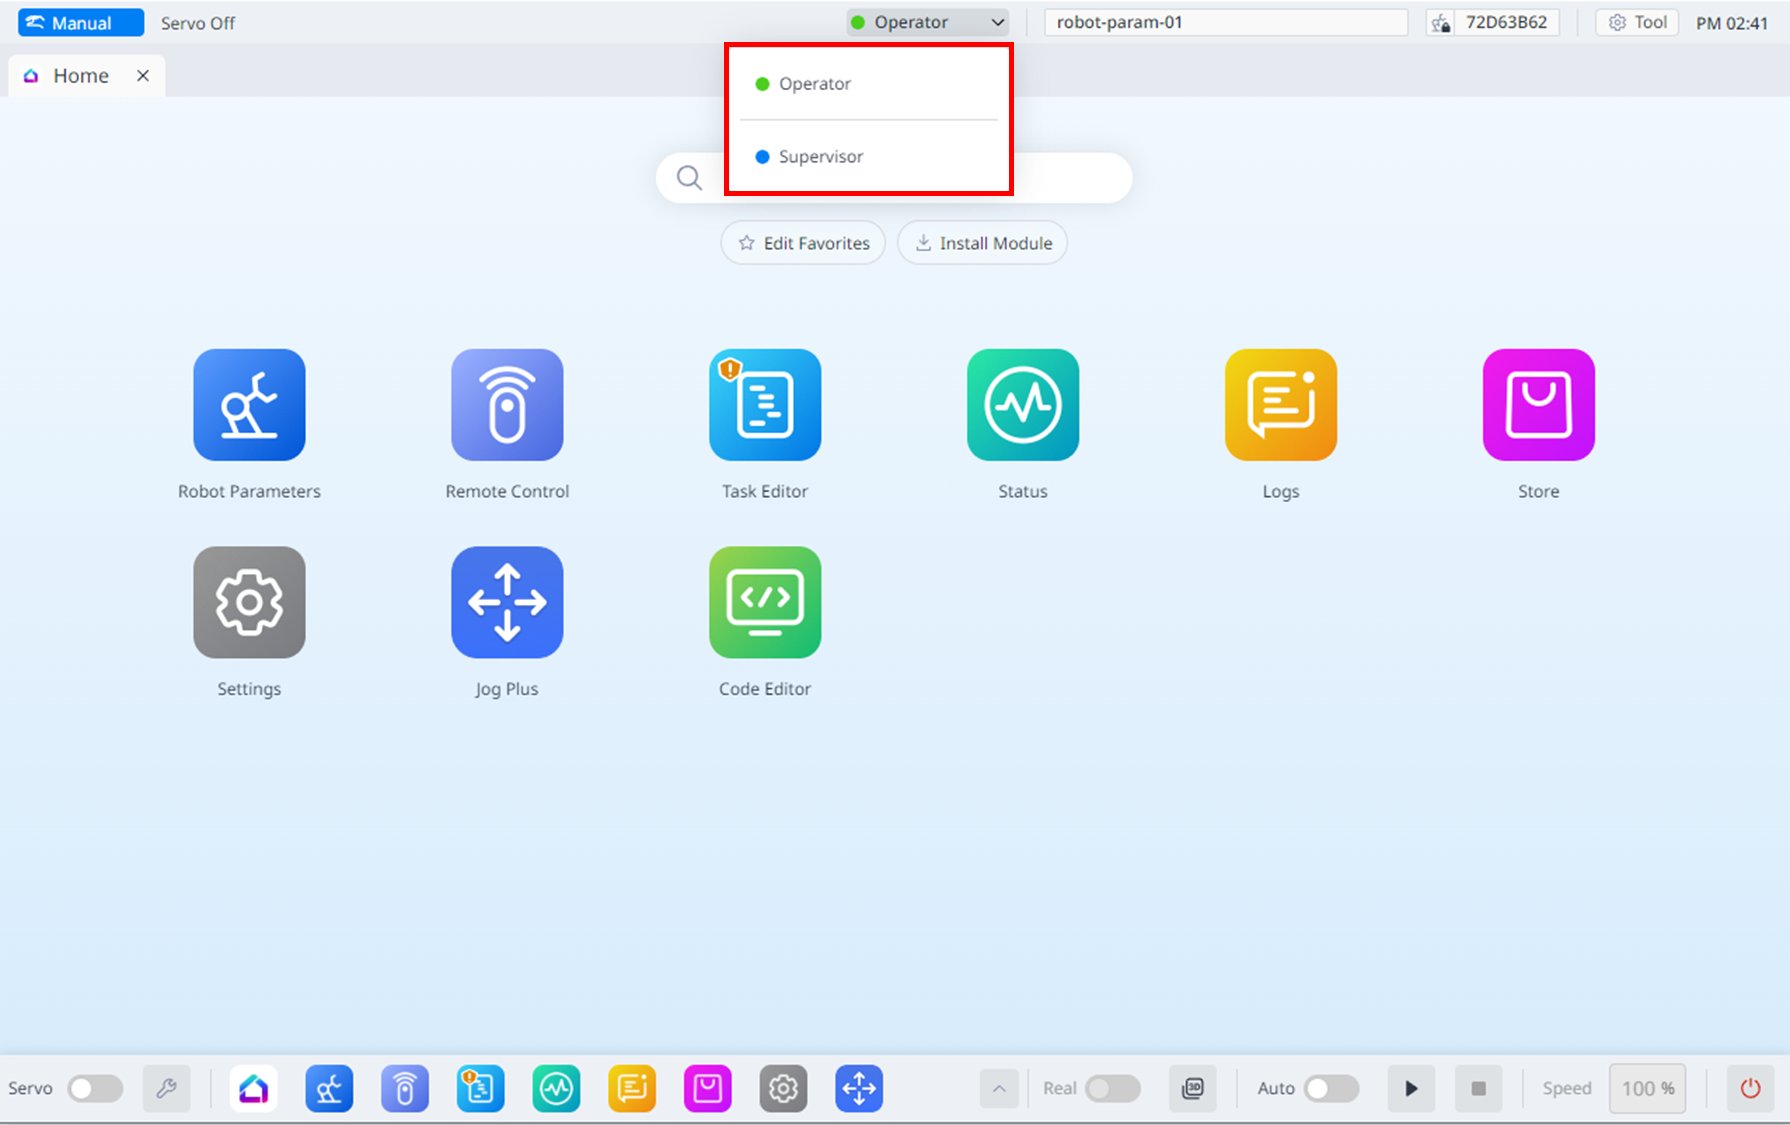
2. Simple way to change the Authority Level
To activate and use the whole functions of the platform, you might need to change the Authority Level.
If you click the red-boxed part which is on the upper right part, you will have two options: Operator and Supervisor.
Click either of them according to your own needs.
OPERATOR Level: Only limited functions such a
Servo OnandAutomatic Robot Motionexecution, are available.SUPERVISOR Level: All functions such as
Jog PlusandDart-Storeare available.
Step 1. Click the
Operator Levelon the topbar.Step 2. Select the
Supervisor Level.Step 3. Input the
Safety Passwordand ClickConfirmButton.Default Safety Password : admin
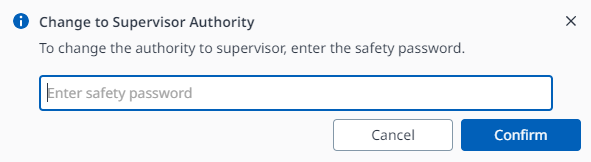
Popup requesting input of Safety Password
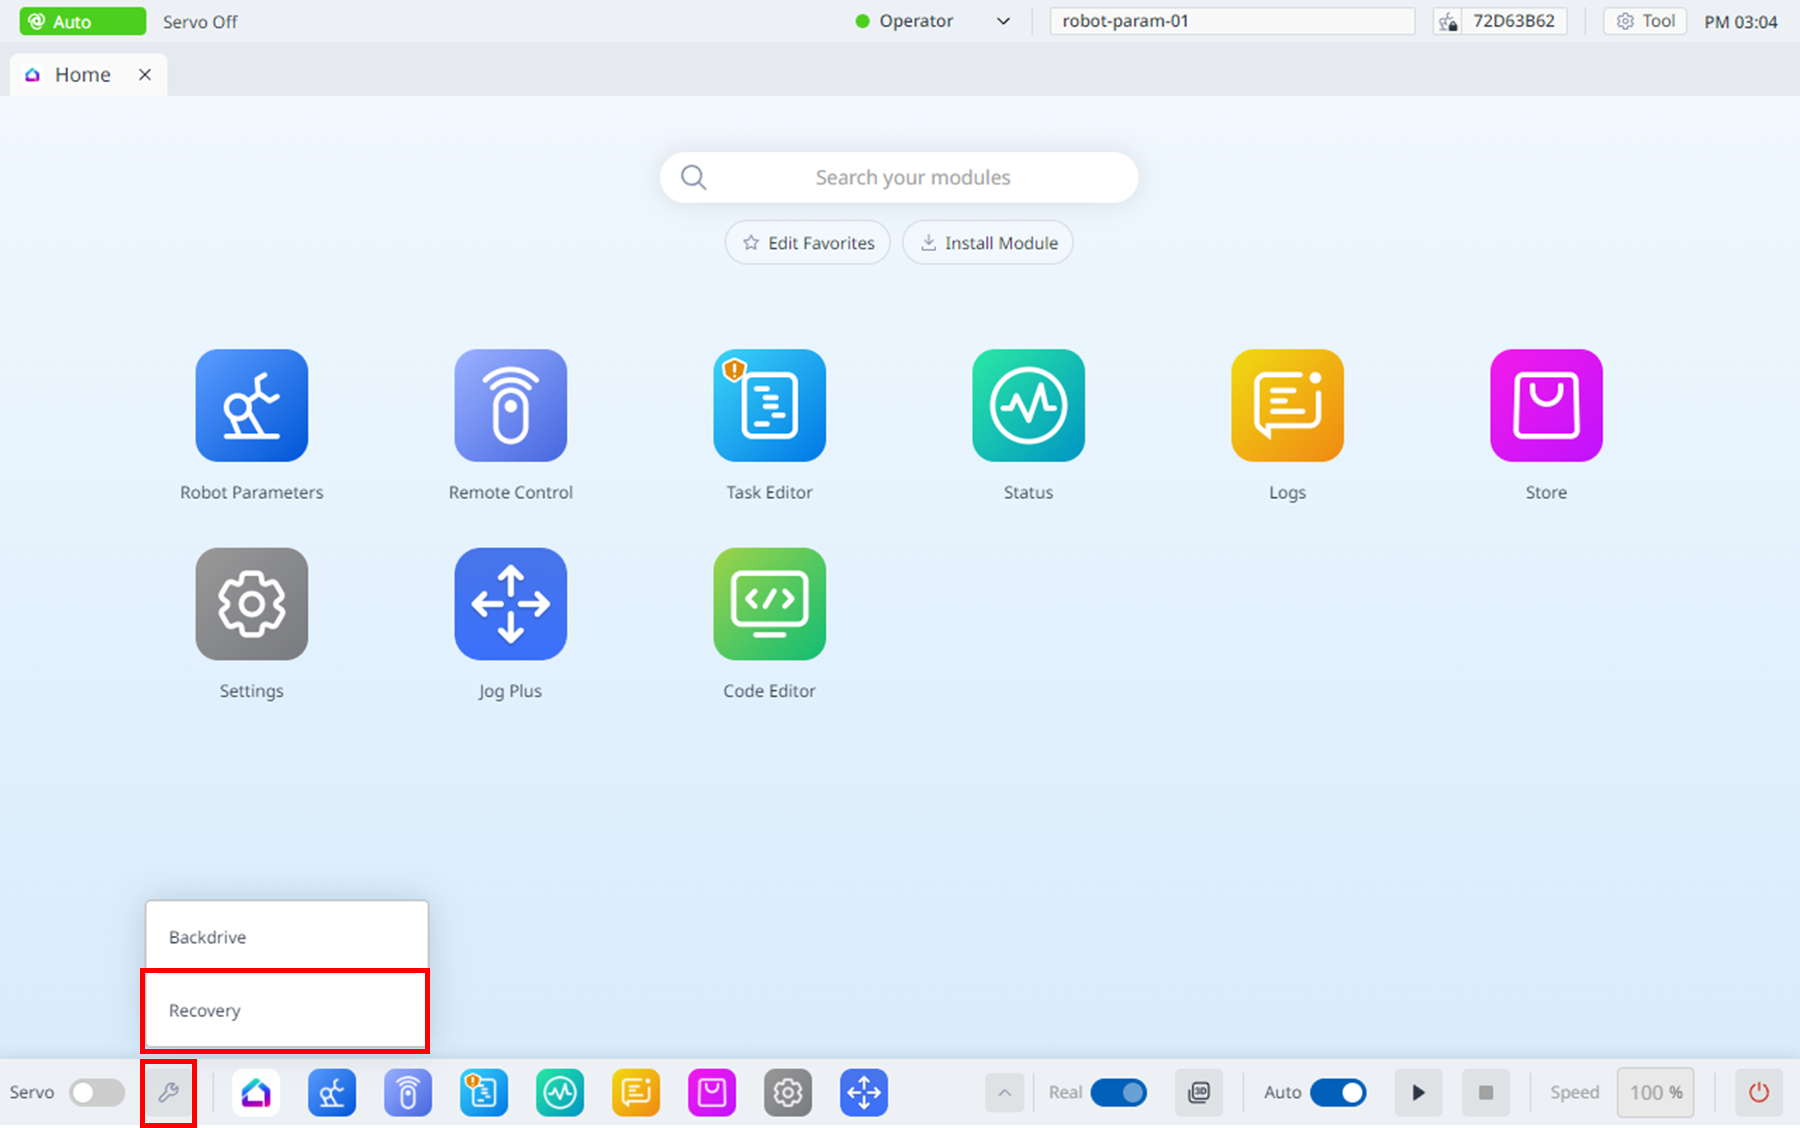
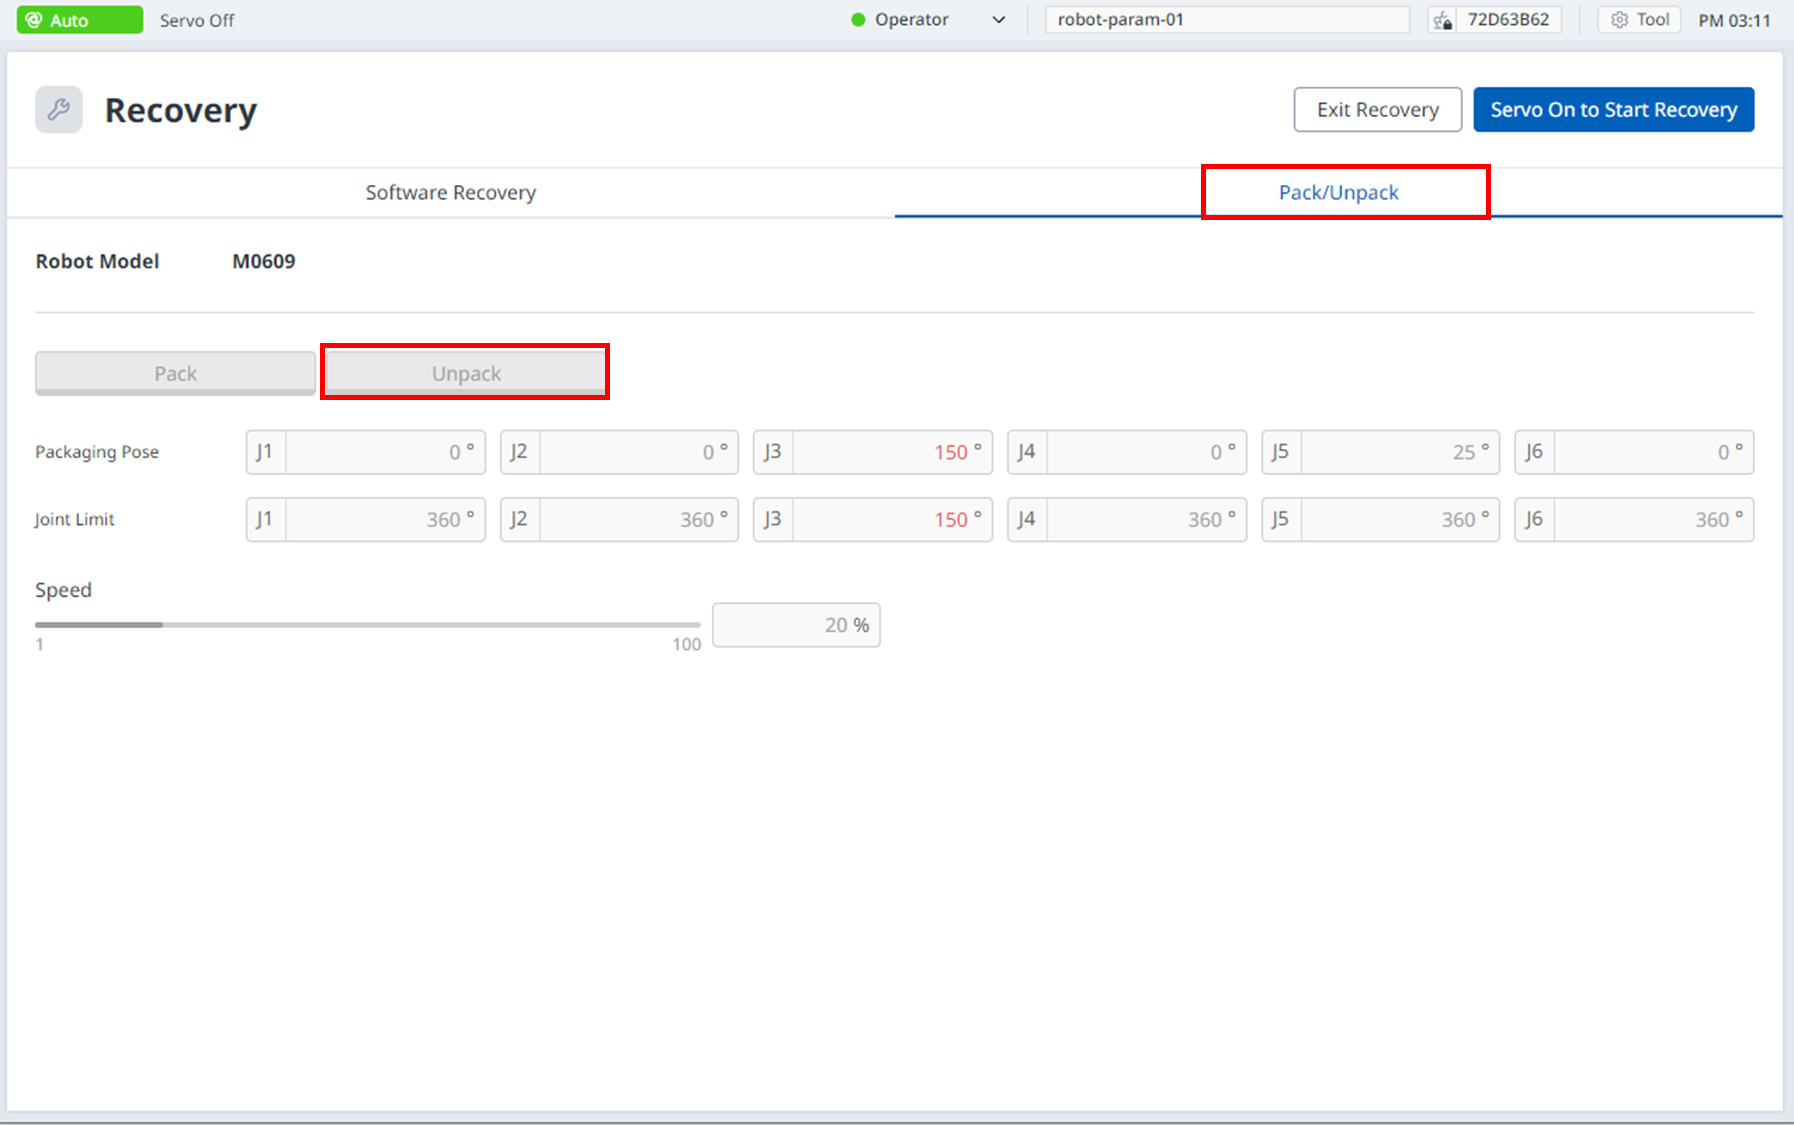
3. How to use the Unpack module in Recovery module
After you take the robot out of the box, you will need to unpack it to use. To unpack the robot connected to the platform, click the Tool-shaped module on the bottom left.
Click the Recovery button then click the Pack/Unpack menu in the new page.
You will find the Unpack button within the menu.
4. How to do Servo On/Off
To operate the robot, power must be applied to each joint of the robot. These are not the exact descriptions for the Servo On/Off, but to put simply, each can be explained with metaphor to Robot Power. To turn on and off the Servo, tab the toggle button on the left bottom of the platform screen.
Servo On : Robot Power
ON, Standby to moveServo Off : Robot Power
OFF, Brake caught
Info.
Servo On refers to the standby status where the robot arm can be operated by supplying power to joints.
Pressing the Emergency Stop button or violating critical safety limits sets the Servo Off status.
During servo off status, the power to joints is cut off, which results in the robot arm being unable to be operated, which are related to robot arm operation, are disabled in the main menu.
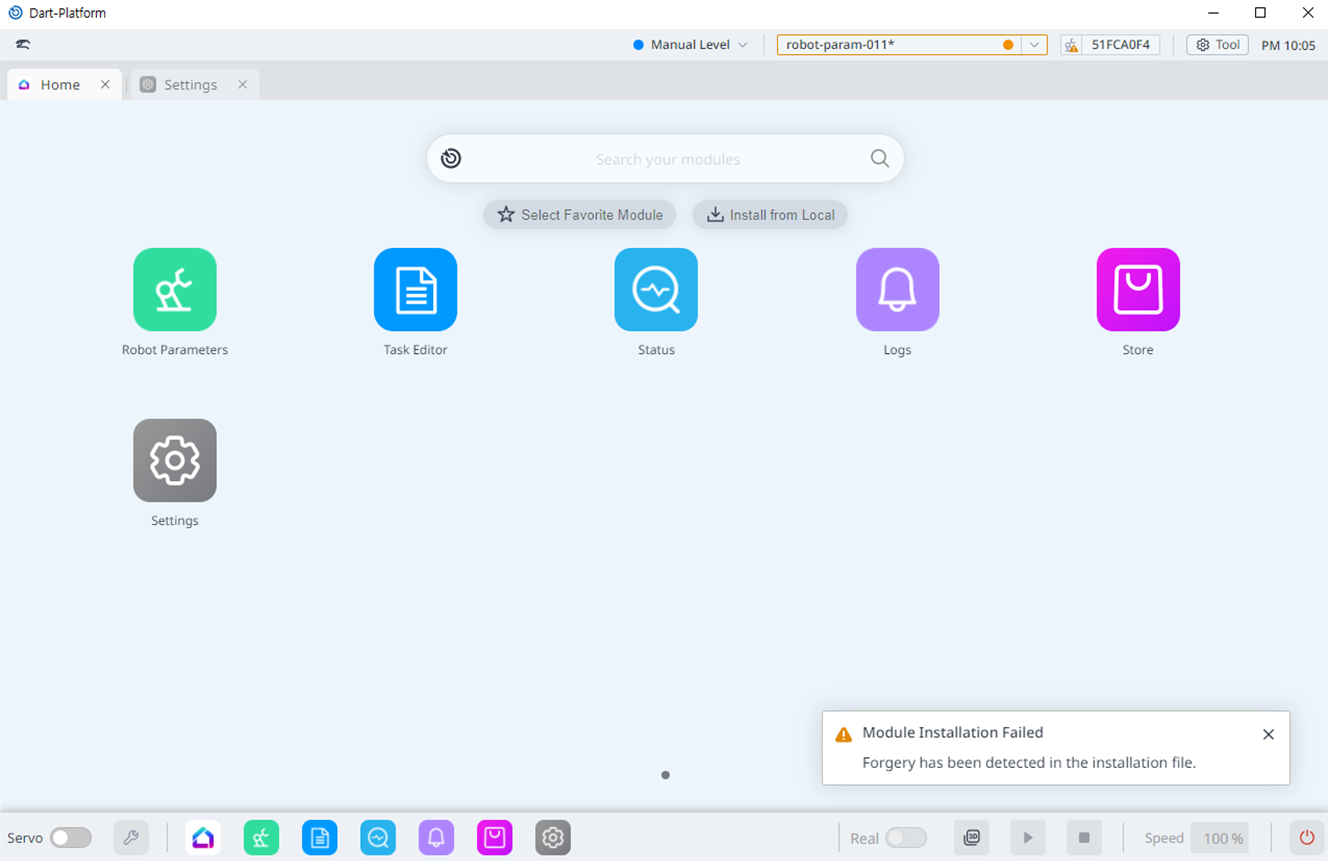
5. Guide on module installation
These functions can be used in only SUPERVISOR mode.
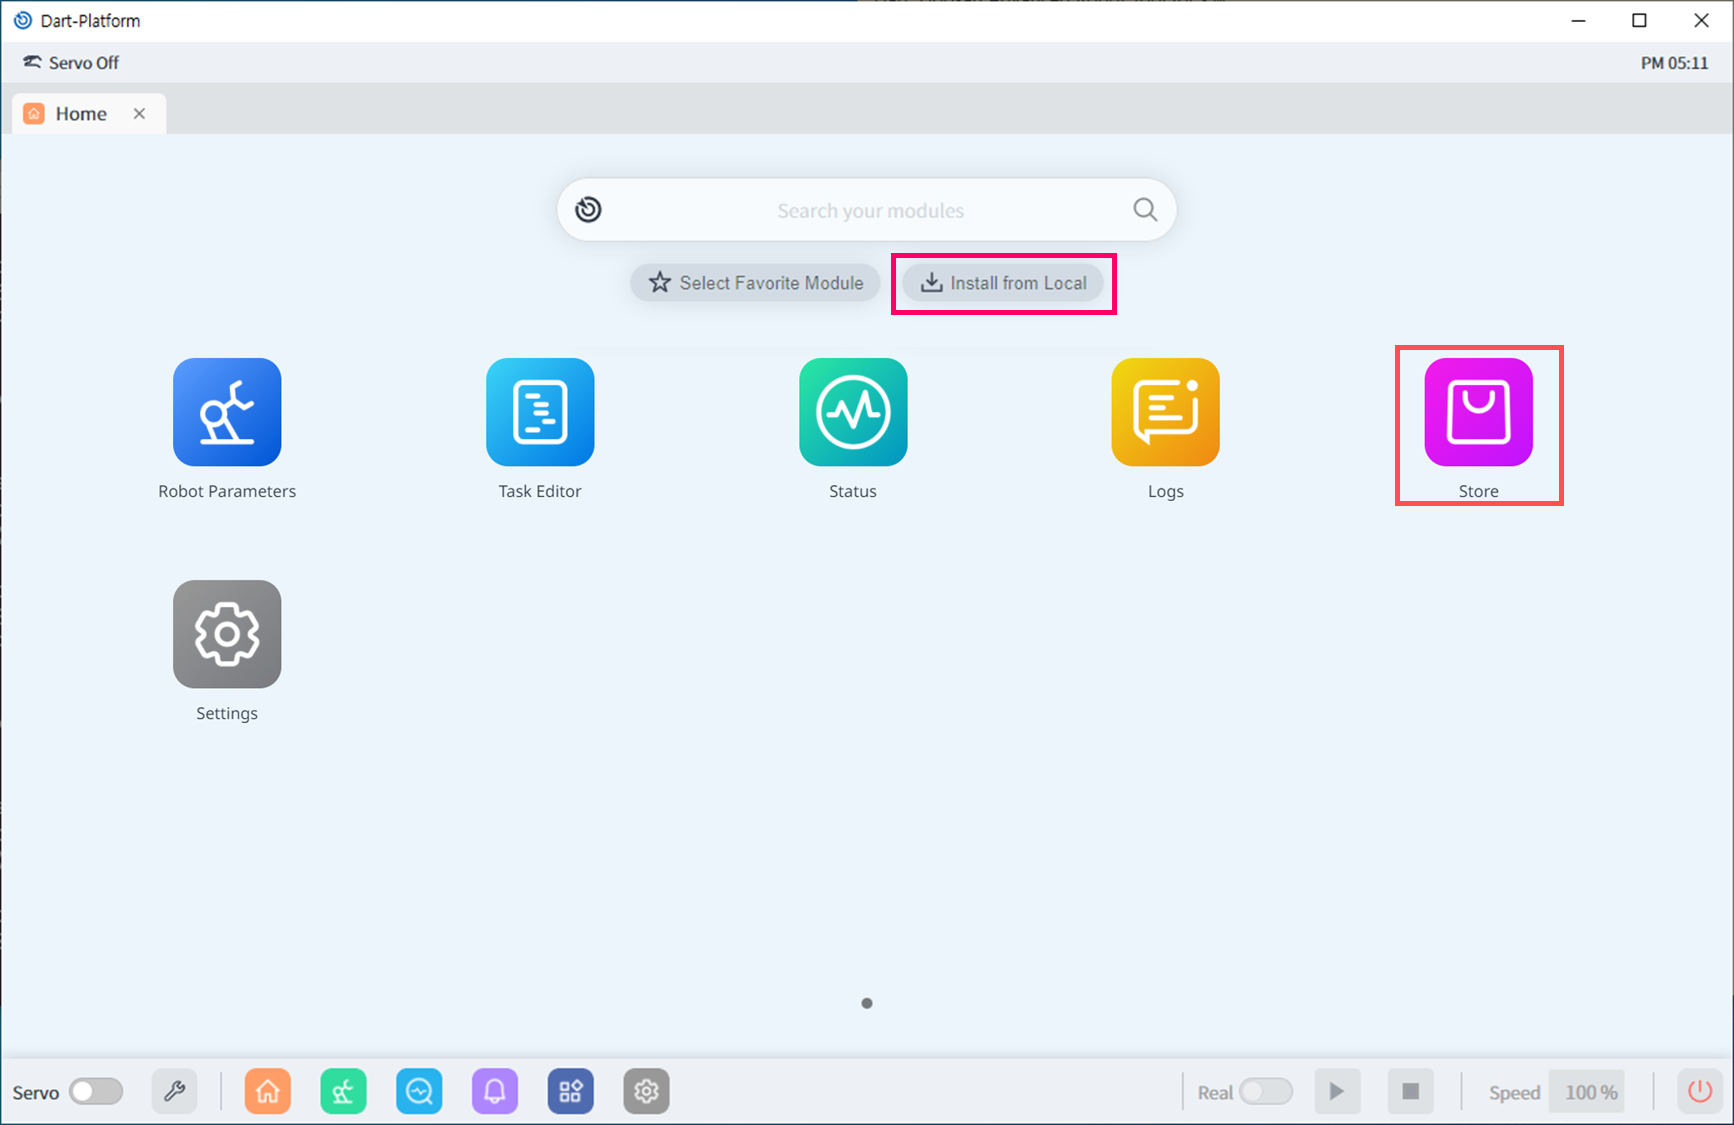
You can install the *.dm file you have created and downloaded in Dart-IDE into Dart-Platform. However, since the file is not downloaded through the Dart-Store, the “Unauthorized” icon is displayed as shown below.

In Dart-IDE, you are able to install the module right after running or building. Download the file and install it by clicking the Install Module button in the home screen. Also in Dart-Store, by simply clicking the download button will let you automatically install the module you want.
Info.
Not following one of these two steps, the module will not be installed in the Platform.
In case of downloading and installing a module from Dart-Store
Step 1. Access https://store.drdart.io/, sign up for membership, and log in.
Step 2. Click the
Home▸Install from Local buttonto install the module.
In case of creating and using it by yourself
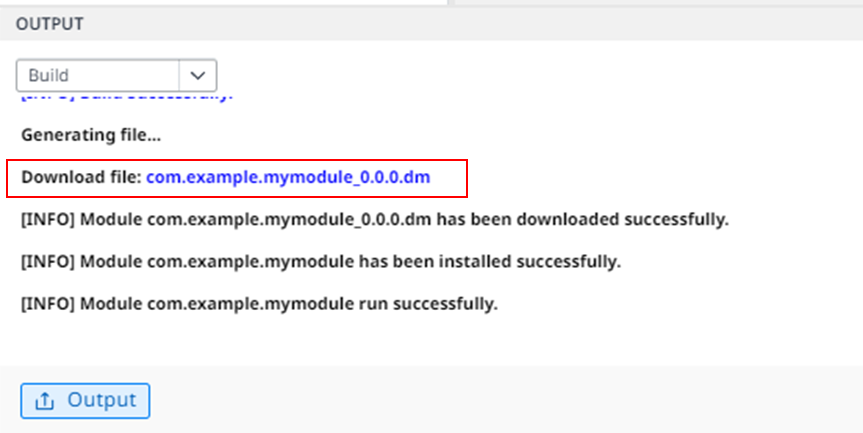
When running a module in Dart-Platform by pressing thePlaybutton in Dart-IDE.Step 1. Access https://ide.drdart.io/, create a module.
Step 2-1. Click the
Buildbutton on the topbar in Dart-IDE. Then clickDownload fileto download the file and install it in Dart-Platform.Step 2-2. Click the
Playbutton on the topbar in Dart-IDE. Then the Dart-Platform screen appears after the module is installed automatically. This process includes the certificate into the module.
Download my module from Dart-IDE
Authentication failure screen
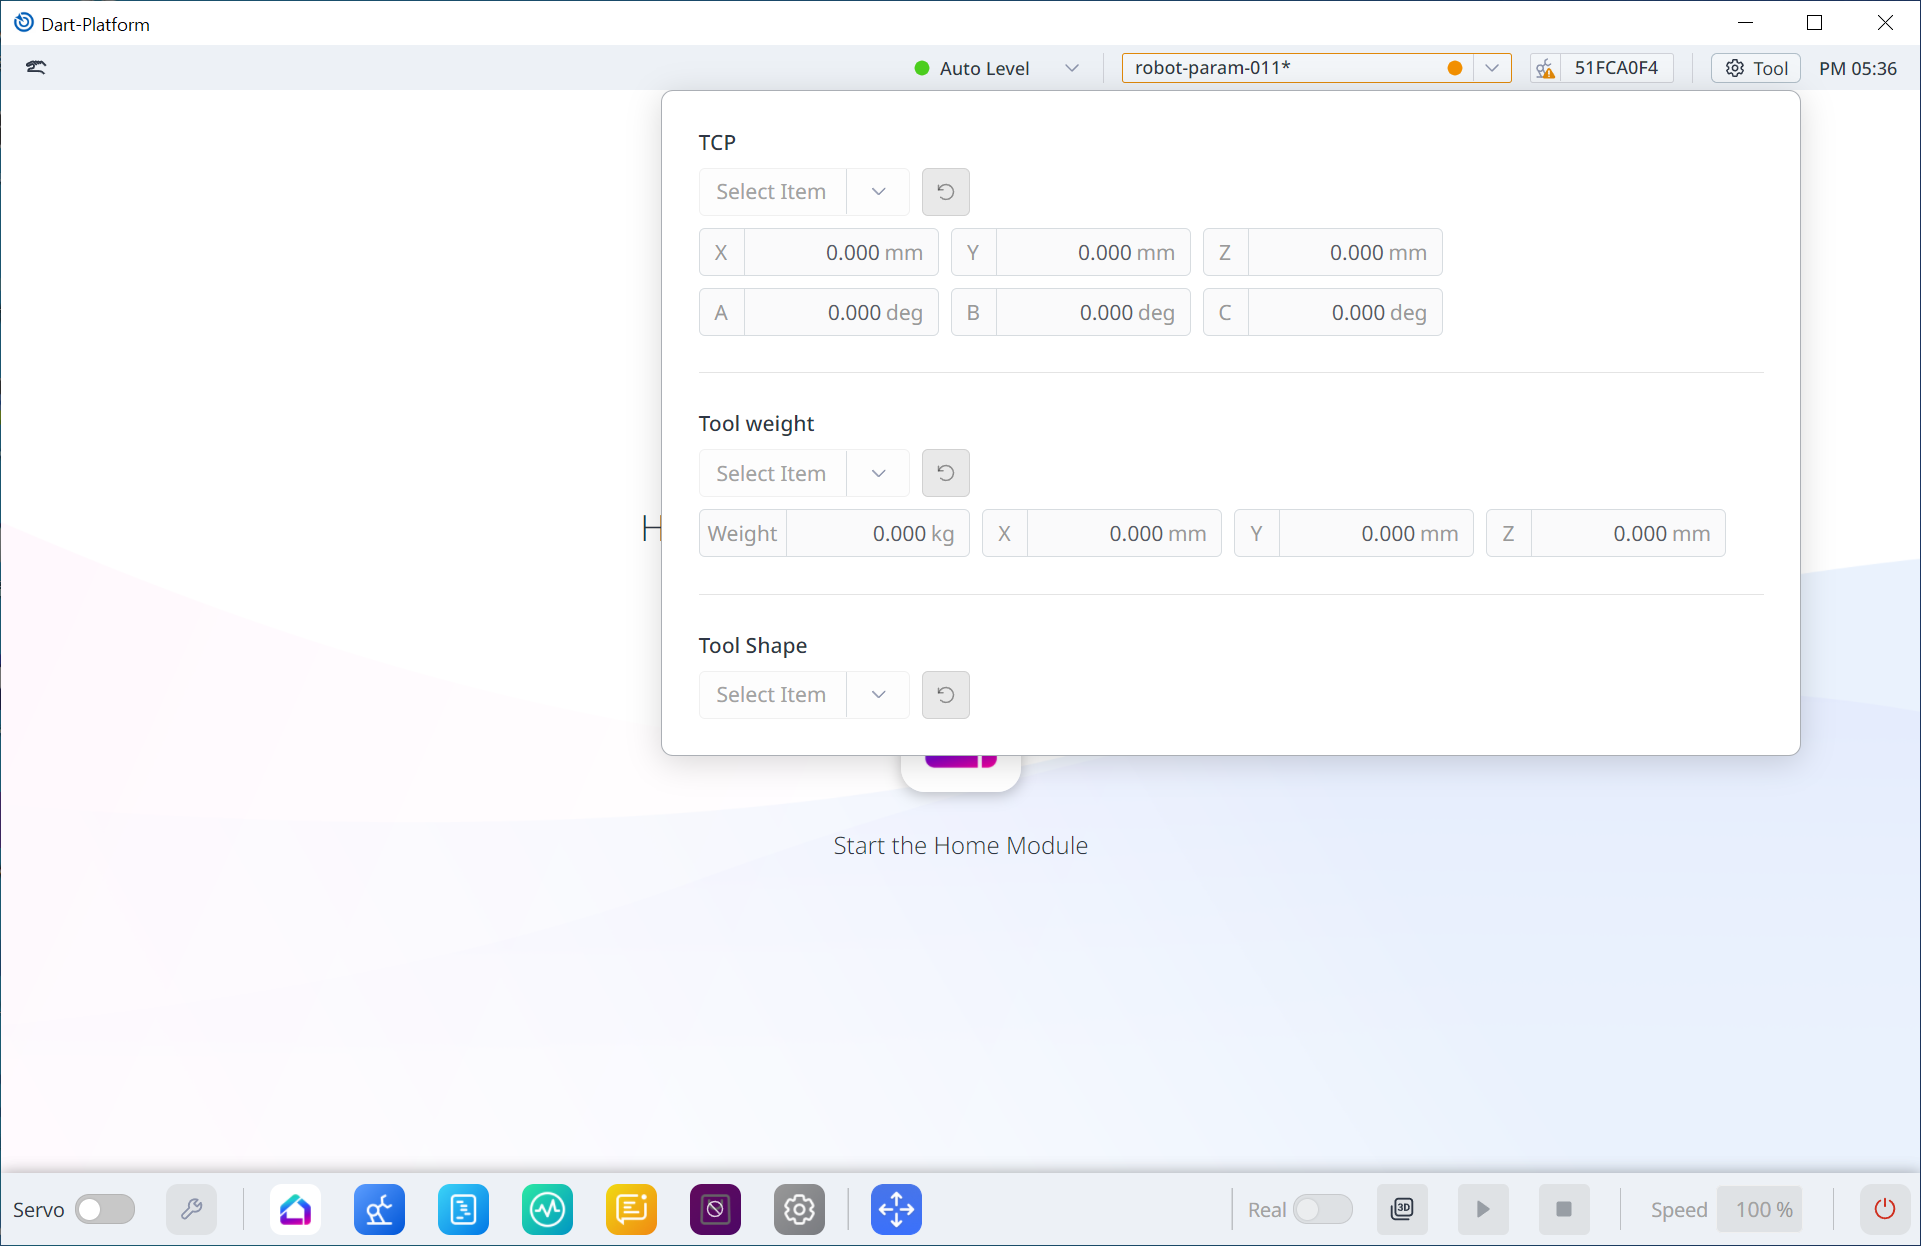
6. Short introduction on Robot Parameter module
This module is for Robot, Tool and Safety related settings. Some of the settings might need your safety password to enter your value. An example of safety parameter setting can be found in Tool Settings below.
To edit some of the settings you need SUPERVISOR level and your safety password.
7. Tool setting

In the Tool Setting part which is on the upper right part of the screen, you may select and revise the values of item for three sections: TCP, Tool Weight, and Tool Shape. You can register the items in the Robot Parameters module.
Note.
If a tool such as gripper is equipped on the Flange, which is the end of the robot, and when the tool setting is unset or wrongly set in Dart-Platform, the safety issue as following might occur. Please be sure to do the Tool Setting.
In case TCP(Tool Center Point) has wrong setting value,
The Pose value of robot represents the position of flange which is at the end of the robot not the end of the gripper.
if you run the previously written task program, crash might occur.
In case Tool Weight has wrong setting value,
Robot will consider that external force is applied as much as the weight of the tool and stop.
Robot might move to one direction during the direct teaching.
Robot might stop due to the safety violation during the task motion.
In case the Tool Shape has wrong setting value,
Robot might collide with external object.
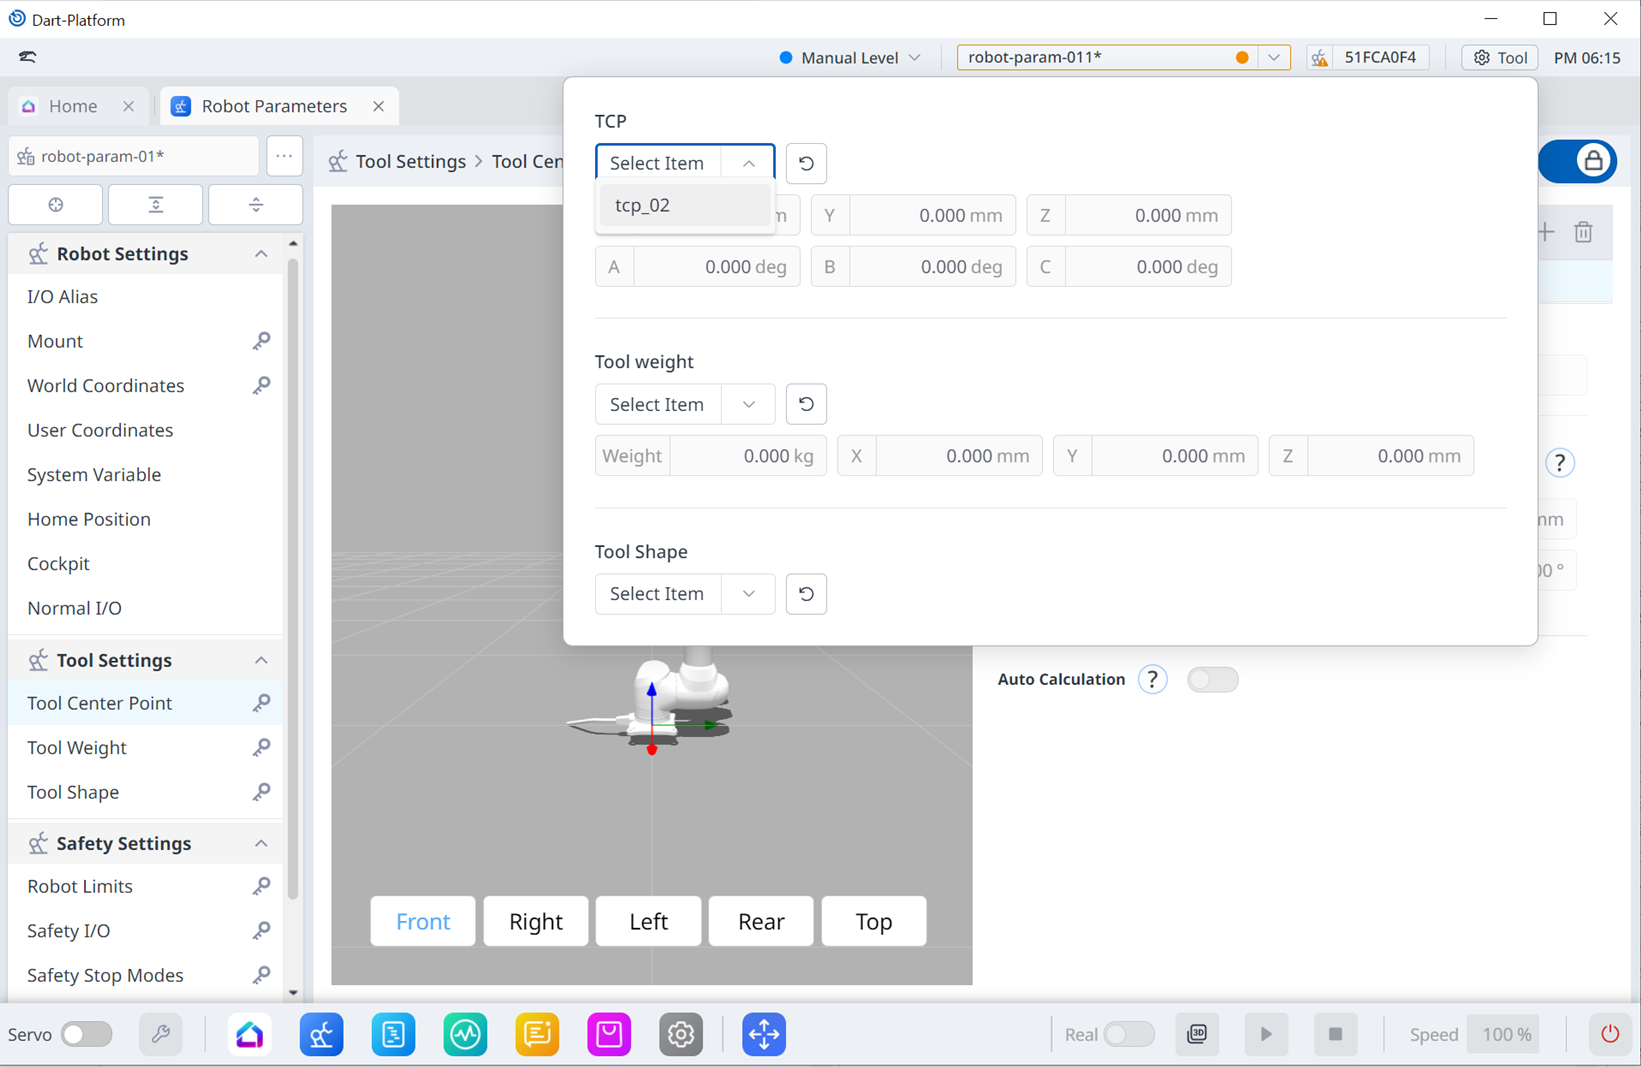
You can add, or change the set tool information also within the parameter.
Info.
Before editing the values, change the Adminsitrator level as SUPERVISOR .
Step 1. Open the
Robot ParametersModule.Step 2. Select
Tool Center Pointin the Tool Settings menu.Step 3. Tab the toggle button saying, “Click to edit the parameter setting” on the right side of the screen.
Default Safety Password : admin
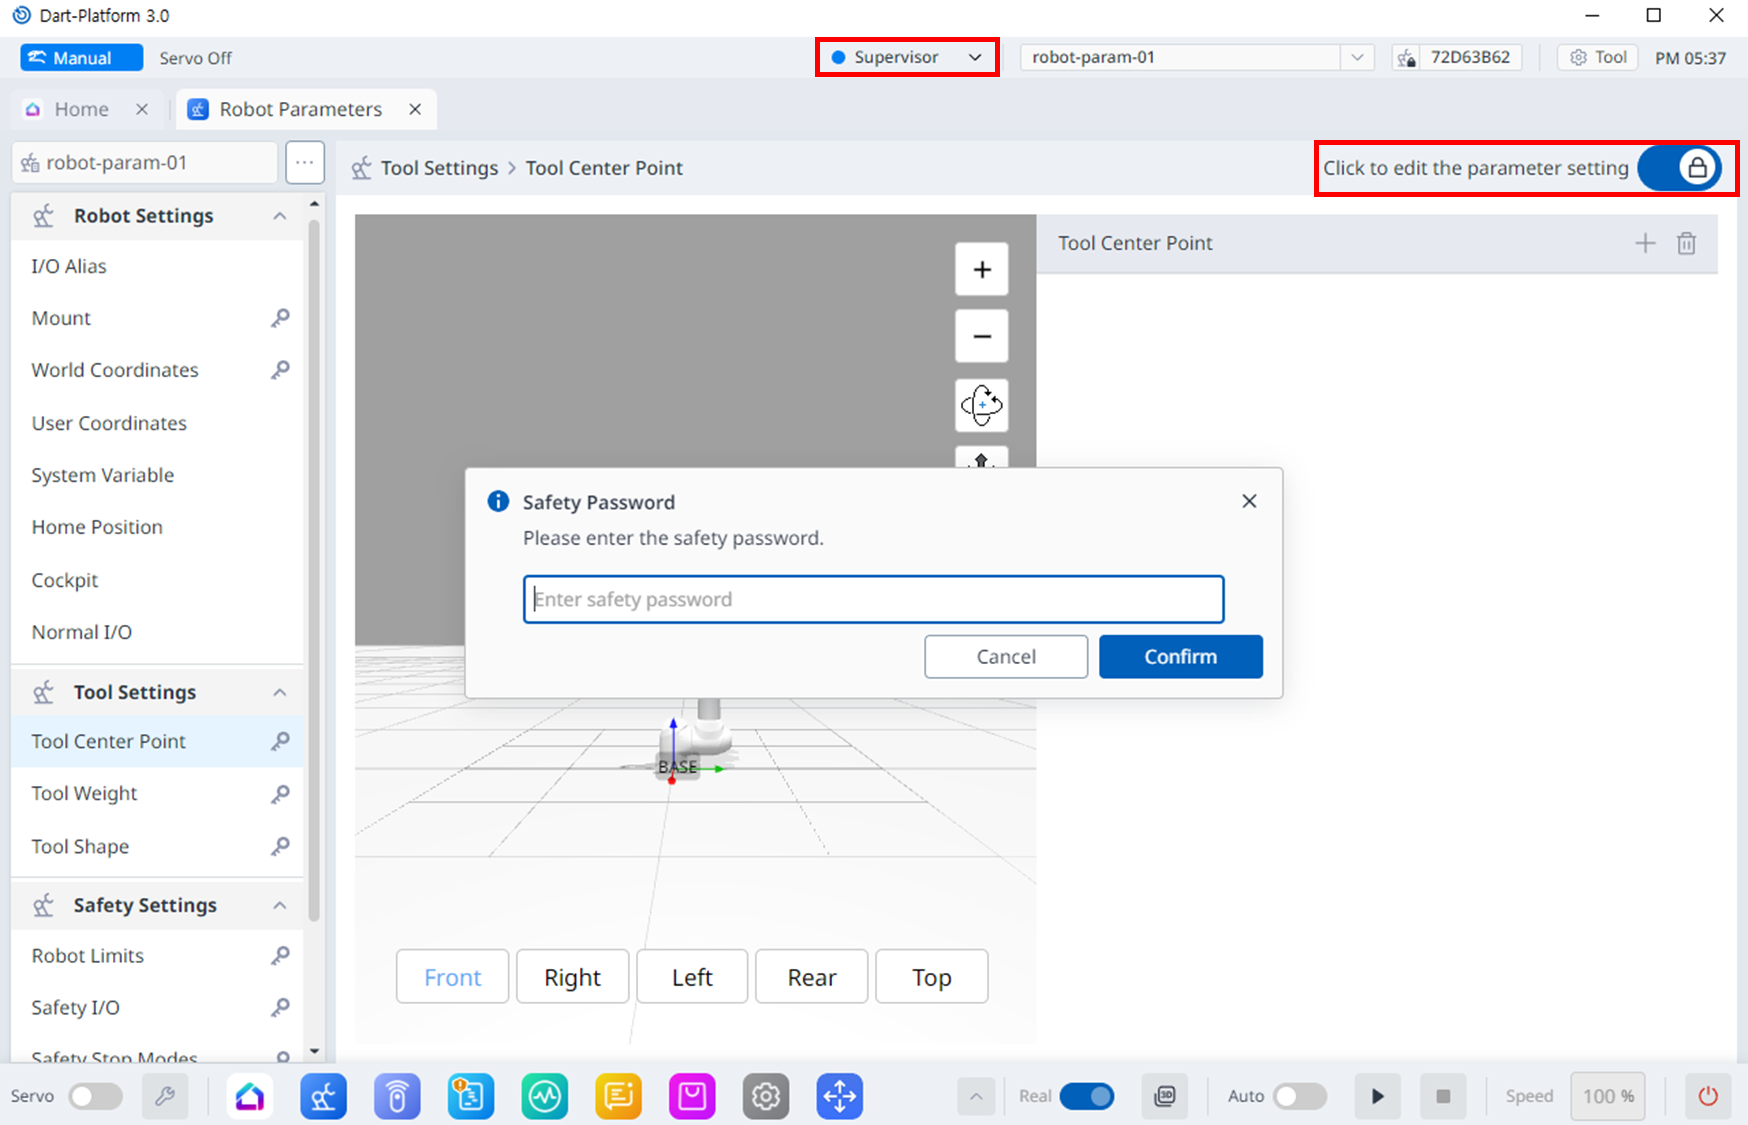
Step 4. Click the
+button to add TCP(Tool Center Point).Step 5. Edit the Name and Points.
Info.
Edited content does not need to be saved separately.
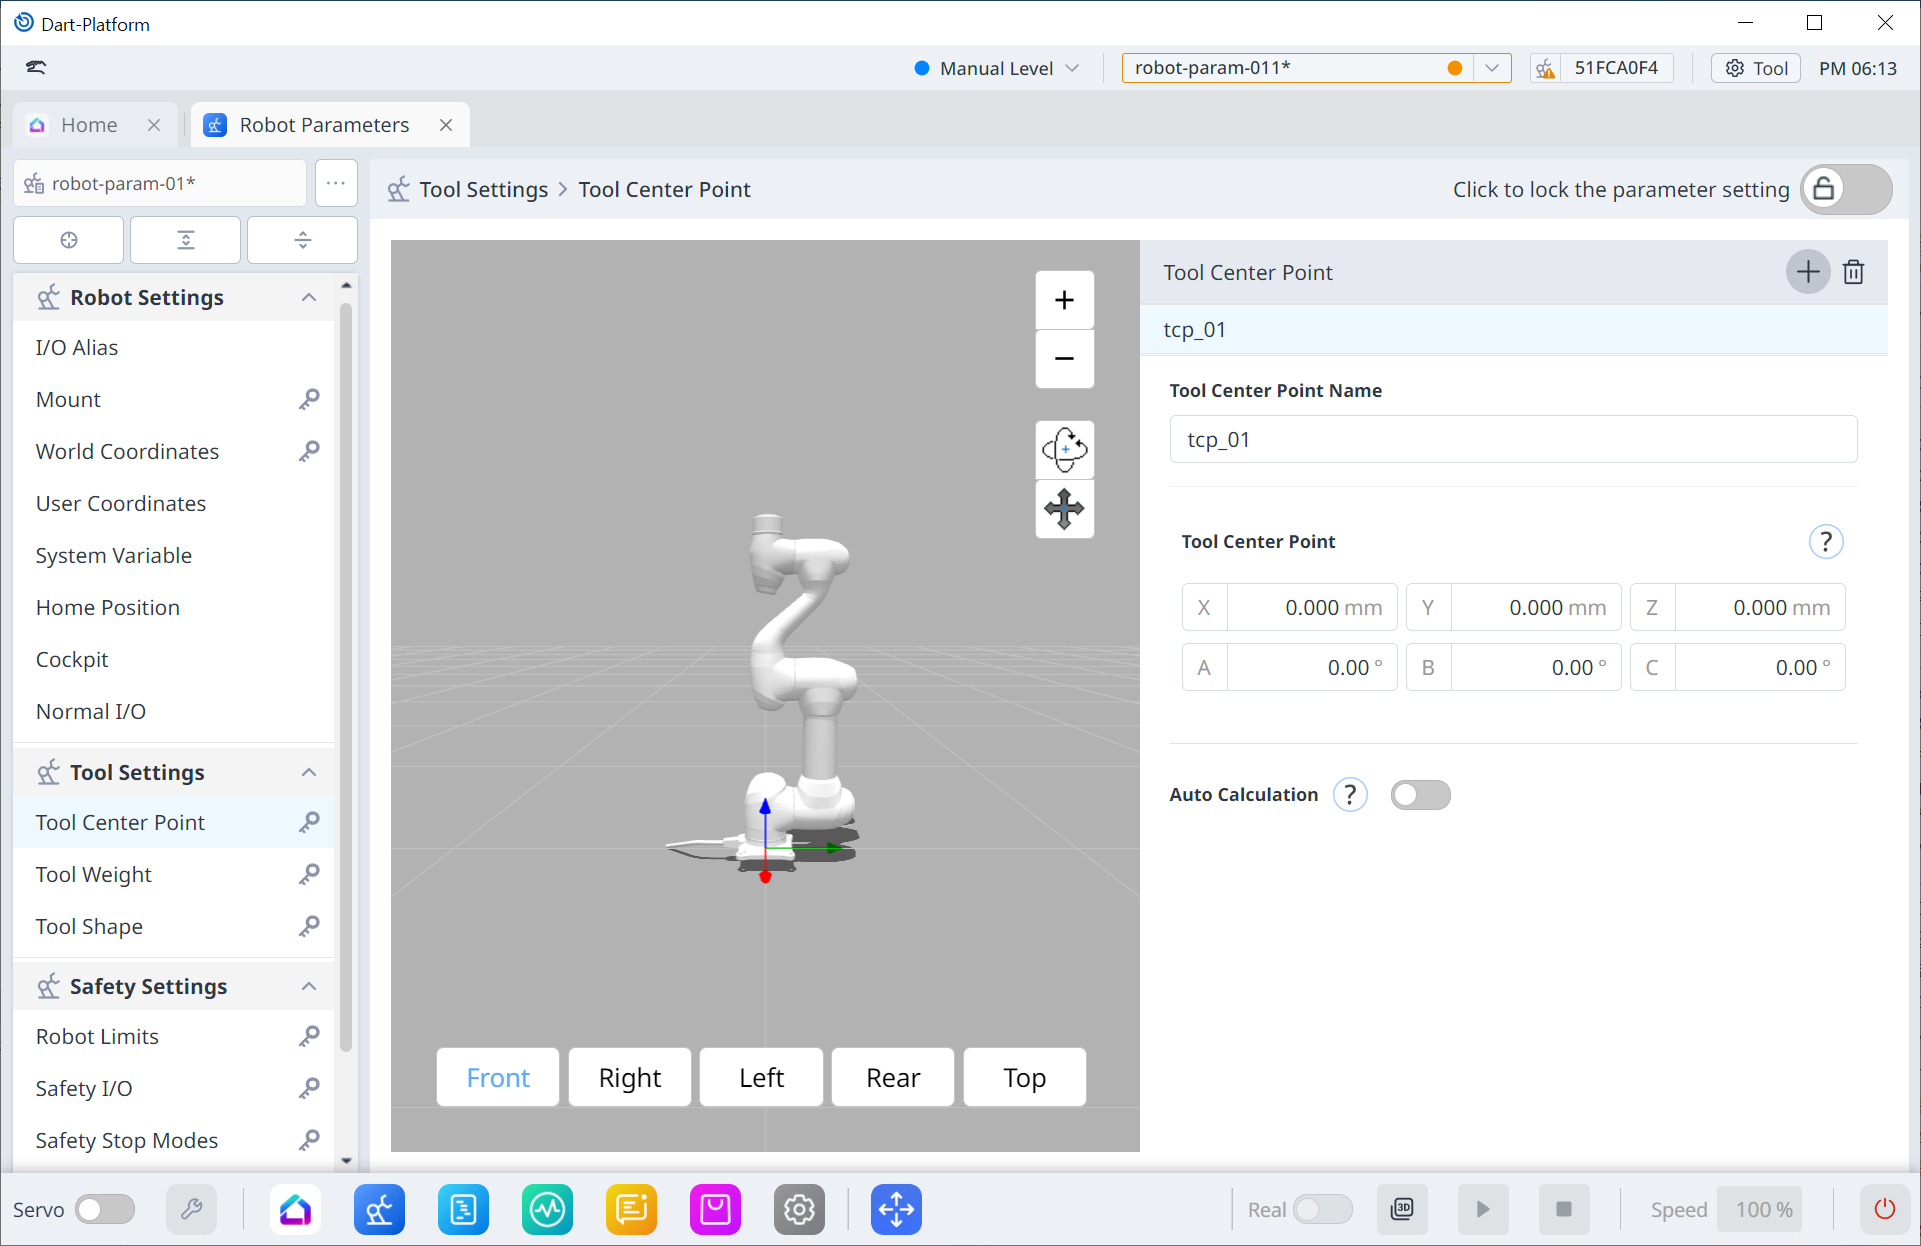
Step 6. Now you can select the TCP item in the Tool Settings screen.
8. Real Button
This function can be used in both OPERATOR and SUPERVISOR mode.

The toggle button is for choosing whether connecting to the real robot or not. The button is activated regardless of the Servo On/Off.
Real Activated: Switches the mode to a state where the actual robot connected to the controller can be controlled.Real inActivated: Switches the mode to a state where you can control a virtual robot for testing.
9. 3D Simulator
This function can be used in both OPERATOR and SUPERVISOR mode.

The module is on the bottom right of the platform screen. With this module you are able to check the 3d robot viewer in pop-up screen, Jog and even Dashboard is displayed.
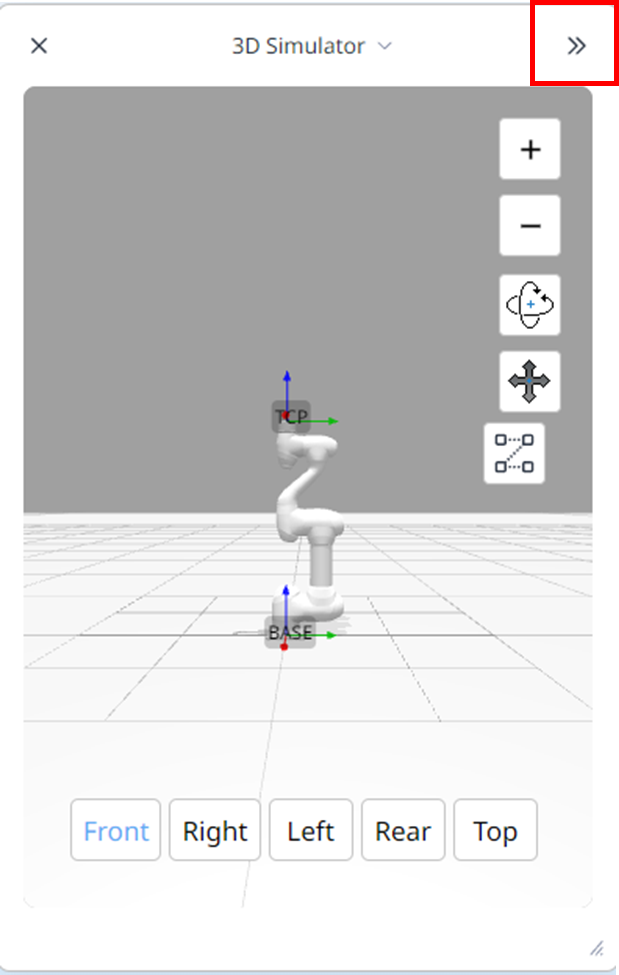
To see the whole popup page, click the double arrow which is in red box above.

10. Auto Mode Button
This function can be used only in SUPERVISOR mode.

Auto Mode button is for selecting whether to play the whole task manually or automatically.
Auto activated: This mode allows the robot to move automatically according to the task registered. This mode is mainly used to operate the robot as a task in Task Editor Module.
Manual (Auto deactivated): This mode allows you to manually move the robot. This mode is mainly used to change safety parameters or to operate the robot with Jog Plus Module.
The mode can be adjusted in Supervisor mode which can be switched via Safety Password. If you want to run the task in Jog Plus module, the Mode should be switched to manual mode and if you want to run the task in Task Editor module, the Mode should be switched to auto mode.
11. Speed Button
This function can be used in both OPERATOR and SUPERVISOR mode.

While playing the task you have entered in, you are able to adjust the speed as you want. The default value will be 100% and you can change it by setting with slider or entering the value. You may change the speed on real time.
The button is on the bottom right of the platform menu.
12. Guide on Backdrive & Software Recovery mode
These modes can be used in both OPERATOR and SUPERVISOR mode.
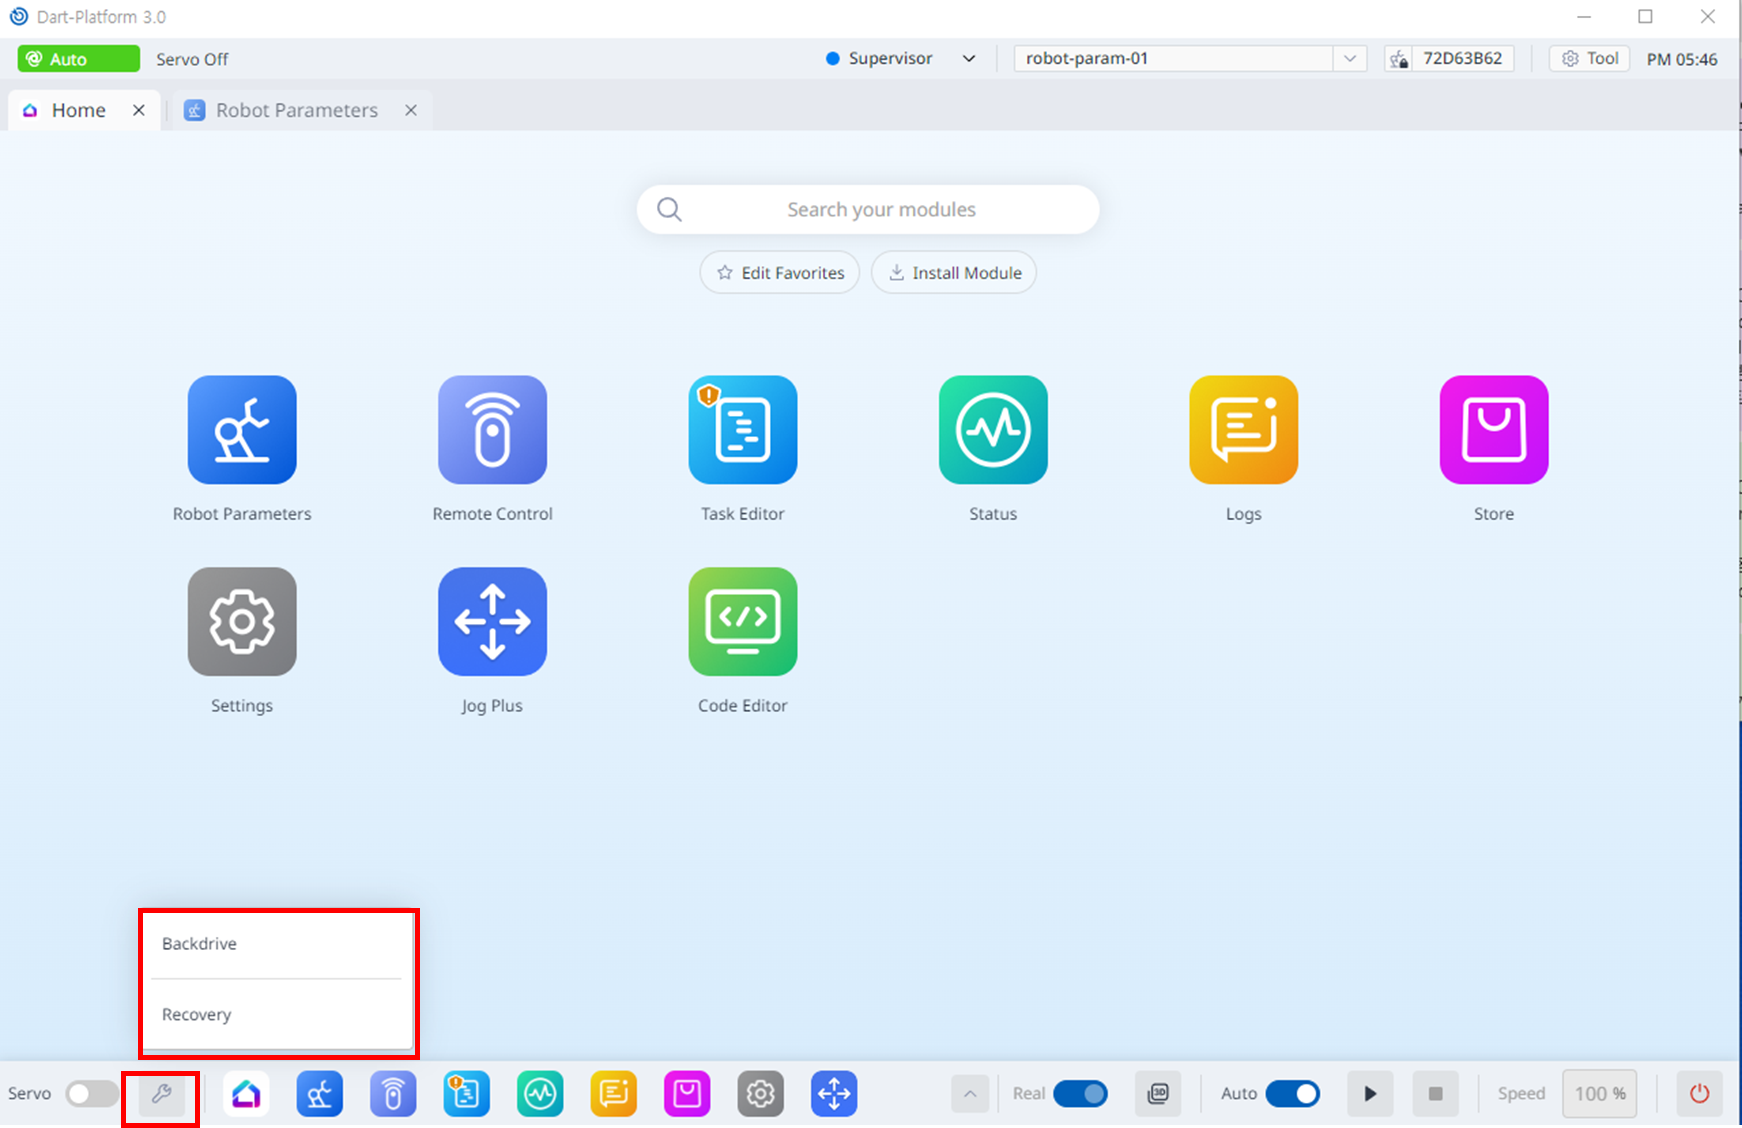
Backdrive and Recovery modules are modules for the safety of the robot.
Backdrive allows the robot joint control with only the brake and without power driving the motor. This function is used when the robot cannot return to normal with Safety Recovery mode or Hand-guiding. With Backdrive mode, the user can engage or disengage the brake of each joint.
Software Recovery mode is a mode that recovers the robot right before the Jog/Task motion for safety. It is used to reset the robot to normal. In Servo Off status, if a safety violation error situation caused by position-related safety violations, such as the robot exiting the operation area or violating prohibited areas, occurs or force is continuously applied when the robot is stopped due to colliding with a fixed object, Servo On or Jog cannot be set even when attempting to reset the robot to a normal state using the Jog or program.
13. Short introduction on Jog Plus module (Manual)
This function can be used only in SUPERVISOR mode.

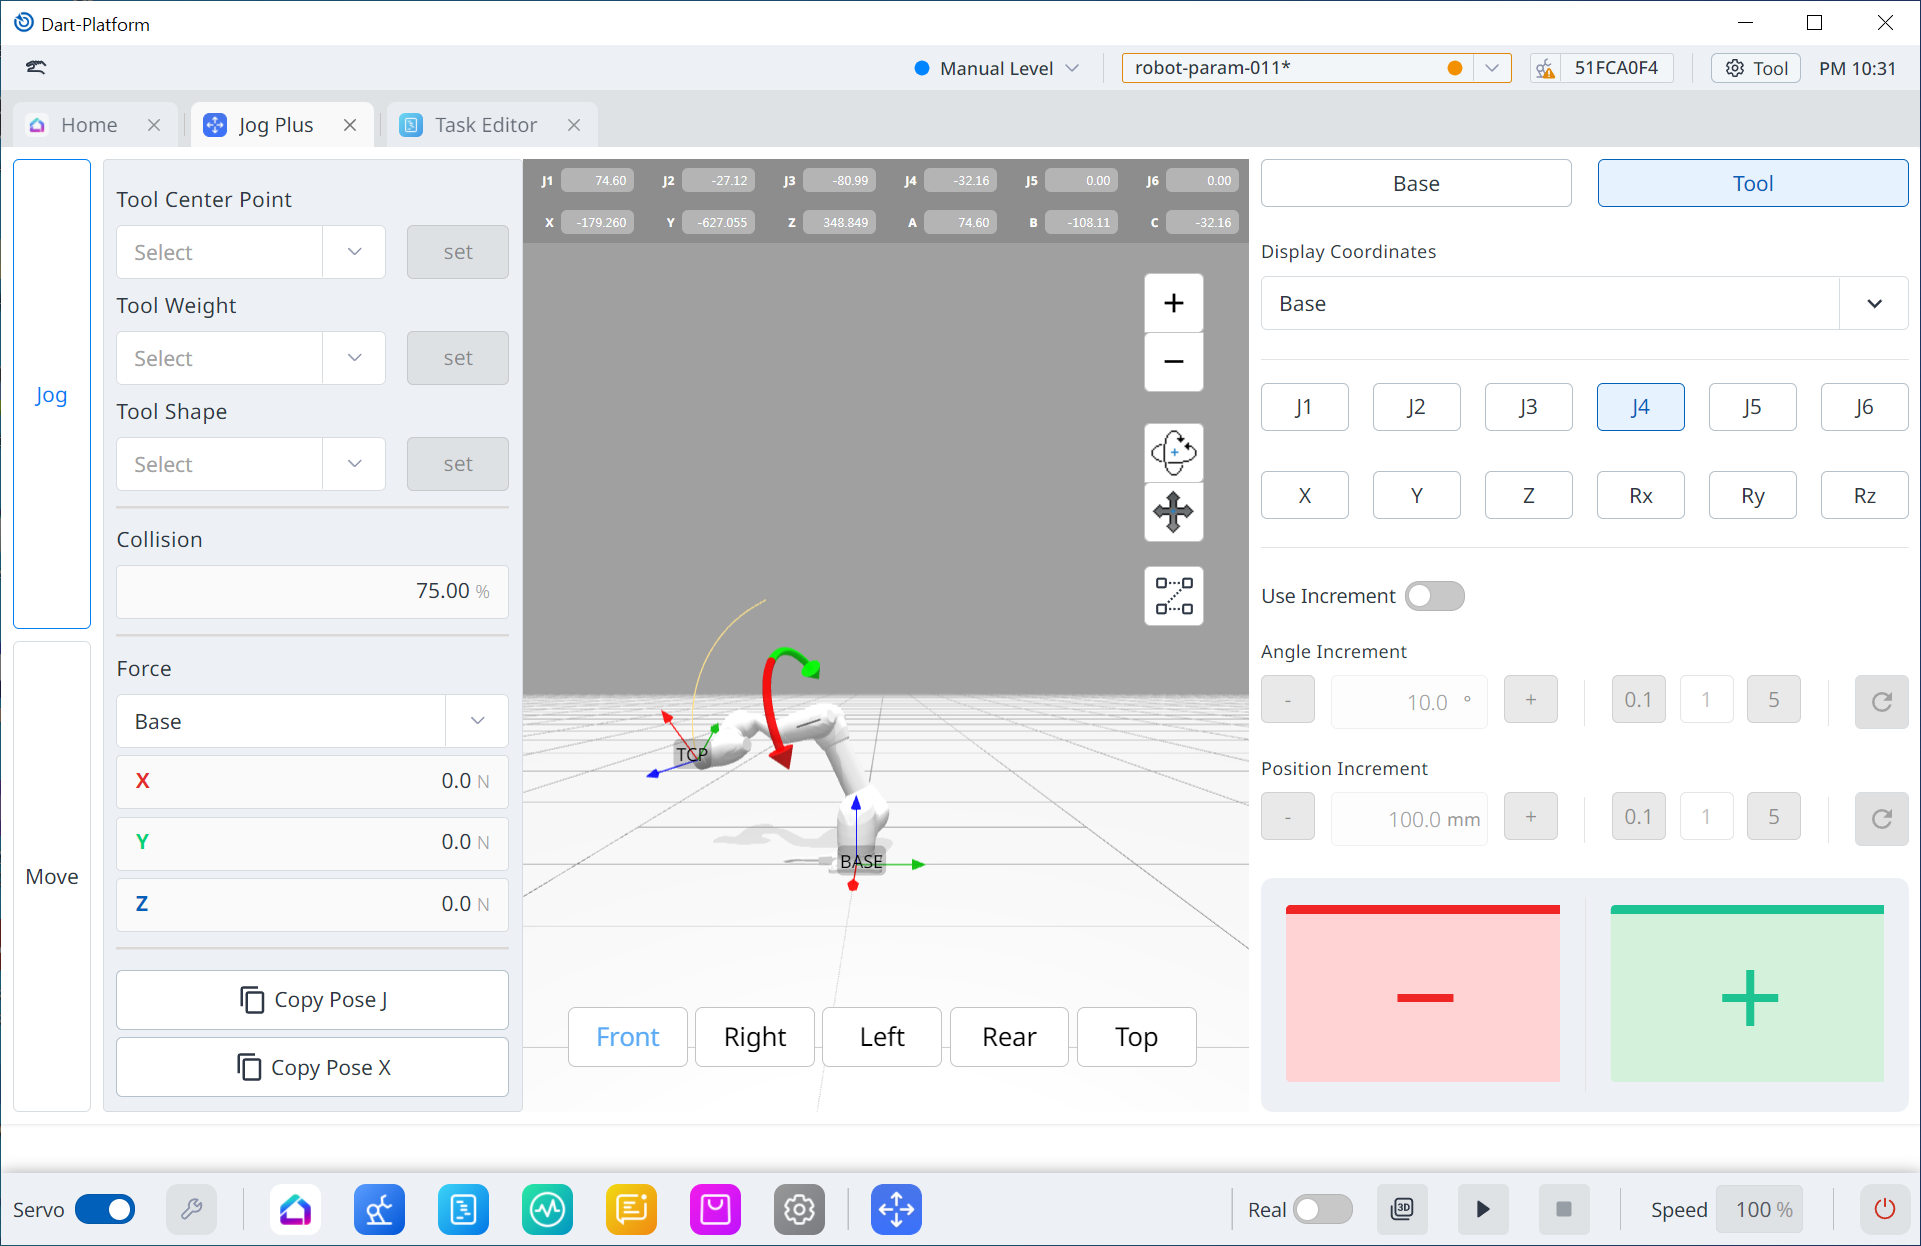
Jog Plus module helps you to set Jog related task. You have two options-Jog and Move.
If you press and hold +/- button, the robot moves to the direction you have pressed.
The user can select a manual movement method by selecting one of the buttons on the left in the Jog Plus Module.
Jog: It moves the robot joint or TCP to the joint axis or coordinate axis the user selected
Move: It moves the robot joint or TCP to the target point the user entered
Note.
Jog operation is available only in Servo On state.
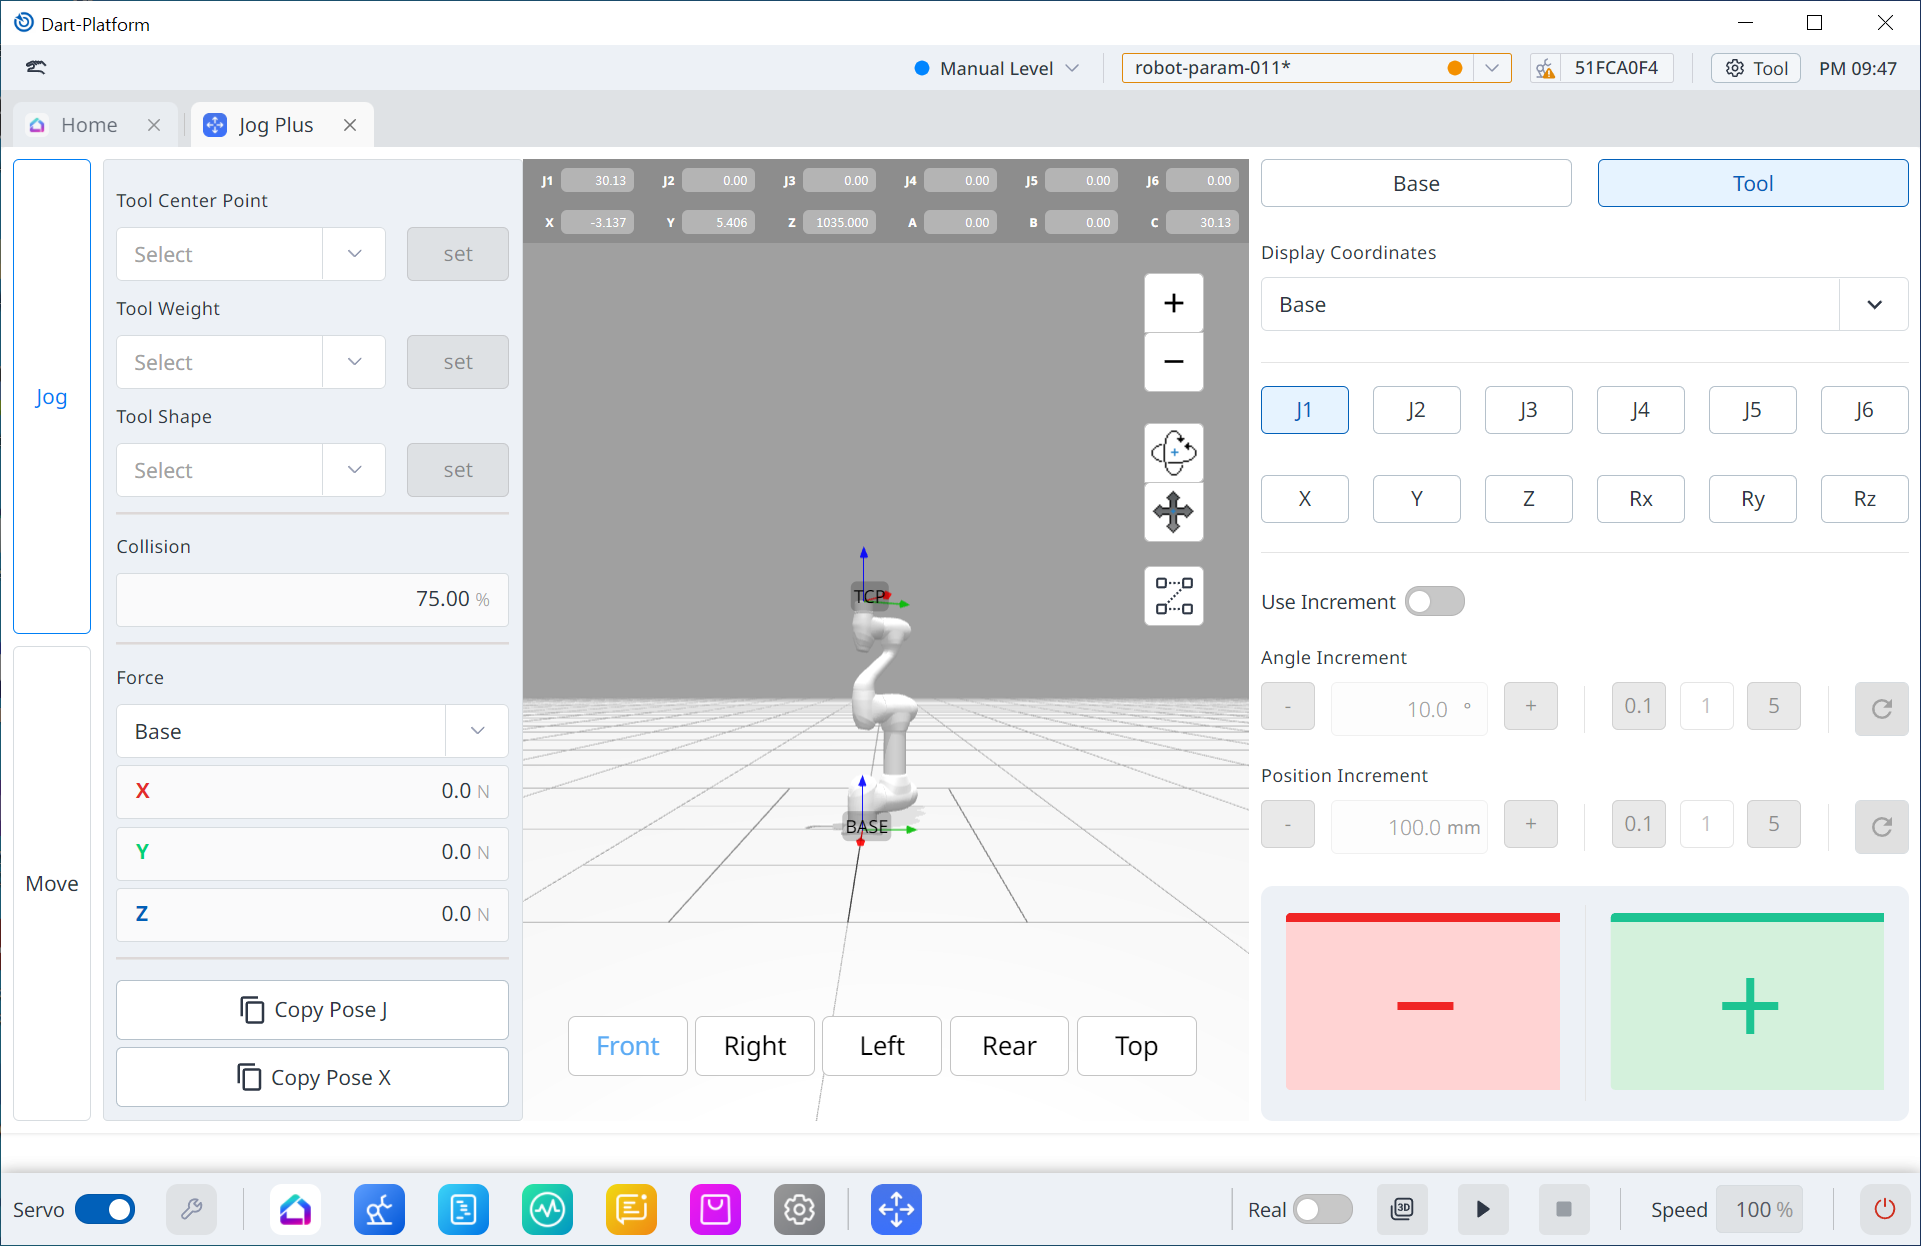
Robot movement consists of two types.
Joint Motion: It moves each joint linearly with a rotating motion

Task Motion: It moves the end linearly to the target point

Joint Motion
The following is the method how to move the robot using joint motion from the jog screen:
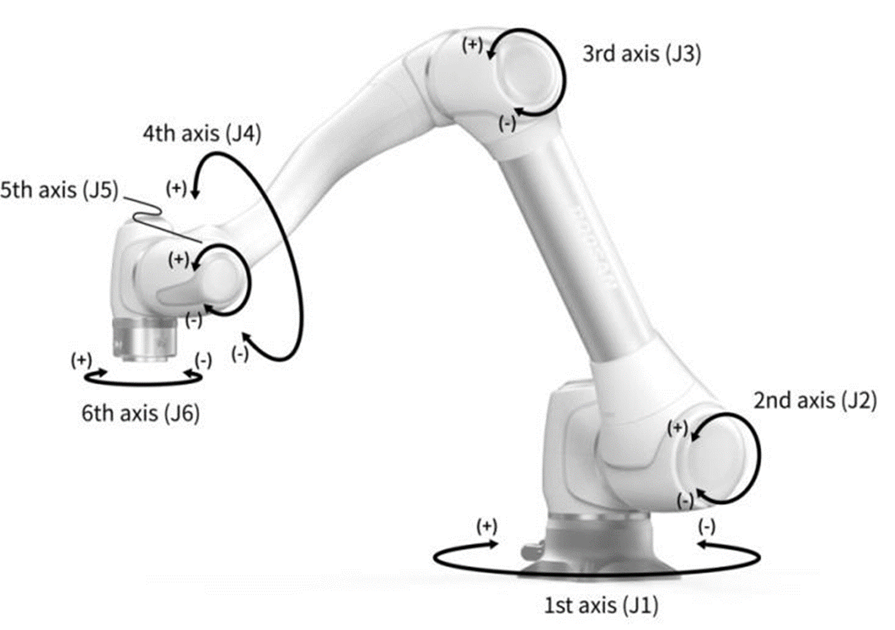
Select the axis to move. For example, You can select J1 referring Joint 1.
Press the +/- button to move the robot. The robot moves while the +/- button is pressed, and the current location is displayed on the screen in real-time.

Task Motion
The following is the method how to move the robot using task motion on the jog screen:
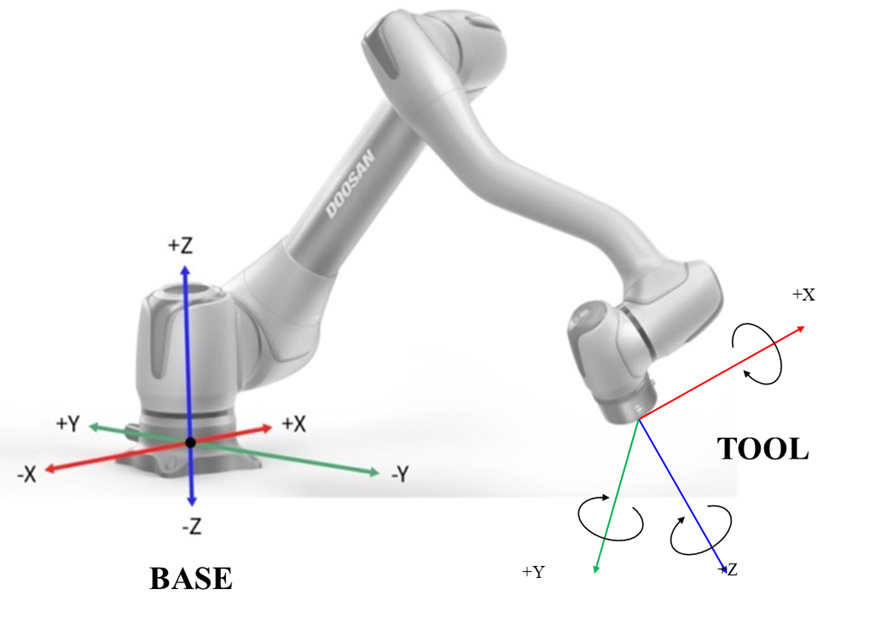
Select the base coordinates. The robot can be moved according to the
Basecoordinates or theToolcoordinates.
Select the direction to move. For example, X-axis can be selected.
To move the robot, press and hold the +/- button, then the current location is displayed on the screen in real-time.

14. Short introduction on Task Editor module (Auto)
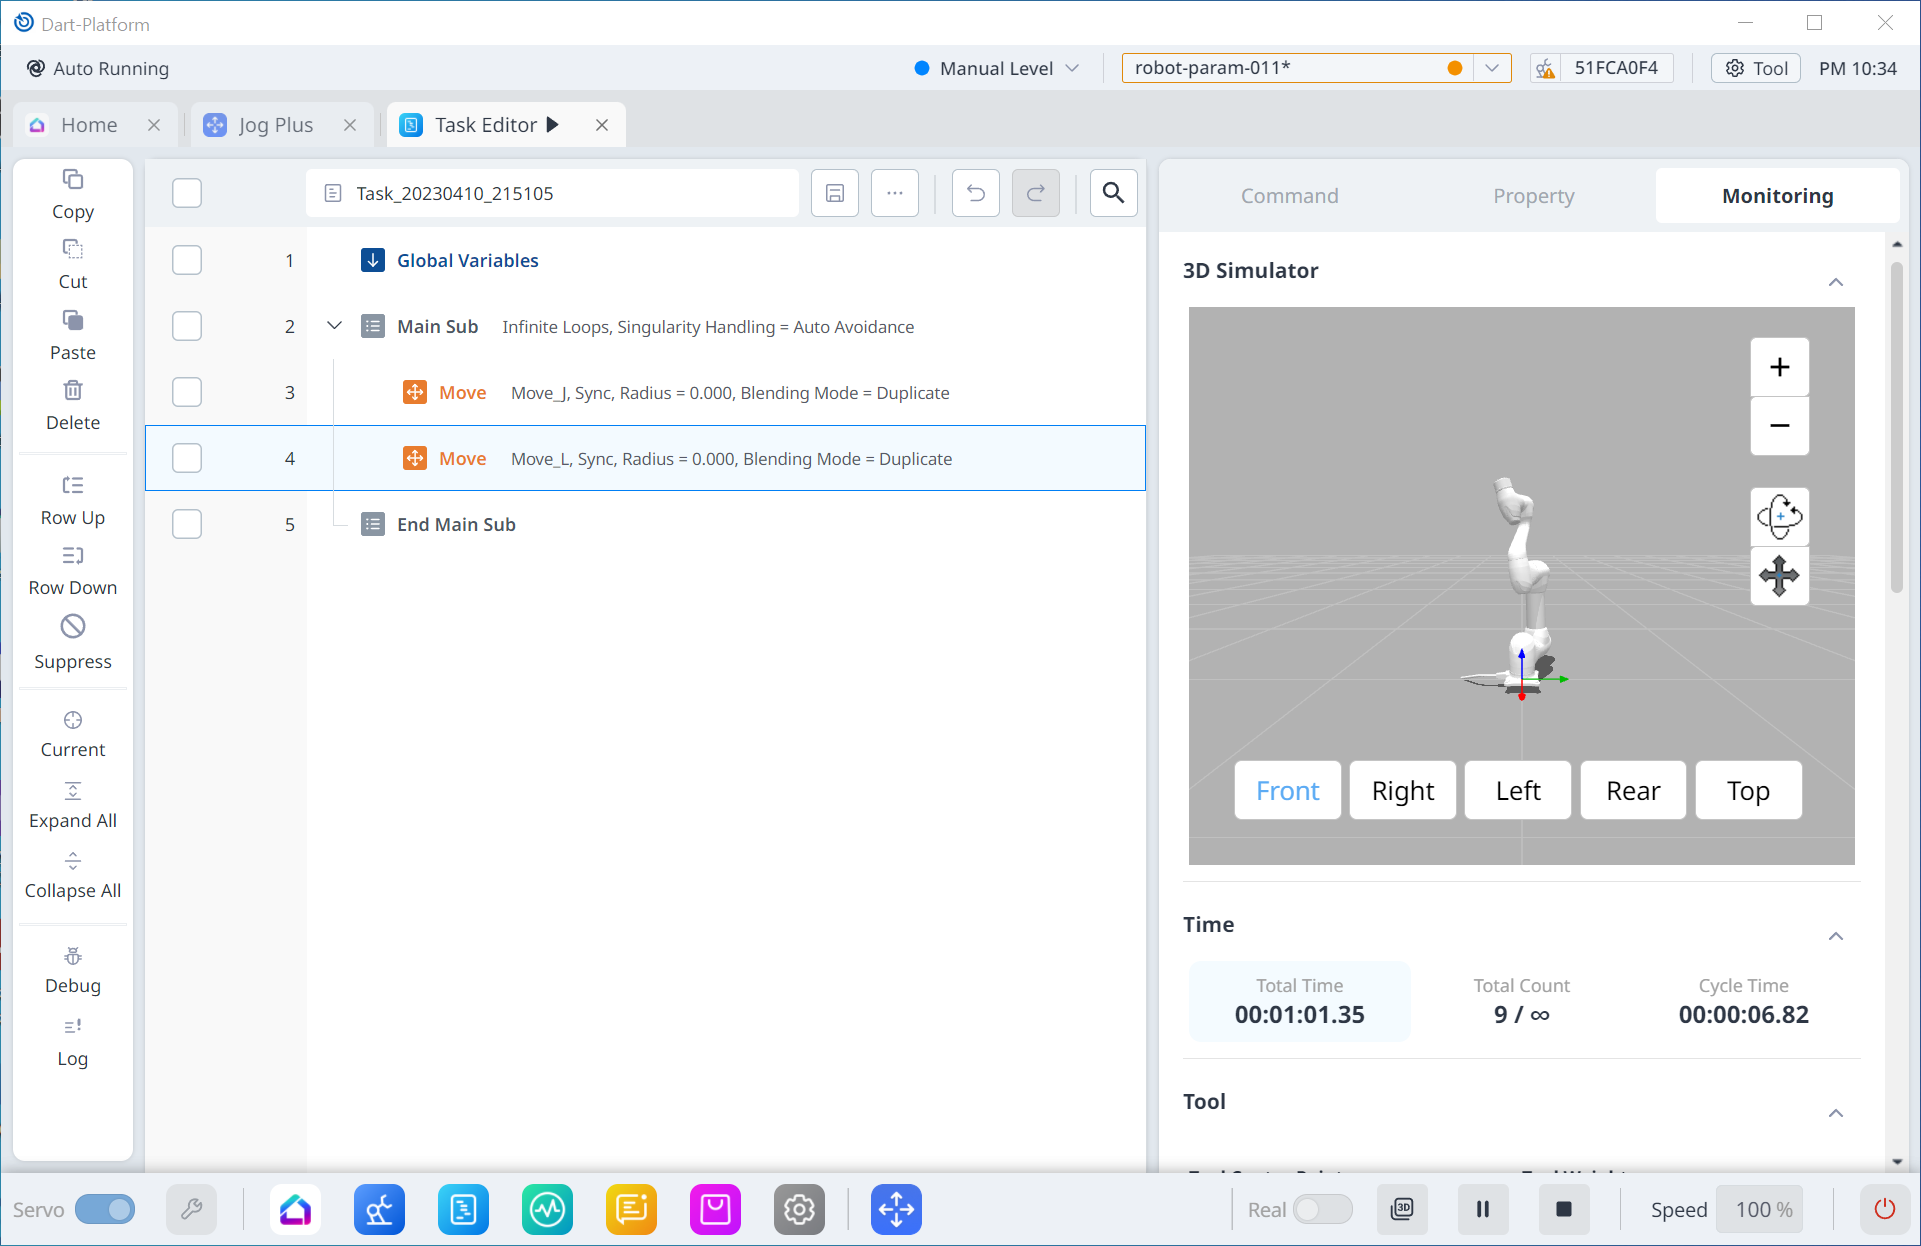
With this module, you can create robot operation as one task file by placing Command Blocks sequentially.
You may select the task, set the property and monitor it via 3D Simulator. You can even edit the whole
composition of the task with functions such as Copy, Cut, or Row Up and Down.
If you install User Command module, it is displayed on the bottom of the right menu of Command section. (This module can be bought in the Dart-Store or created in Dart-IDE.)
You can make robots move automatically with the Task Editor module.
Info.
Task is a unit of total file.
Note.
Task operation is available only in Servo On state. However, command editing in Task Editor is possible even in Servo Off state.
Step 1. Open Task Editor Module.
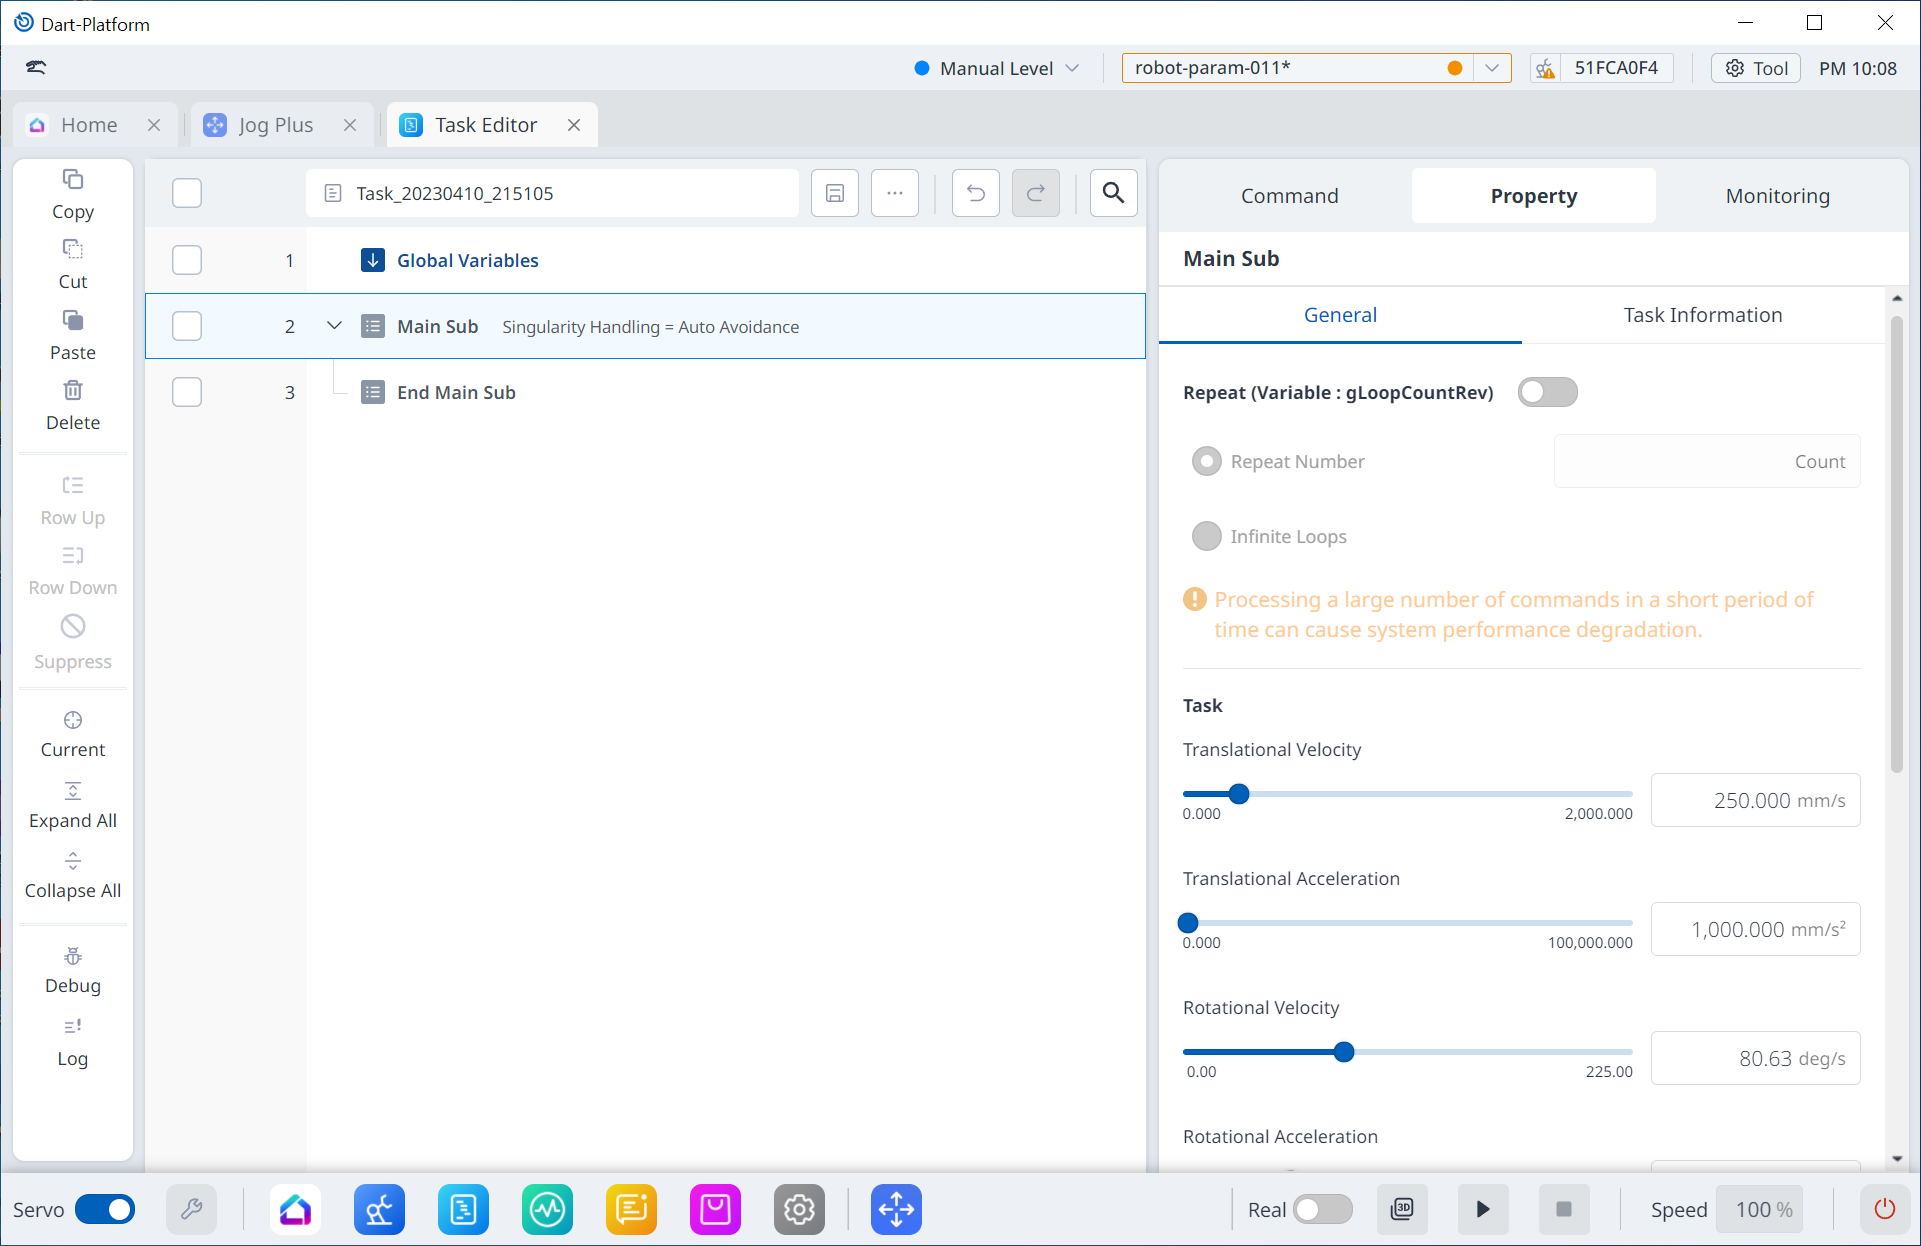
Step 2. Select Main Sub and Enable Repeat toggle button.
Step 3. Select Infinate Loops.
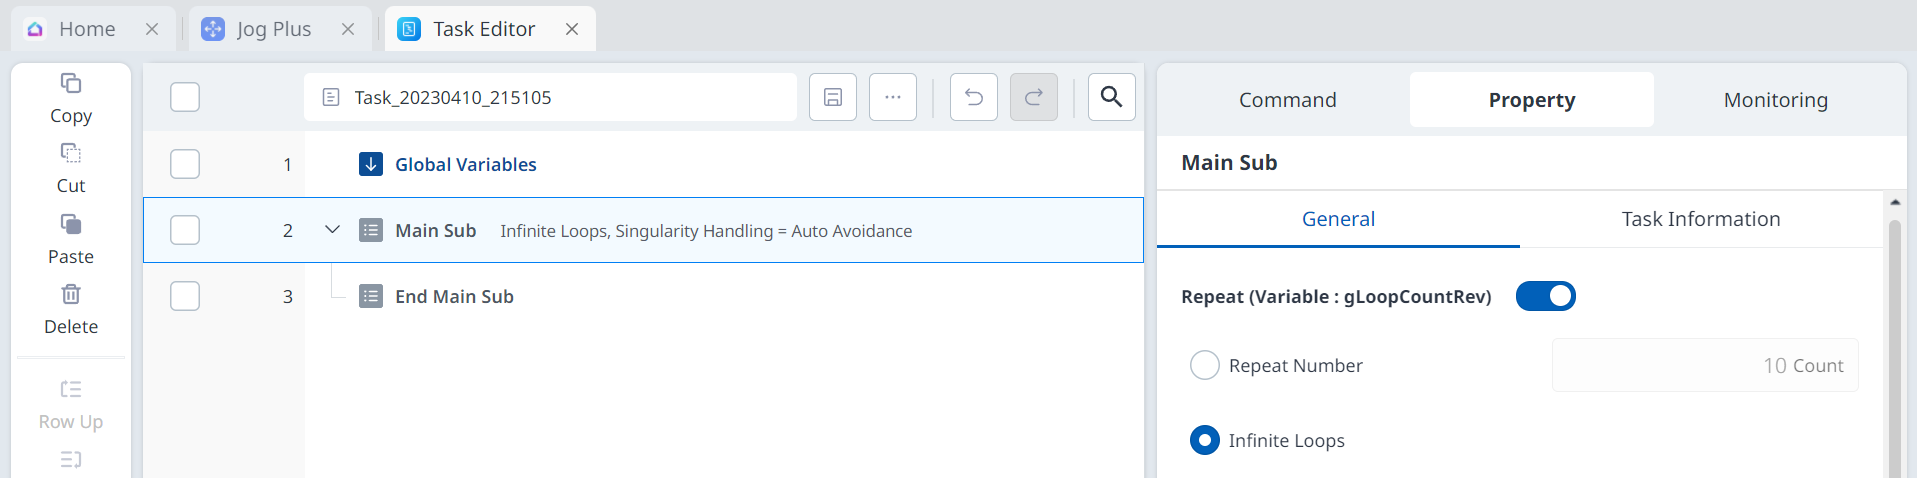
Step 4. With MainSub on the second line selected, press
Moveto add Move command to the task list.
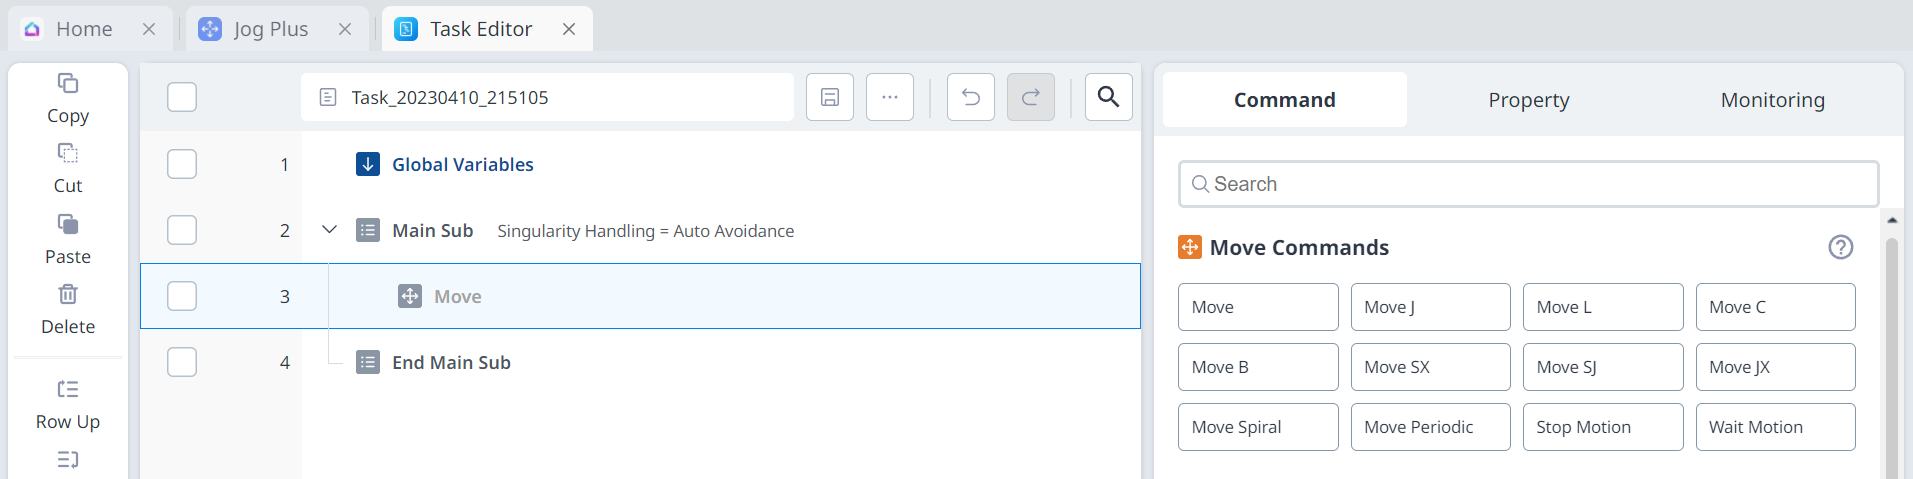
Step 5. Select the Property tab at the top right. Property values of the command can be set in the Property tab.
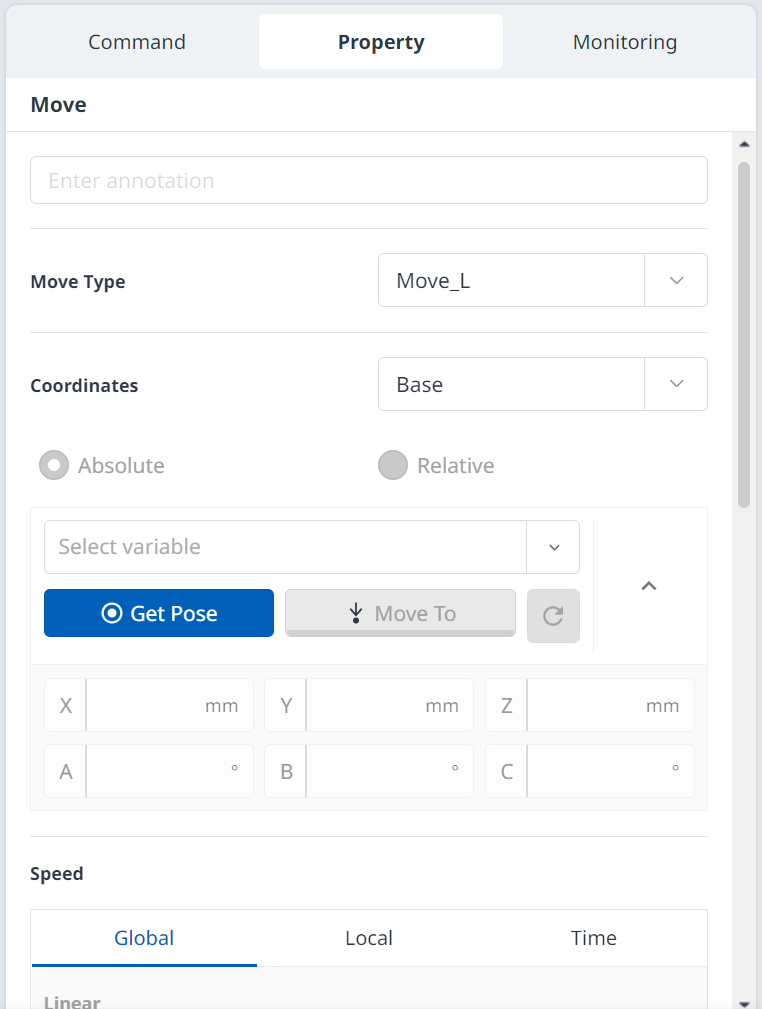
Step 6. Select the Move Type as
Move_J.

Step 7. Click the
Get PoseButton to set the moving target position to the current position.
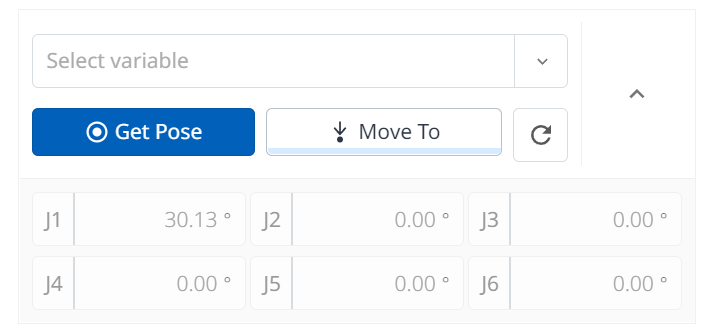
Step 8. Once again press
Moveto add Move command to the task list.Step 9. Select Jog Plus Module from the top tab.
Step 10. Move the robot to the position you want.
Step 11. Return to the Task Editor Module and press the
Get Posebutton.Step 12. Click the
Playbutton (▶) in the footer bar.

Info.
Currently, it is connected to the robot controller simulator (Dart-Services), not the robot, so you need to press the Play button with the Real Toggle button disabled. However, when connecting with a real robot controller, the real robot moves only when the Real button is activated. Therefore, if you want to move the robot, activate the Real Toggle button and then click the Play button.
Step 13. Click the
Stopbutton(◼) in the footer bar to stop the robot.

15. Short introduction on Settings Module
The settings of the module can be activated in both OPERATOR and SUPERVISOR mode, and some menus are activated/deactivated according to the mode.
In Settings module, you are able to manage the settings of general system of Dart-Platform such as
language, Robot update, or Safety Password etc.