V3.5.0(major)
Software Version Information
Release Date: 2025.12.19
ALIAS | V3.5.0 | ||||
MODELS | H2017 H2515 M0609 M0617 M1013 M1509 A0509 A0509s A0509f A0912 A0912s A0912f E0509 P3020 | ||||
SOFTWARE VERSION | Application | GV03050000 (NEW) | Inverter | GA33050000 (NEW) | |
Safety | GD33050000 (NEW) | ||||
Platform | GF03050000 (NEW) | ||||
System | GS03050000 | ||||
OS | GK03020000 | ||||
SDK VERSION | Current SDK Version | 5 | |||
Compatible SDK Version | 1, 2, 3, 4, 5 | ||||
Dart-Bridge SW | 1.5.0 | ||||
Key Features
Improvements to Tool TCP and Tool Weight Setting/Getting Functions
Previously, the Tool Center Point (TCP) and Tool Weight could only be set using items registered in the Robot Parameters module. This required users to pre-register items before setting them. Even when executing programs with DRL, users could not set a TCP or tool weight item without prior registration, which caused inconvenience.
To address this, the tool setting feature now provides separate options for Safety Tool Settings (pre-registered in Robot Paramters Module) and Temporary Tool Settings (modifiable on-the-fly).
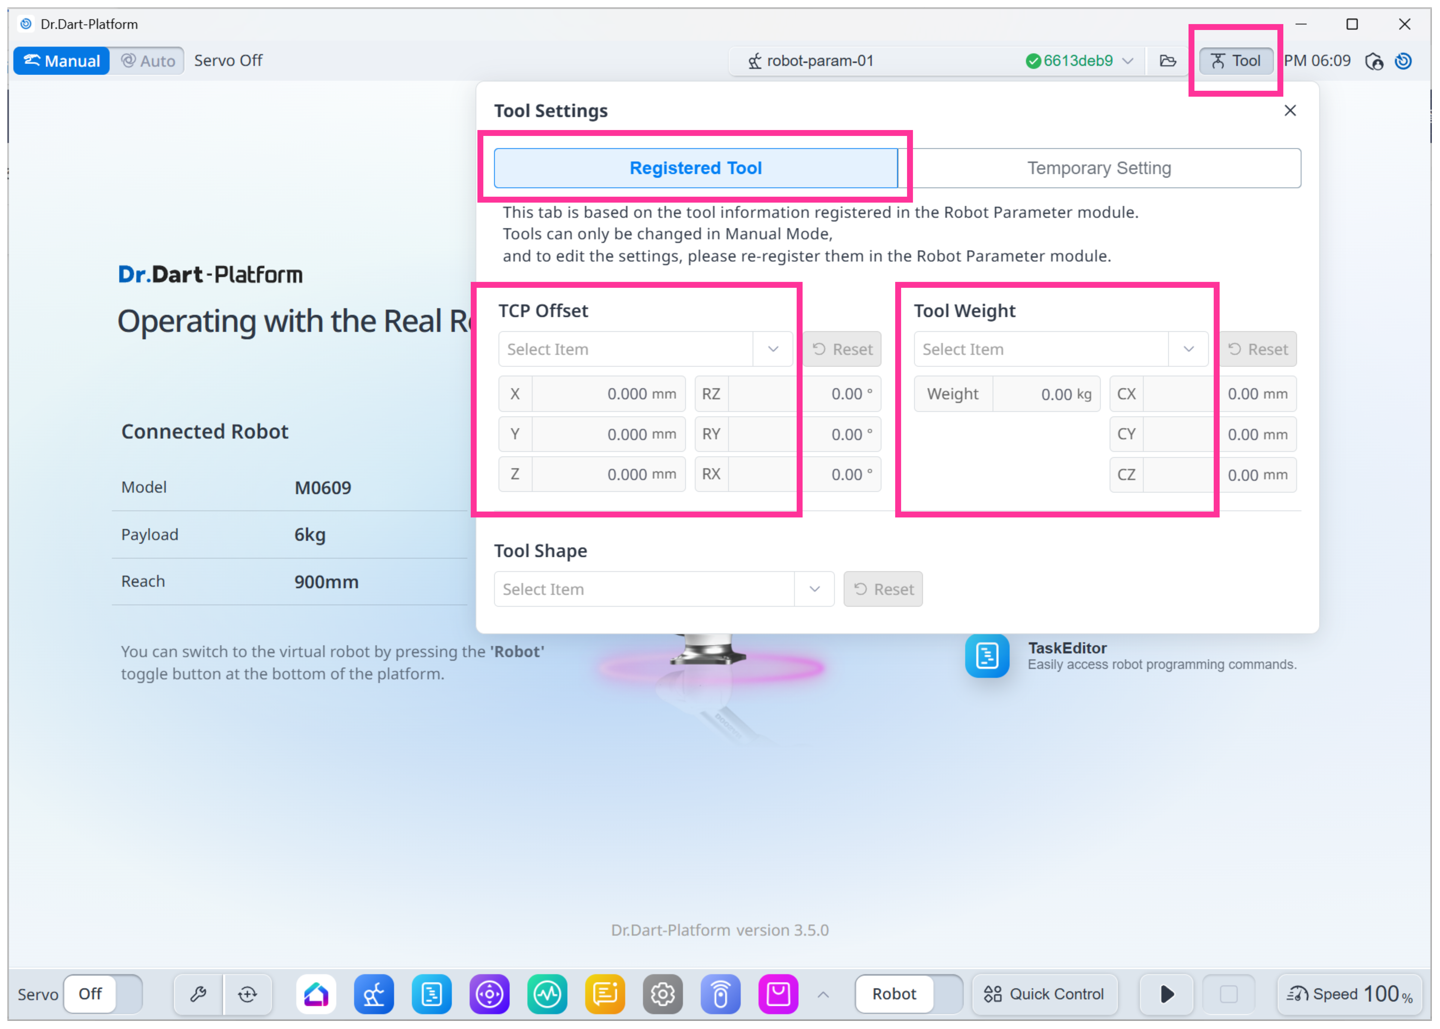
Safety Tool Setting (Pre-registered in Robot Paramters Module):
As before, safe tool settings can be pre-registered in the Robot Parameters module.To apply a registered item, open the tool setting window using the tool button at the top of Dart-Platform, then in the Registed Tool tab, select and apply the desired item.
During program execution, safety tool settings can be configured using the DRL commands
set_tool(for tool weight) andset_tcp(for TCP offset).CODEset_tool("Tool1") # Tool1 is the name of the tool weight item that has been registered. set_tcp("TCP1") # TCP1 is the name of the TCP offset item that has been registered.The currently applied safety tool weight and TCP offset can be checked in the tool setting window or retrieved via DRL commands during program execution.
CODEret = get_current_tcp() # Return current safety setting TCP offset item ret = get_current_tool() # Return current safety setting tool weight item
Temporary Tool Setting:
Temporary tool settings can also be configured in the tool setting window or via DRL commands.How to apply temporary tool settings in the Tool Setting window:
Go to the Temporary Setting tab, enter the desired TCP offset and tool weight values, and click “Apply Input Value” to set.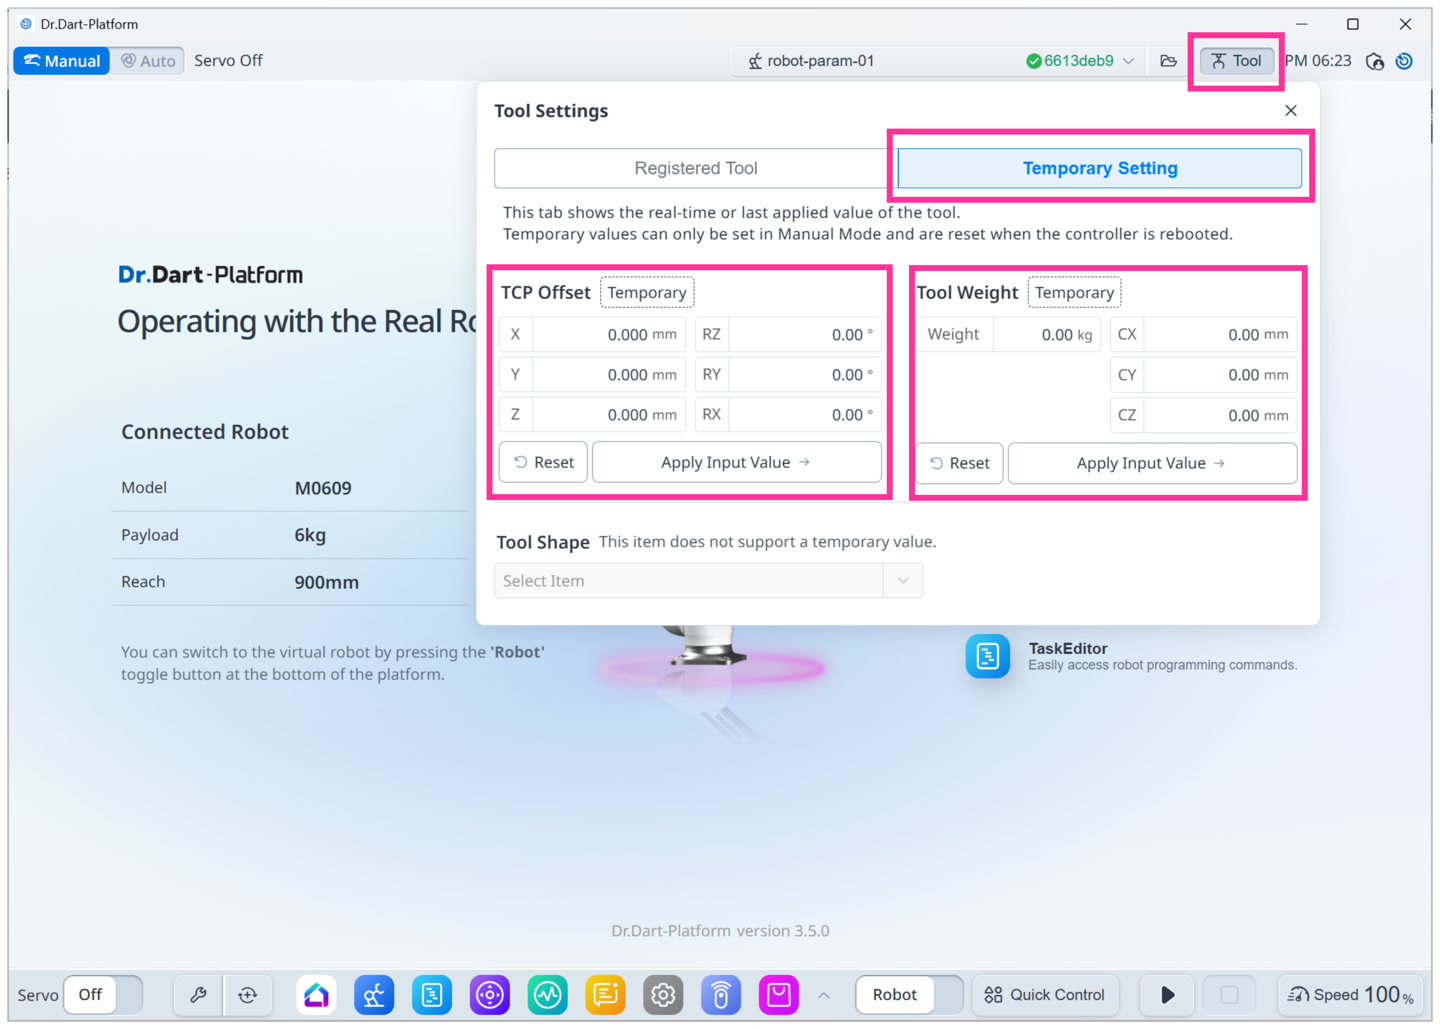
How to apply temporary tool settings via DRL commands:
Useset_temp_tcpDRL command to set the TCP offset (Orientation Type: ZYX),CODEtcp1 = config_tcp([0, 40, 150, 0, 180, 0]) set_temp_tcp(tcp1)and
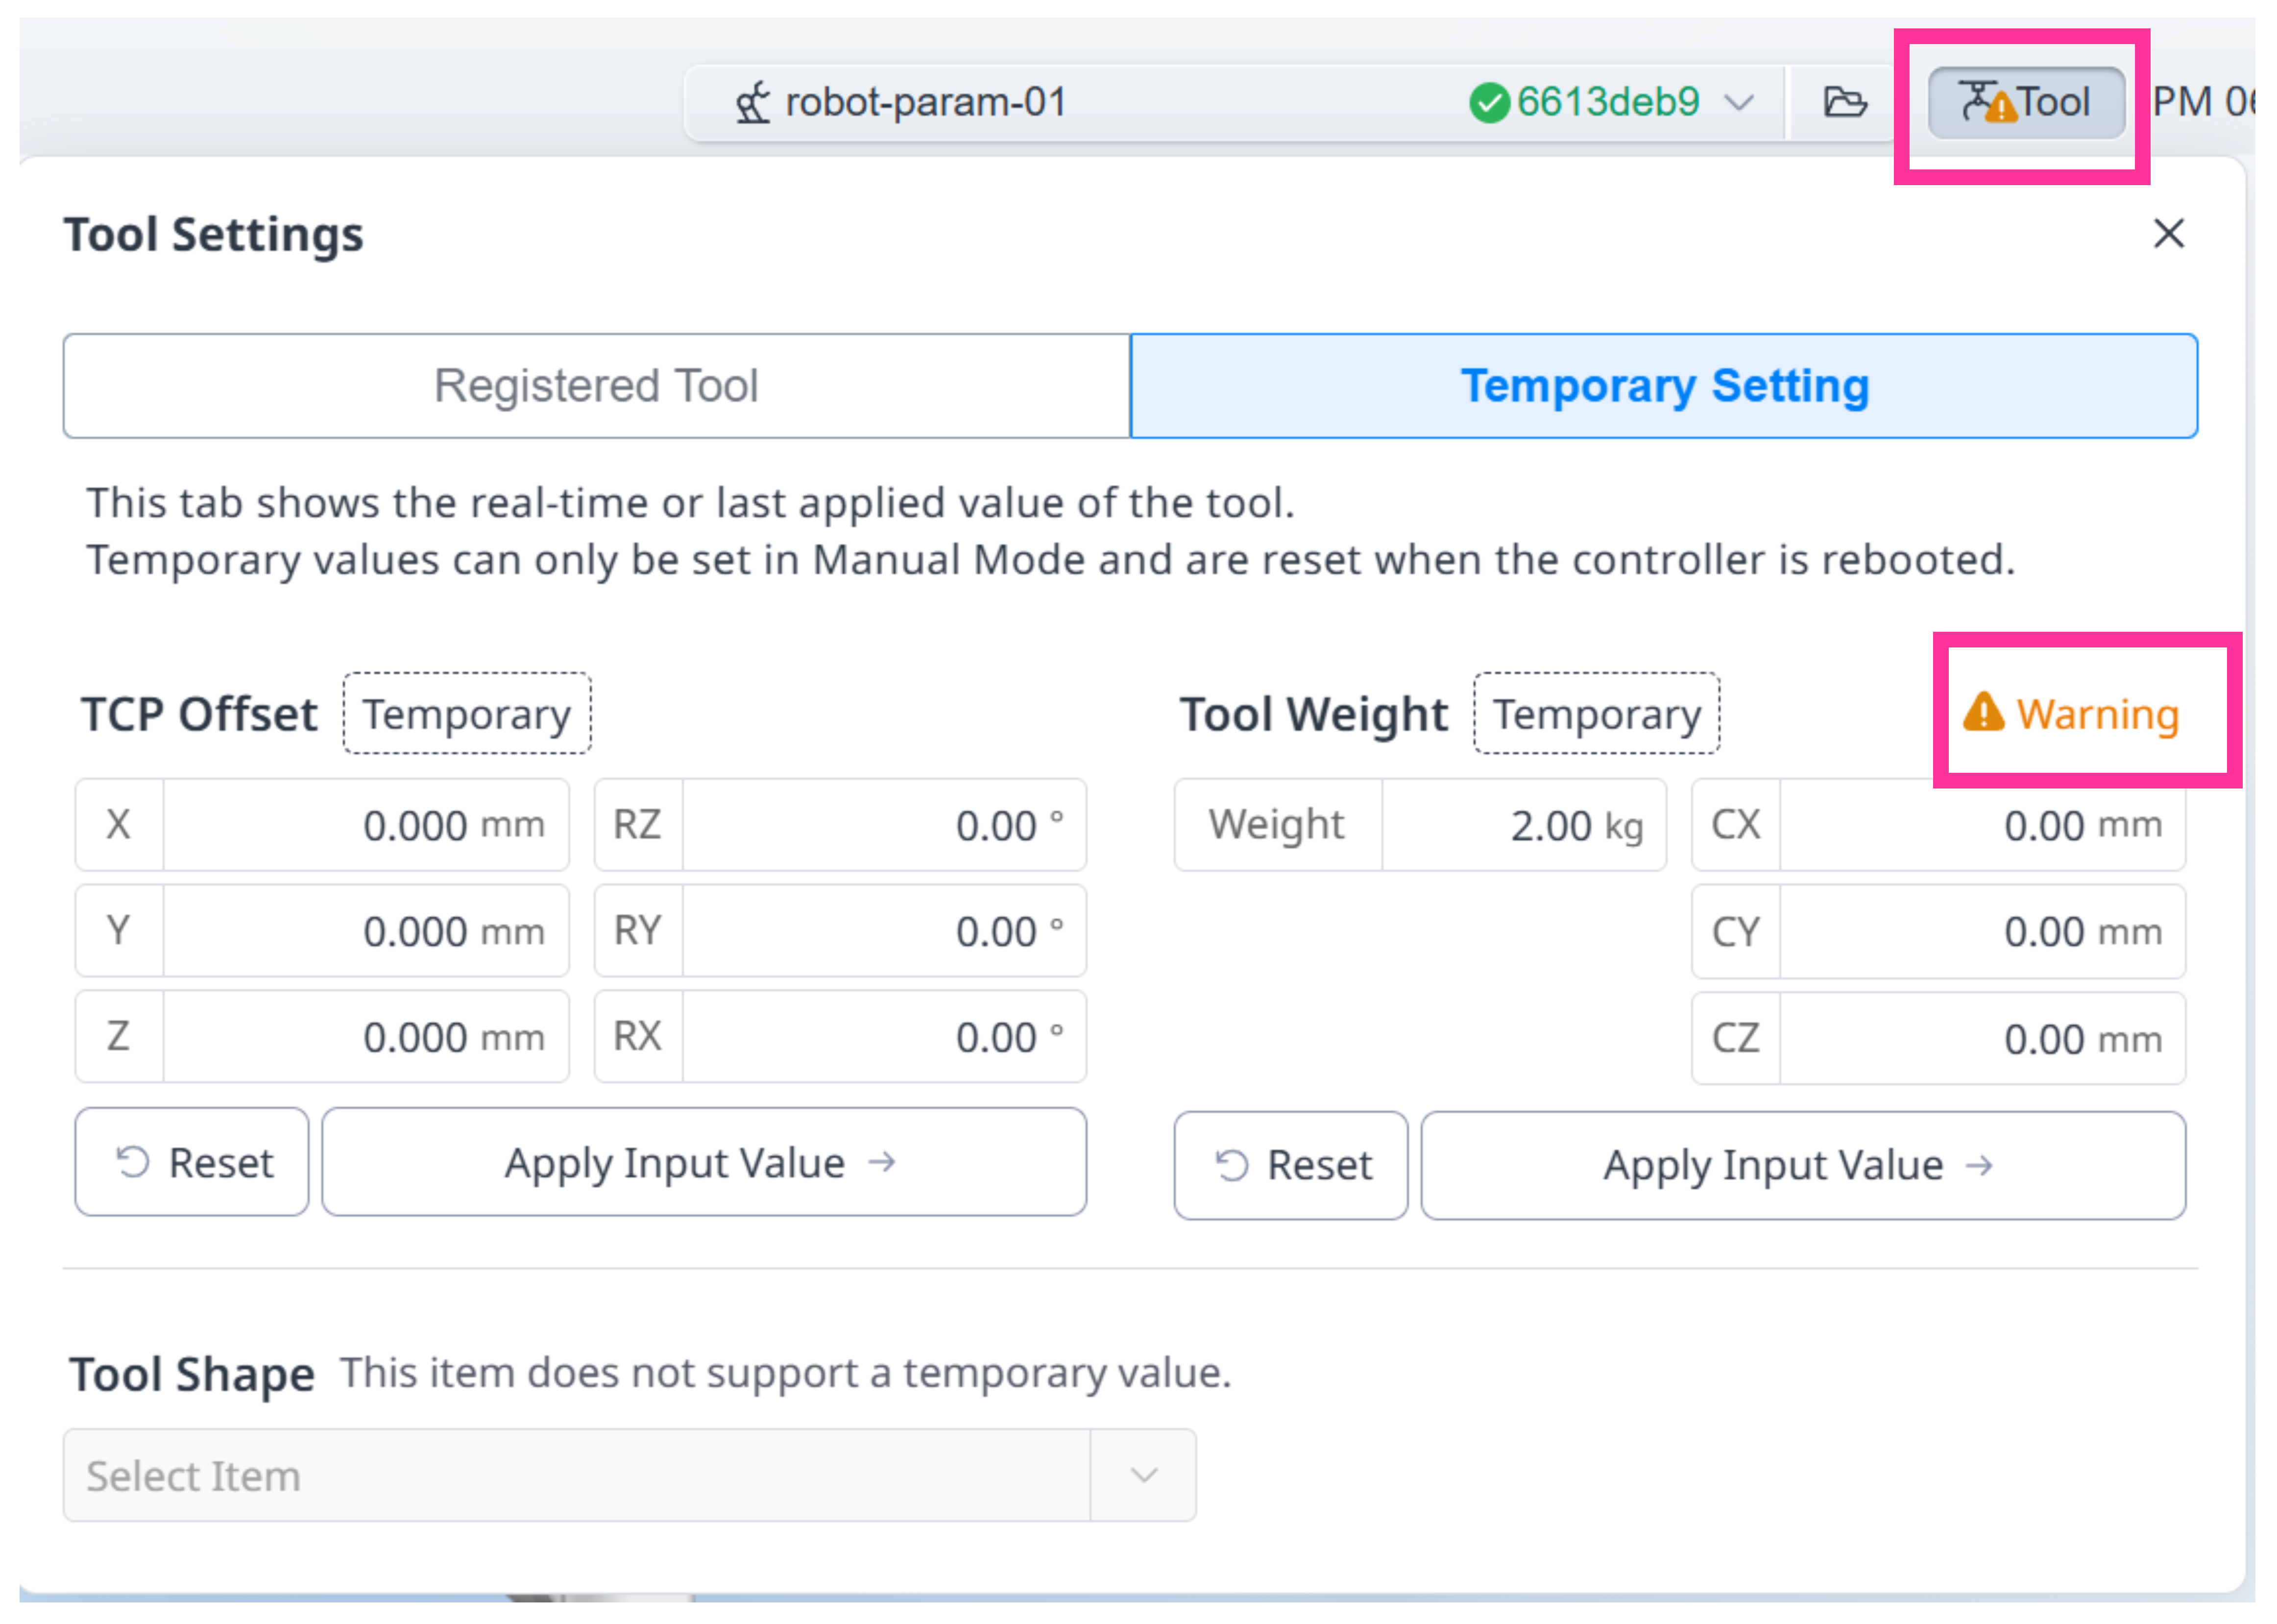
set_temp_toolto set the tool weight, center of mass, and inertia values.CODEtool1 = config_tool([5.2, [0, 40, 250], [0.01, 0.01, 0.01, 0.0, 0.0, 0.0]]) set_temp_tool(tool1)When a temporary tool setting is applied, an orange warning icon appears on the tool setting button. Users can easily check the currently applied temporary values in the tool setting window.
The temporarily set TCP offset and tool weight values can also be checked using the following DRL commands.
CODEret = get_temp_tcp() # 임시 설정 반환 ret = get_temp_tool() # 임시 설정 반환A reset function is also provided, allowing user to revert to the last safety tool setting while temporary settings are active.
Clicking the “Reset” button in the temporary tool setting tab restores the previous safety tool configuration.
Alternatively, using the reset DRL command in your program.CODEreset_temp_tcp() reset_temp_tool()
Both safe and temporary tool settings remain effective even after program stop or control authority transfer.
For detailed instructions, please refer to the user manual and programming manual.
Modbus Master Feature Optimization
Following the improvements to the Modbus Slave feature in the previous version, this update focuses on optimizing Modbus Master functionality.
Previously, when adding a Modbus signal, users were required to set a value at the same time, which was inconvenient if a value change was not needed.
In this version, the signal addition and value setting functions have been separated, allowing users to add signals or set values independently as needed.
As the value setting command is now provided separately, the value parameter has been removed from the signal addition command.
Please note that programs using the previous function may encounter error popups after upgrading to version V3.5. We recommend removing the value parameter before running your program.
After removing the “value” parameter, the Modbus signal addition command is as follows.
For detailed instructions, please refer to the updated programming manual.
Modbus TCP:
CODEadd_modbus_signal(ip, port, name, reg_type, index, slaveid)Modbus RTU:
CODEadd_modbus_rtu_signal(slaveid, port, baudrate, bytesize, parity, stopbits, name, reg_type, index)
Additionally, this update resolves an issue from version V3.4 where Coil settings could not be applied on Modbus Master devices.
Other Improvements
For a better software service, we have continuously worked to improve the user interface and overall user experience in addition to the main features.
Additional improvements are as follows:
Dart-Platform
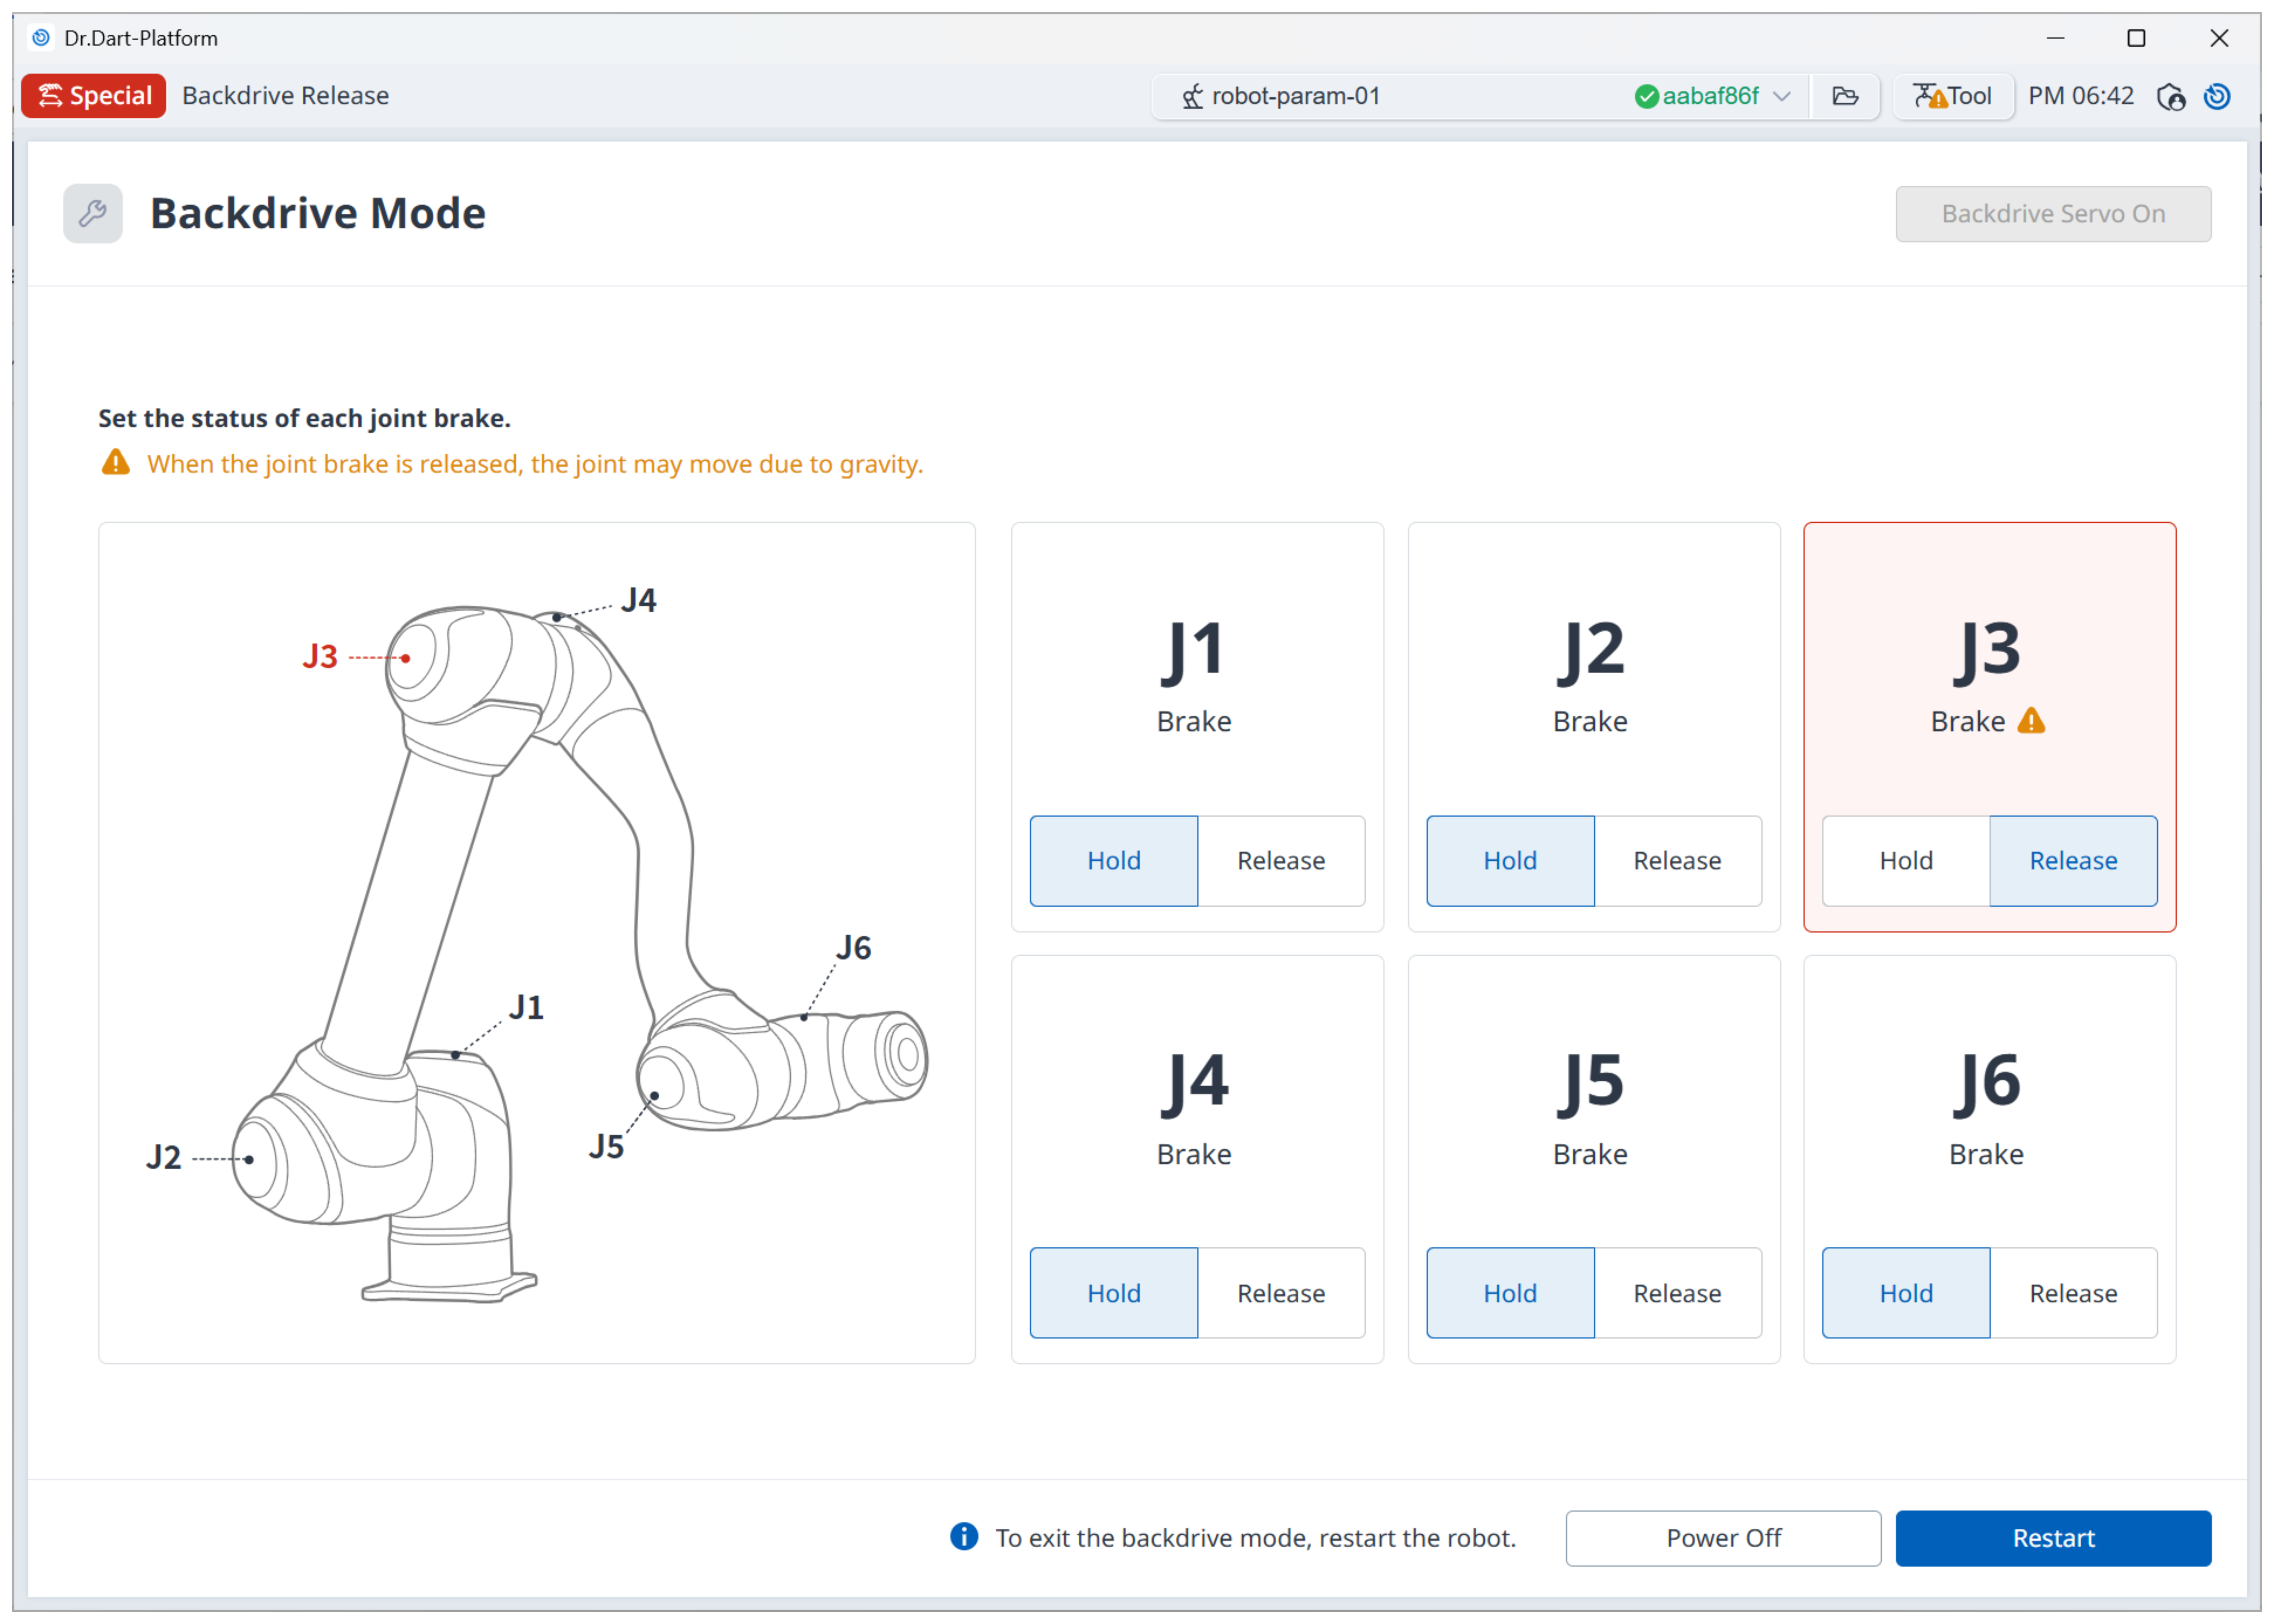
Backdrive Mode allows users to manually adjust the posture of each robot joint by disengaging its power. To make it easier to check the status of each joint’s brake (Hold/Release), the interface has been improved as follows.
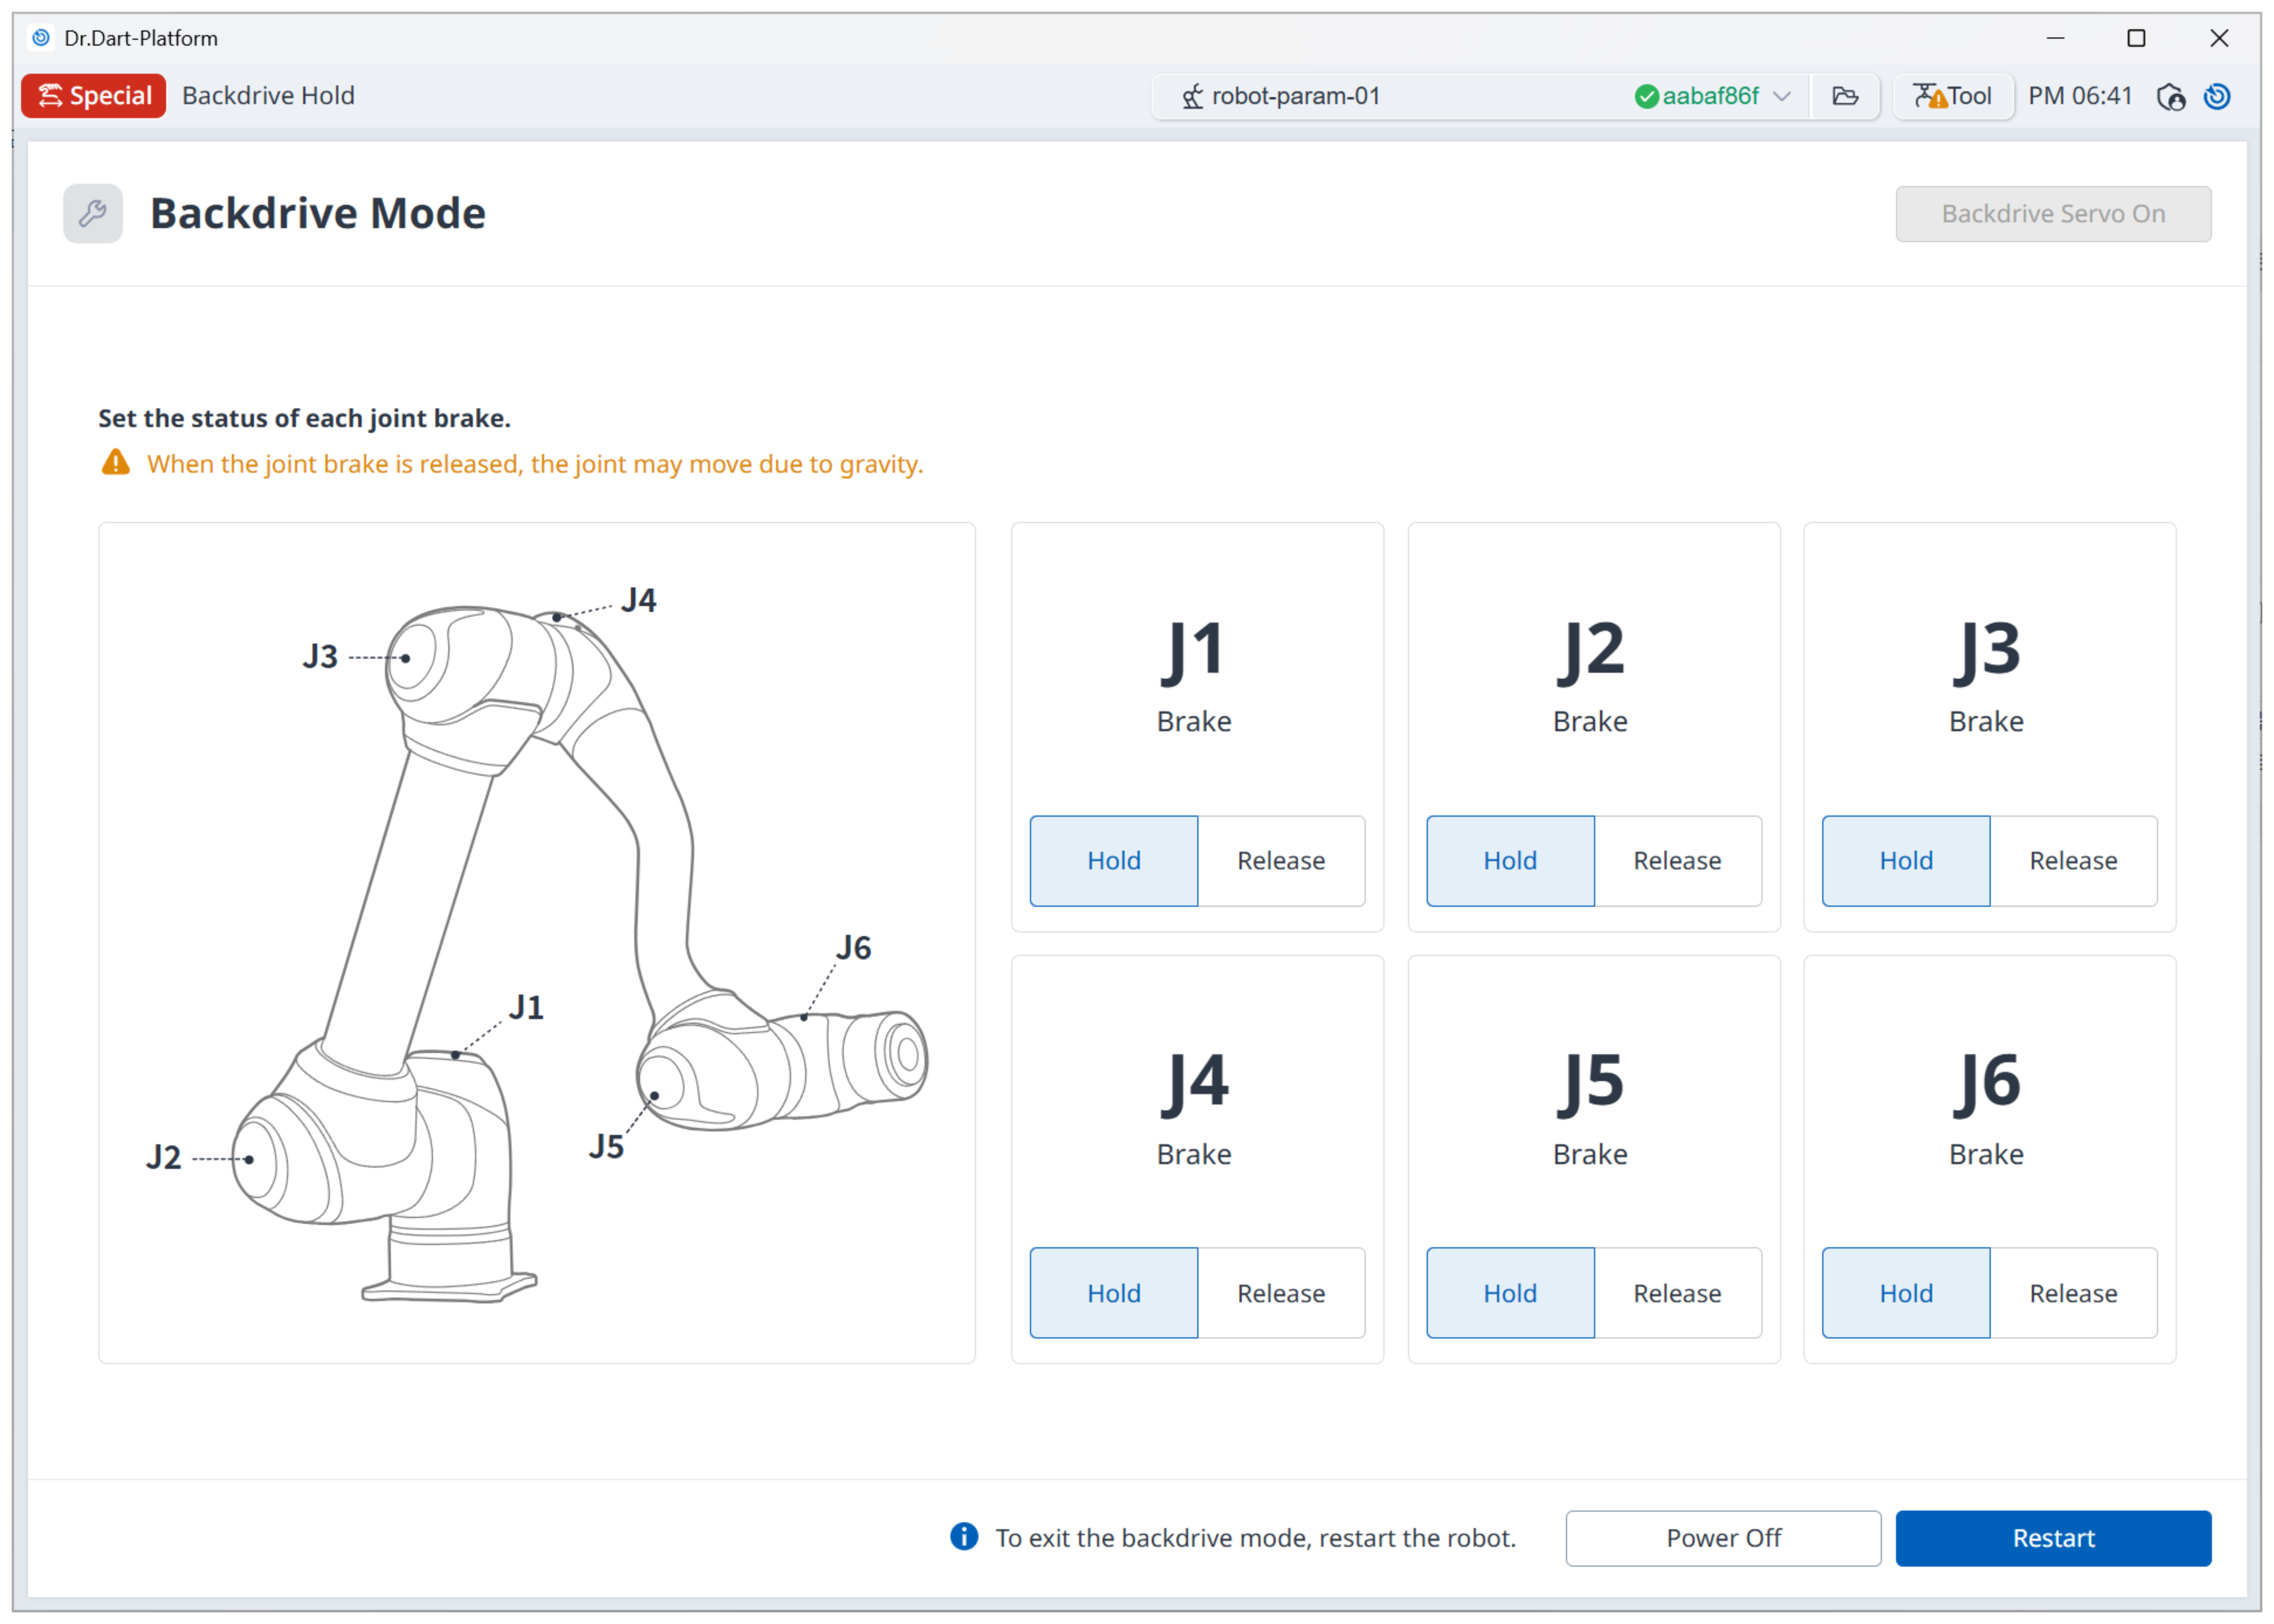
When the brake of a specific axis is released, a warning alarm is displayed to clearly indicate which axis brake has been released, and the corresponding axis field is highlighted for easy identification. Please note that when using the Backdrive Mode, joints with released brakes may move due to gravity.
To improve error handling and program debugging convenience, the error occurrence time is now displayed on all pop-ups and screens when a robot error occurs.
Some modules are developed for specific robot models; however, previously, there was no logic to check compatibility when installing a module. To ensure safer and more appropriate use, this version introduces an automatic compatibility check during module installation or import.
The system now verifies whether the module can be used with the currently connected robot model. If a module is found to be incompatible, a confirmation popup will be displayed, allowing users to decide whether to proceed with the installation.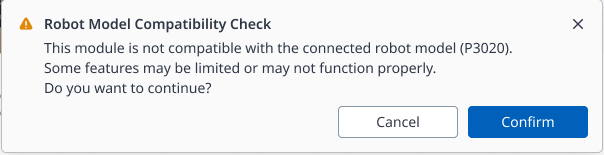
A new feature has been added to Dart-Platform that allows users to easily view and quickly close open modules when multiple modules are running.
By clicking the arrow button on the right side of the top Tab Bar, a popup will appear showing the list of currently open modules.
Within the popup, users can click a module name to instantly switch to that module, or click the ‘x’ button next to it to close individual modules.
Selecting the ‘Close All Tabs’ button will close all open modules at once.
Previously, inconsistent unit expressions across module screens and the system could cause confusion for users. To address this, all unit notations have been standardized according to the following criteria:
Angle unit conversion
deg → °
Time unit conversion
s, sec → s
Time squared unit conversion
s², s2, sec2 → s²
Angular velocity / angular acceleration unit conversion
deg/s → °/s
deg/s² → °/s²
Task Editor Module
The DRL recommendation feature available in Custom Code has been updated.
Unsupported commands have been removed, and relevant DRL commands for welding and IO have been added to enhance functionality.
This update allows users to code more conveniently and efficiently within Custom Code.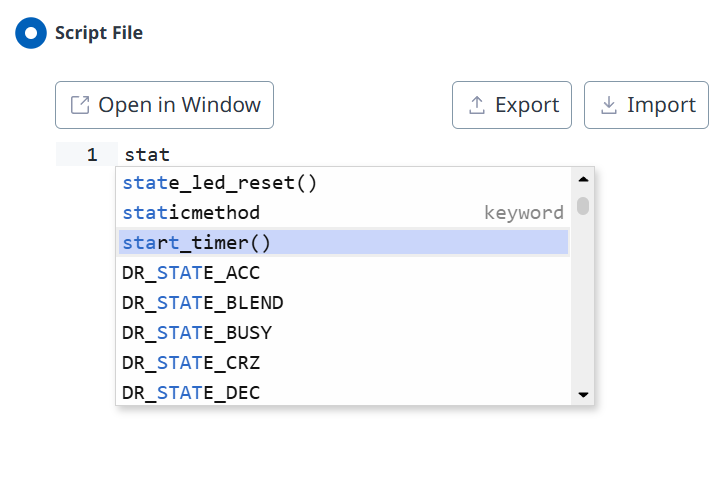
The usability of the Custom Code command has also been improved.
For script file usage, the “Open in New Window” feature previously displayed only an icon, which made it difficult to recognize. In this version, text has been added to the button for easier identification.
Additionally, when opening a script file in a new window, the window now expands for a larger view, allowing users to work more comfortably.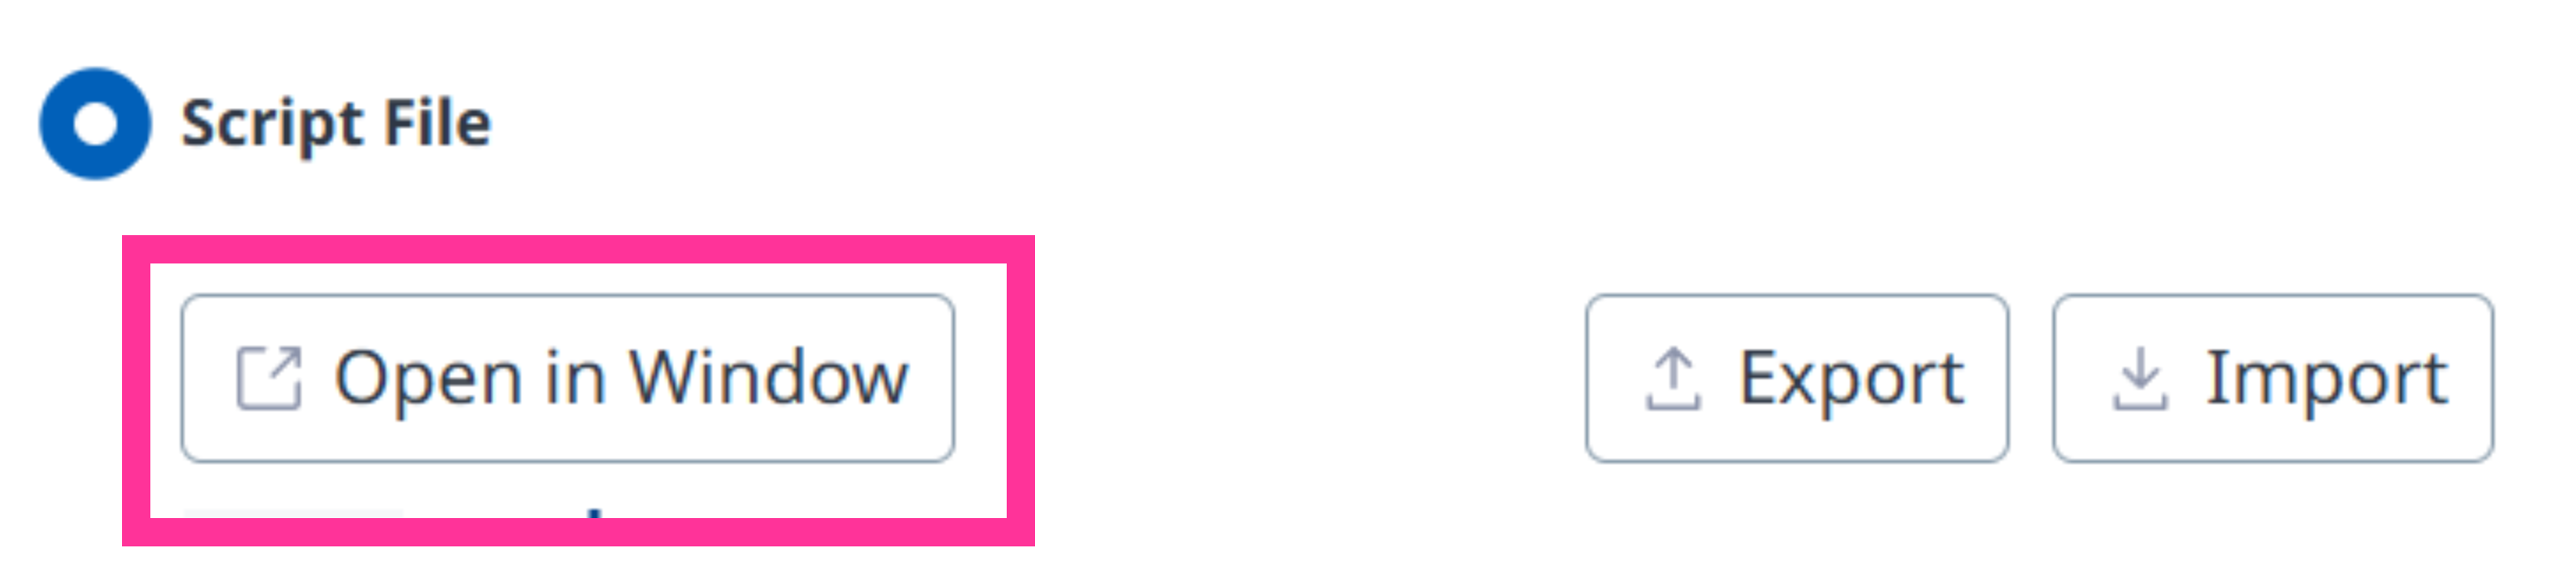
Robot Parameters Module
Safety-related settings on the A and E series can now be configured without automatically performing the Servo On procedure.
Settings Module
A new feature has been added that allows users to set a “Start Module” to run automatically after boot completion. To configure, go to the Start Module tab in the Settings module, enable the Auto Start option, select the desired module, and save your settings.
The currently set auto-start module is indicated with a check icon, and any module being selected for configuration is highlighted in blue.
Only one auto-start module can be set at a time.
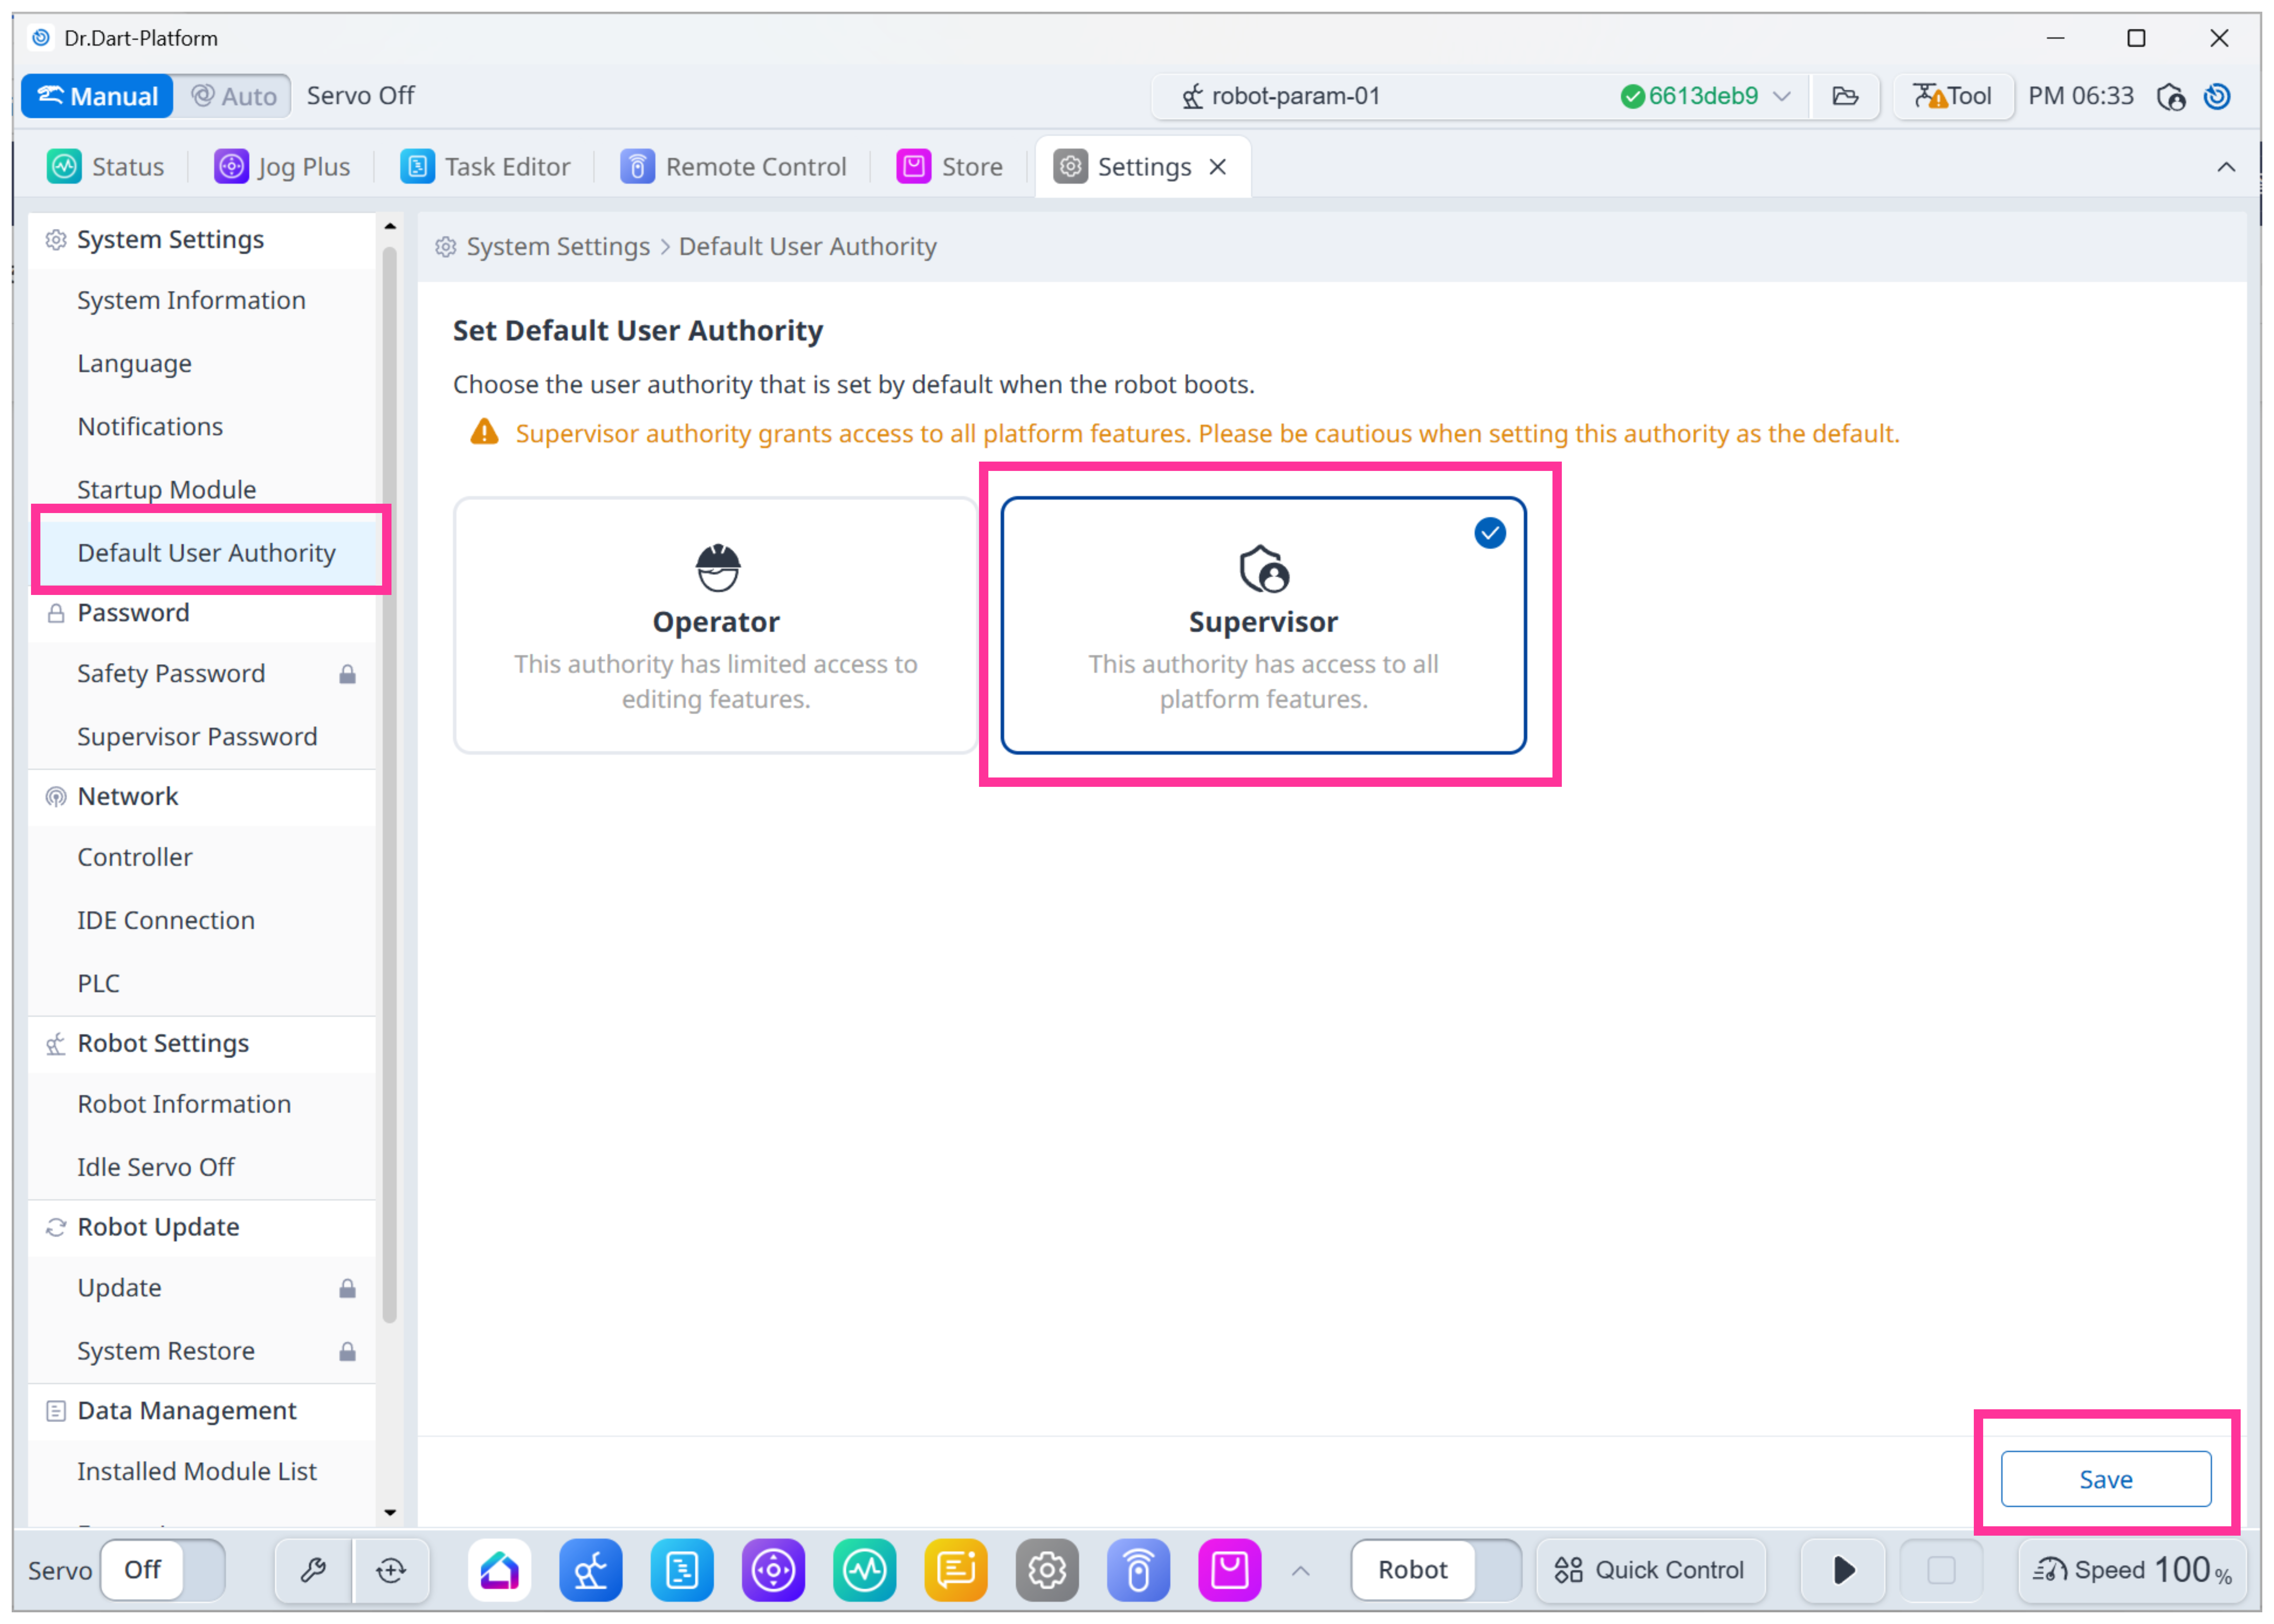
A new “Default User Authority” setting is now available, allowing users to specify the user authority level that will be applied when the robot completes booting.
When updating from a version prior to V3.5 to V3.5 or higher, the system will enter with operator authority by default, as before.
To change the default user authority, go to the Default User Authority tab in the Settings module, select the desired authority, and save your selection.Please note that only users with supervisor authority can change this setting.
Previously, exporting logs required selecting the log types to be exported in the log export tab.
In version V3.5, this process has been simplified.
Now, you can simply select the date range and click the export button to output all logs from the selected period at once.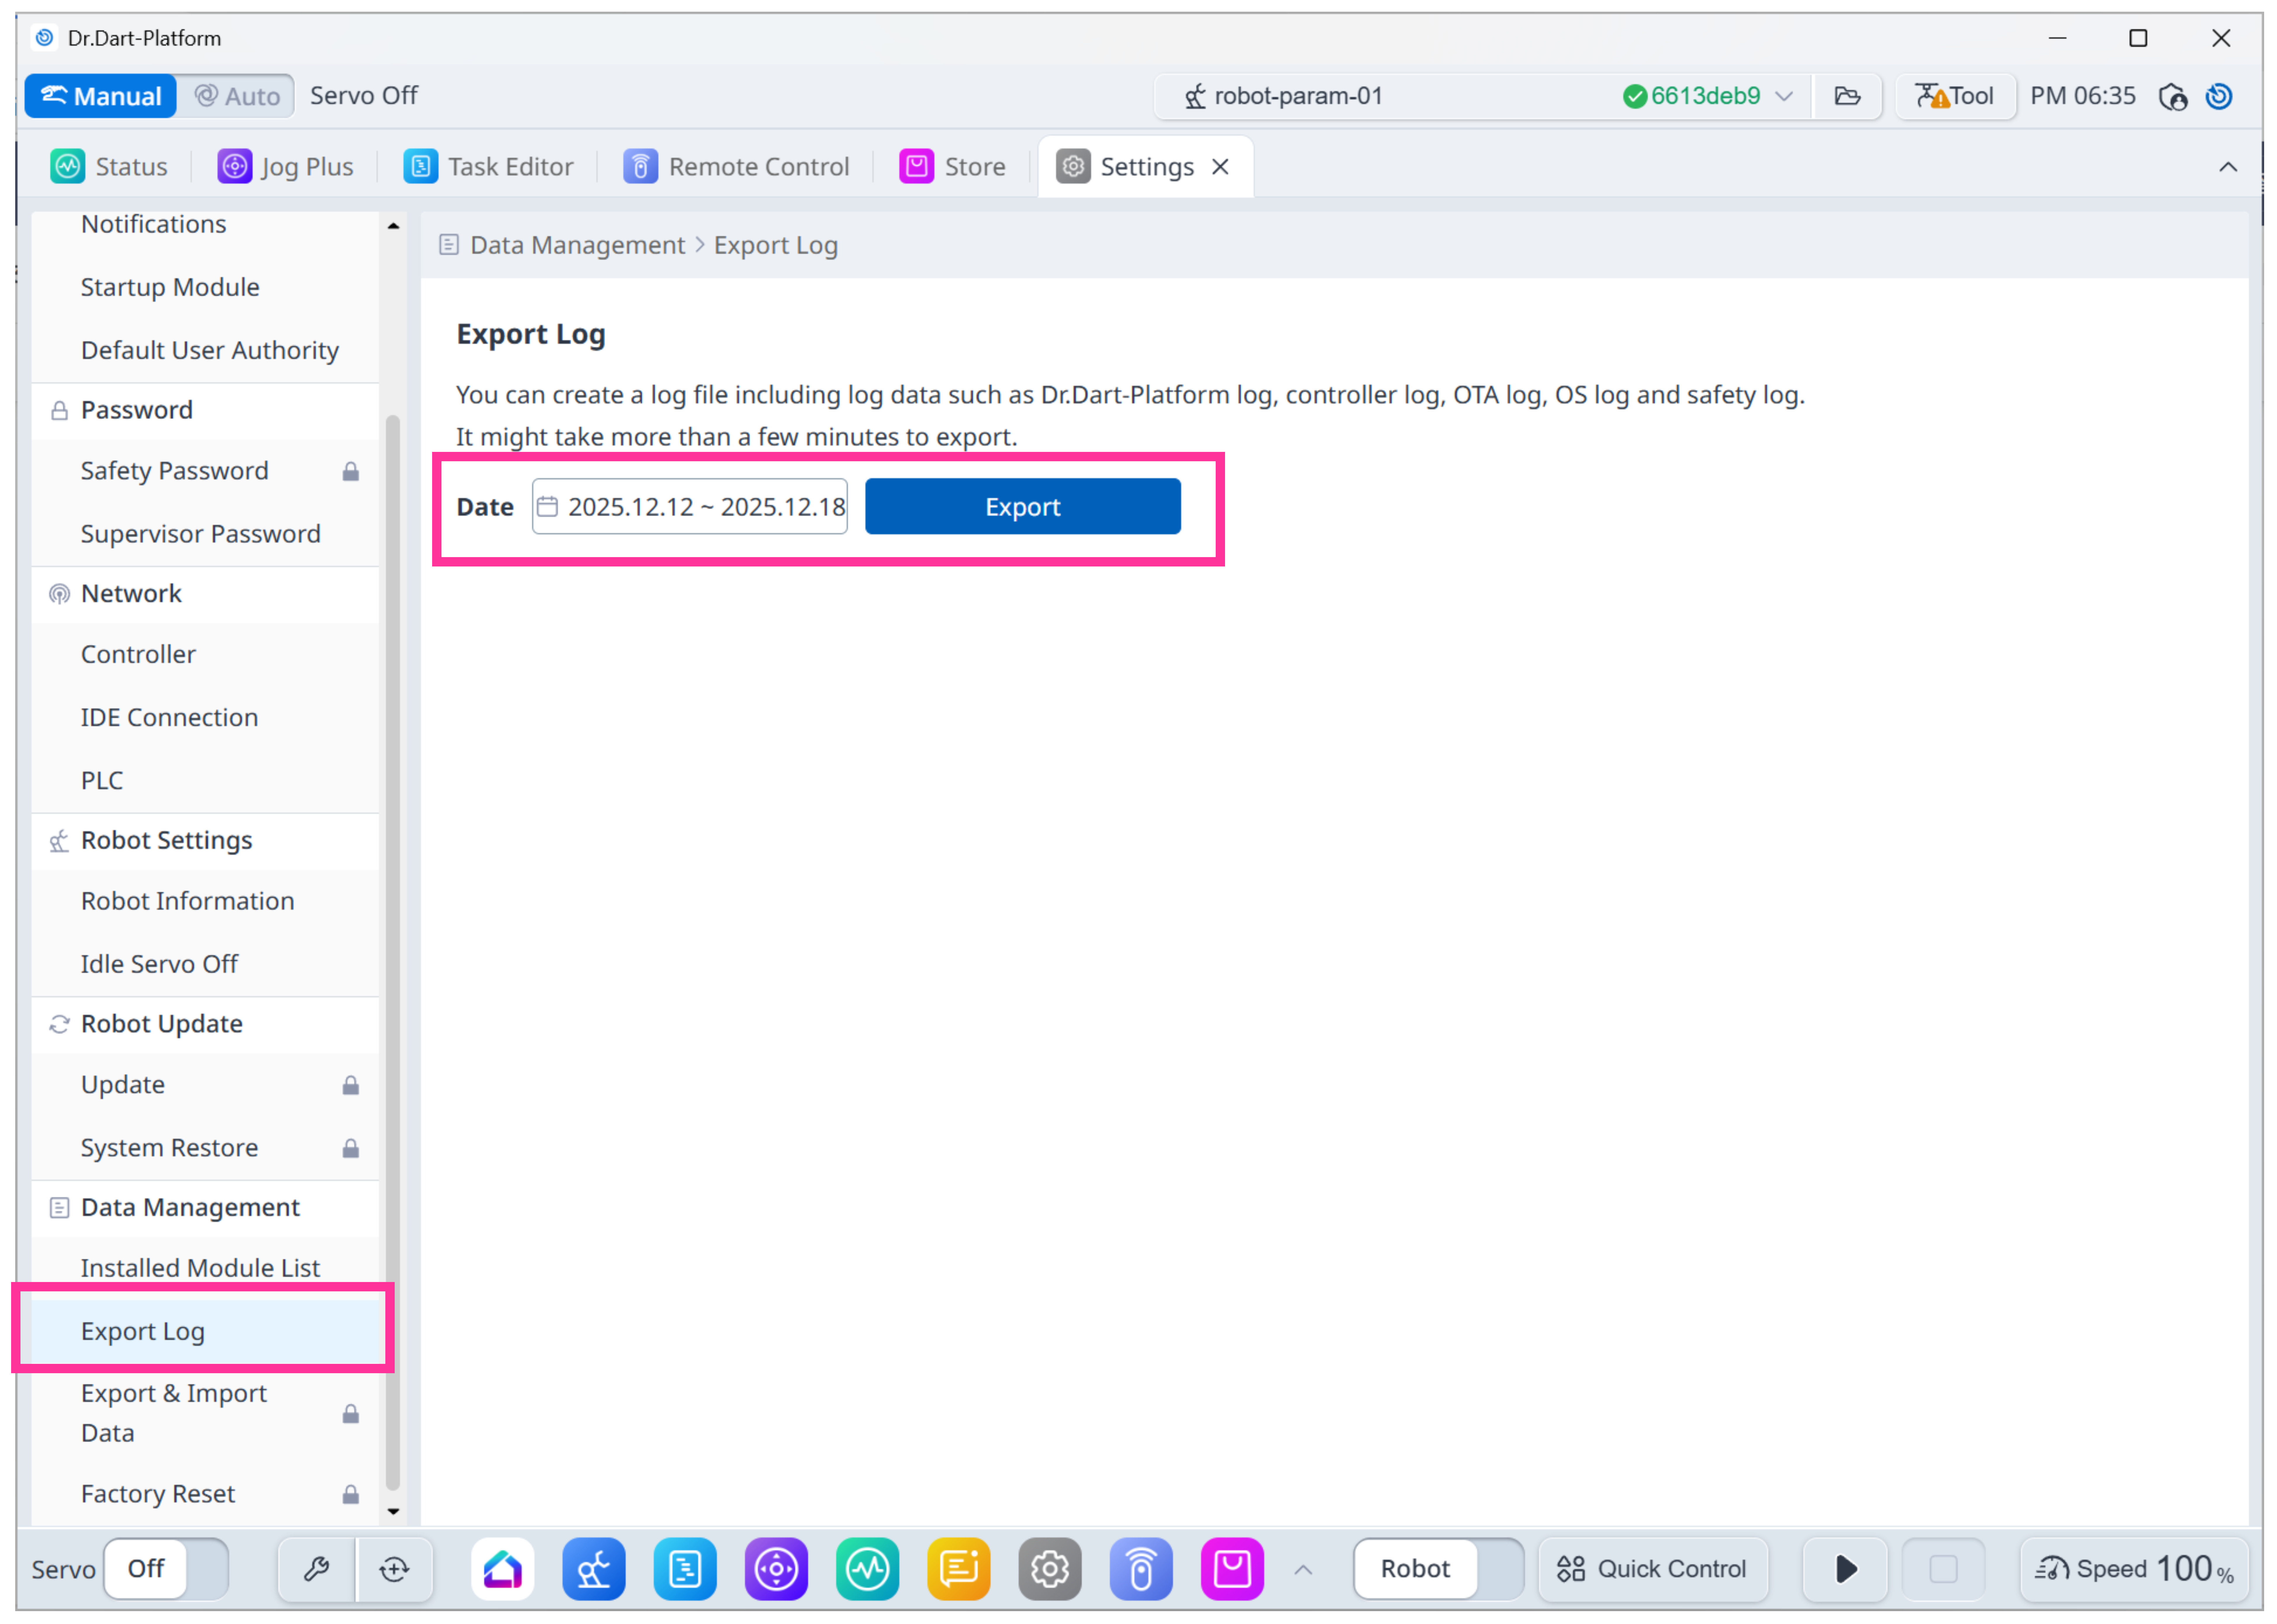
Friction calibration can now be performed even when the tool is attached.
Logs Module
Screen rendering has been optimized to reduce flickering, and previous issues with log record loss have been resolved.
Additionally, logs can now be searched in real time as user enters search terms.
Remote Control Module
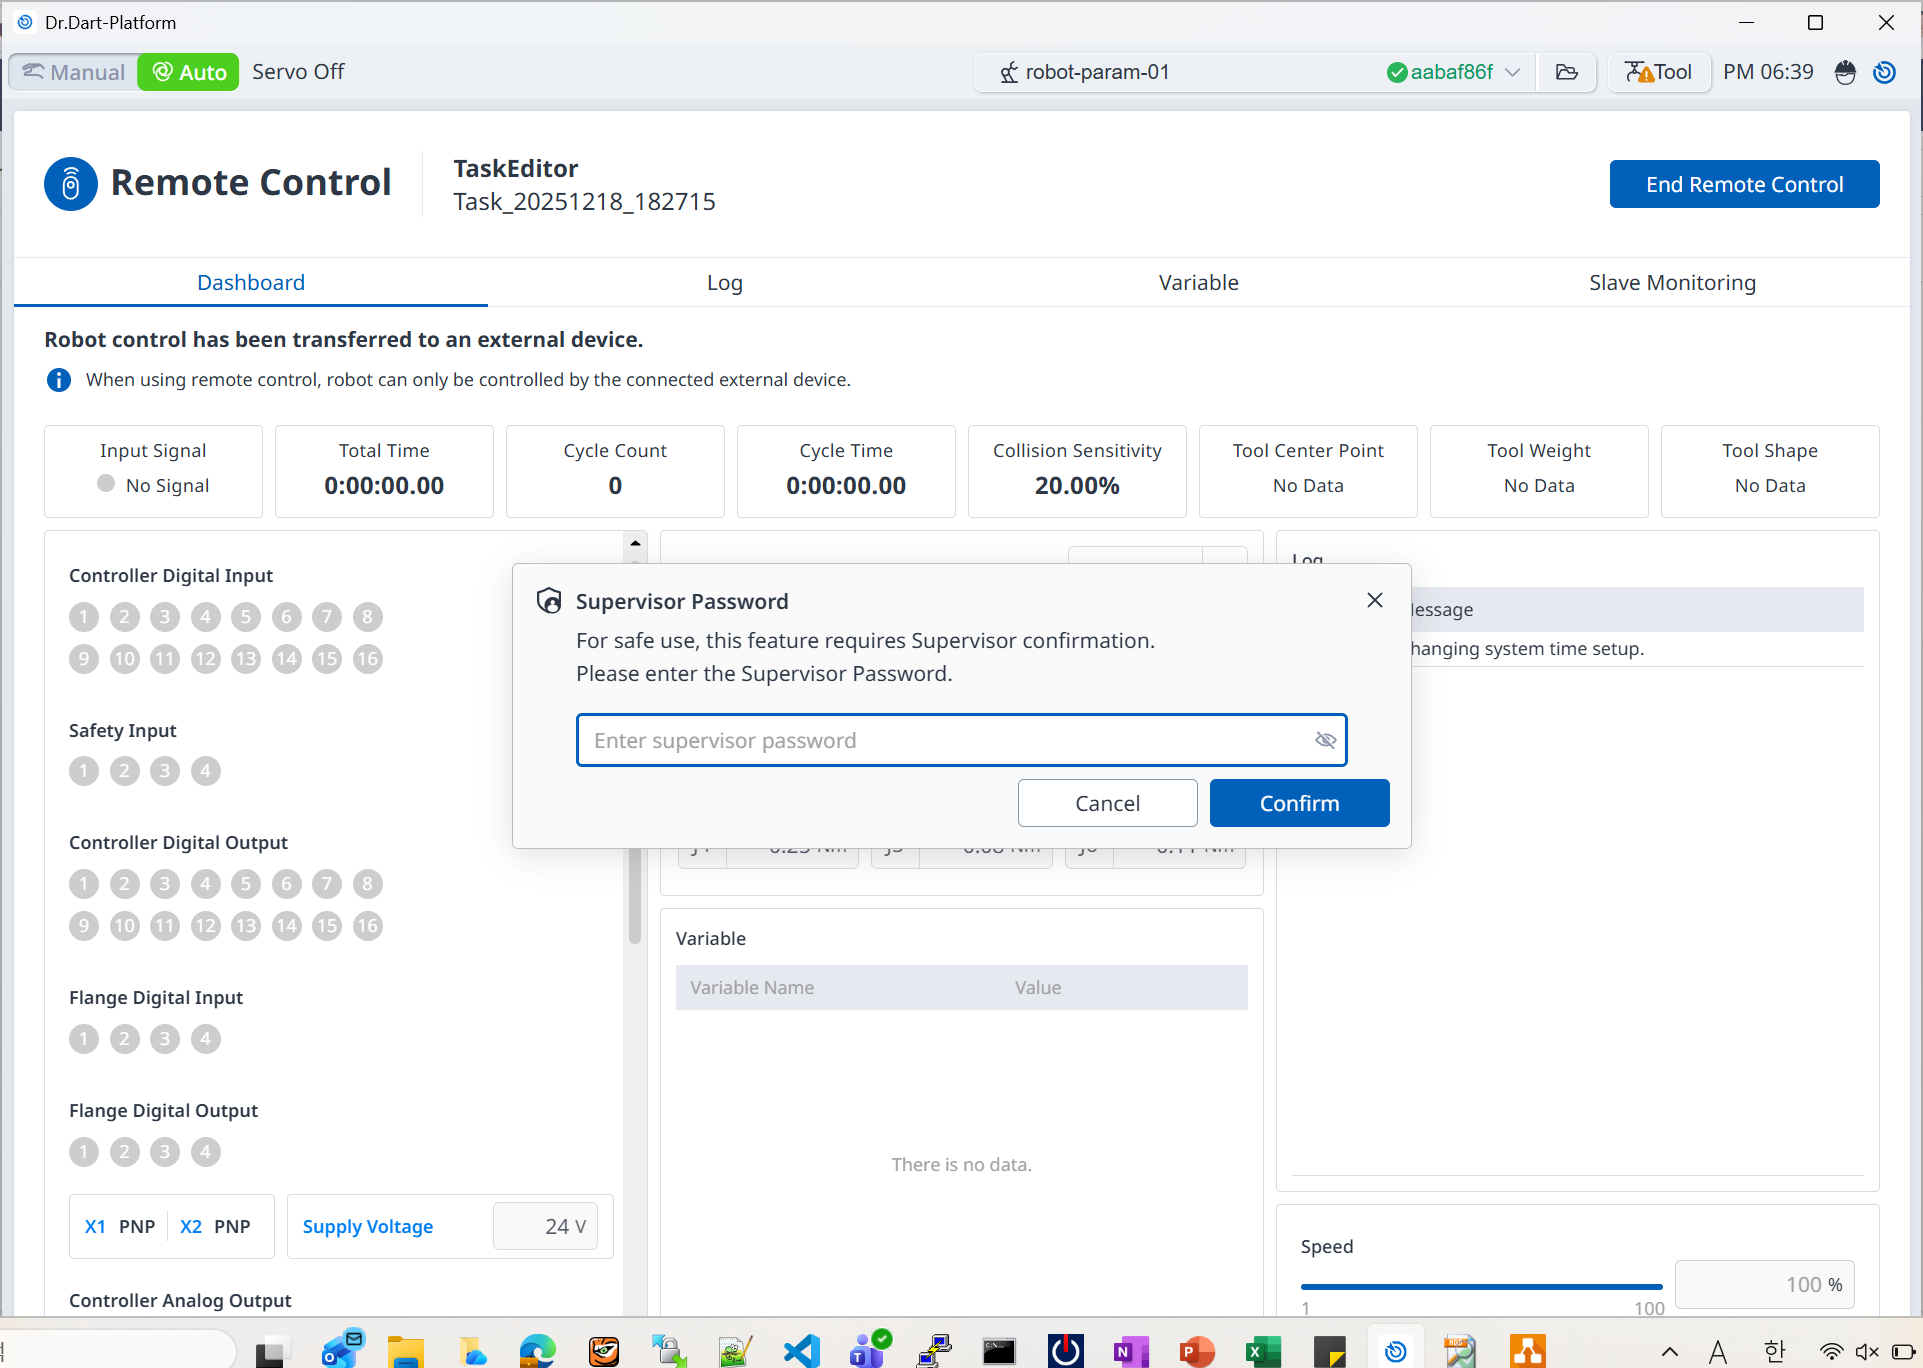
A new feature has been added that allows users to optionally require an administrator password when exiting remote control with operator authority.
An advanced settings option is now available directly below the required settings in the Remote Control module, where you can choose whether to prompt for an administrator password when exiting remote control with operator authority.
This option can only be configured in manual mode with administrator authority.
When enabled, a popup requesting administrator password input will appear when exiting remote control with operator authority, as shown in the image below.Anyone can start remote control regardless of authority, but when this option is activated, only administrators can exit remote control.
The start module feature can now be configured separately in the Settings module.
As a result, the previous “Auto Start Remote Control” toggle option has been removed from the Remote Control settings screen.
Users can check whether the Remote Control module has been set as the Start Module in the Remote Control auto start section, and can easily change or disable this option by clicking the “Configure Start Module” button to go directly to the Settings module.
Please note that if the Remote Control module is set as the auto start module, the system will enter the remote control screen directly after boot, instead of the remote control settings screen.
Dart-Bridge
Dart-Bridge is an integrated migration solution that converts task programs and configuration data from Dart-Platform v2 into formats compatible with Dart-Platform v3.
Dart-Bridge v1.5.0 supports backup and migration for Dart-Platform v2 up to version V2.12.2.2.
The Dart-Bridge solution is composed of the following components:
Dart-Bridge Software: Provides functionality to back up Dart-Platform v2 data and convert it to Dart-Platform v3 format.
Dart-Bridge Module: Enables migration of data files converted by the Dart-Bridge program to Dart-Platform v3.
Function Modules
Device Manager Module: Allows creation and management of device data.
Basic Devices Module: Provides basic devices. Device data can be created through the Device Manager module.
Basic Command Module: Offers the following commands for use in the Task Editor module.
Set Digital IO, Contact, Door Open Close
Pick & Process Command Module: Offers the following commands for use in the Task Editor module.
Pick, Place, Interlock Pick, Interlock Place, Pick Bolt, Insert
Process Command Module: Offers the following commands for use in the Task Editor module.
Airblowing, Polishing, Deburring, Gluing, Bolting, End Task
Conveyor Command Module: Offers the following commands for use in the Task Editor module.
Conveyor Coordinates, Conveyor Tracking
Classic Welding Module: Enables creation of Analog/Digital Welding device data and provides the following commands for use in the Task Editor module:
Start Welding, Welding motion commands (Move L, Move C, Move B, Move SX)
Dart-API
Previously, after booting, users had to activate industrial communication monitoring using the
setMonitoring(start: boolean)Dart-API in order to access industrial communication slave data via theieSlavemonitoring object.
This process has been improved so that industrial communication slave data can now be accessed directly through the Dart-API without any additional operations after booting.A new API,
ModuleScreen.setNavigationComponentVisibility(), has also been provided, allowing users to show or hide the Dart-Platform header as needed.
For detailed instructions, please refer to Dart-API Doc V5.
DRFL API
The update rate for monitoring data that periodically refreshes robot status values has been improved from 10Hz (100ms) to 50Hz (20ms).
Bug Fixes
The following issues that remained unresolved in previous versions have also been addressed.
Task Editor Module
Improved error line indication during program syntax checks to ensure that the correct line detection is displayed when an error occurs.
Previously, if variable or function names set in Sub, Thread, Run Thread, or Repeat commands were duplicated with existing names, they could overwrite the last declared function or cause the program to malfunction.
To address this, a new validation logic has been added to prevent variable and function name duplication, improving program stability.Fixed an issue where pose saving via Cockpit was not possible when using MoveJ within the Move command.
Fixed an error in the Wait command where inequality signs in the analog wait input command were recognized incorrectly.
Fixed an issue where Sub, Thread, and Sub Task items with empty execution names could not be copied and pasted.
Robot Parameters Module
Fixed an issue where tool weight was not automatically measured and was immediately processed as complete in certain situations.
Dart-Studio
Removed the unsupported “Real-Time Welding Conditions” button from the tool window.
Programming DRL
Fixed an issue where, in blending motion with a subsequent movejx and automatic solution space, the solution space was calculated based on the starting position, resulting in inaccurate blending motion.
The solution space for blending motion is now calculated based on the target point of the preceding motion.Fixed an issue where the 6th axis would rotate during Joint to Task (J2T) blending.
Resolved a noise issue that occurred when using sinusoidal weaving with certain weaving widths and periods.
Previously, blending motions were skipped when executing the set_auto_acceleration_mode() DRL command during program operation. This issue has been fixed in version V3.5. For software versions prior to 3.5, it is recommended to comment out lines containing the set_auto_acceleration_mode() command if this issue occurs.
Others
Fixed crash errors that occurred when running the Dev Tool popup or Quick Control mode in V3.4.
Resolved an issue where connecting to Dr.Dart-Store from the Store module was not possible even with an active internet connection, ensuring smooth access.
Fixed an intermittent 5.7009 motion algorithm monitoring cycle overrun error when sending the Remote Control Enable command.
Fixed an issue where, after the program stopped due to a "Selfbody collision Error" in Auto mode, the "Safety Status" value in the robot's Modbus Slave information did not update and remained in Standalone running status.
Resolved a 5.7072 error that occurred during specific motions when operating the A0912 robot.