FAQ
1. How can I enable virtualization on Windows OS?
How to Enable Virtualization in BIOS?
Reboot the computer
While the system is restarting from a black screen, enter BIOS by pressing the hotkey. The hotkeys differ depending on the brand of the computer used. Usually, F1, F2, F3, F10, Esc, or Delete keys are the hotkeys to enter BIOS.
Navigate to Advanced Tab and press Enter to continue
Select Virtualization and Enable
Save changes and reboot the computer
BIOS can also be accessed through Windows in Settings.
How to Enable Virtualization without BIOS?
To enable Virtualization without opening BIOS, follow these steps:
Navigate to the Security tab and press Enter on CPU Setup.
Select Intel(R) Virtualization Technology and press Enter.
Choose Enable and press Enter.
Press F10.
Press Enter to select Yes to save the settings and Boot into Windows.
How to Enable Virtualization in Windows 11?
Go to Windows Settings.
Click on Update and Security.
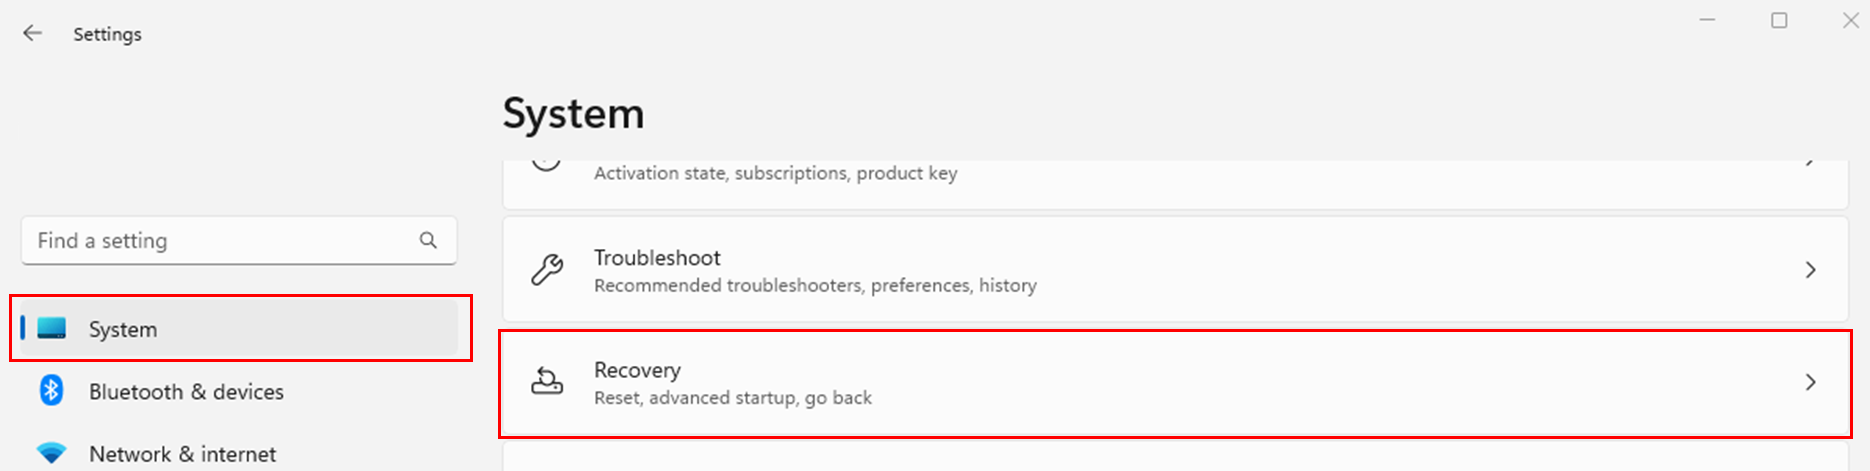
Click on
Restart Nowfrom theRecovery Tabto enter Windows Recovery Environment.
Click
Troubleshoot▸Advanced▸UEFI Firmware Settings.To continue, click
Restart.BIOS Settings will be displayed. Select Virtualization and enable it.
How to Enable Virtualization in Windows 10?
Go to Windows Settings.
Click on Update and Security.

Click on
Restart Nowfrom theRecovery Tabto enter Windows Recovery Environment.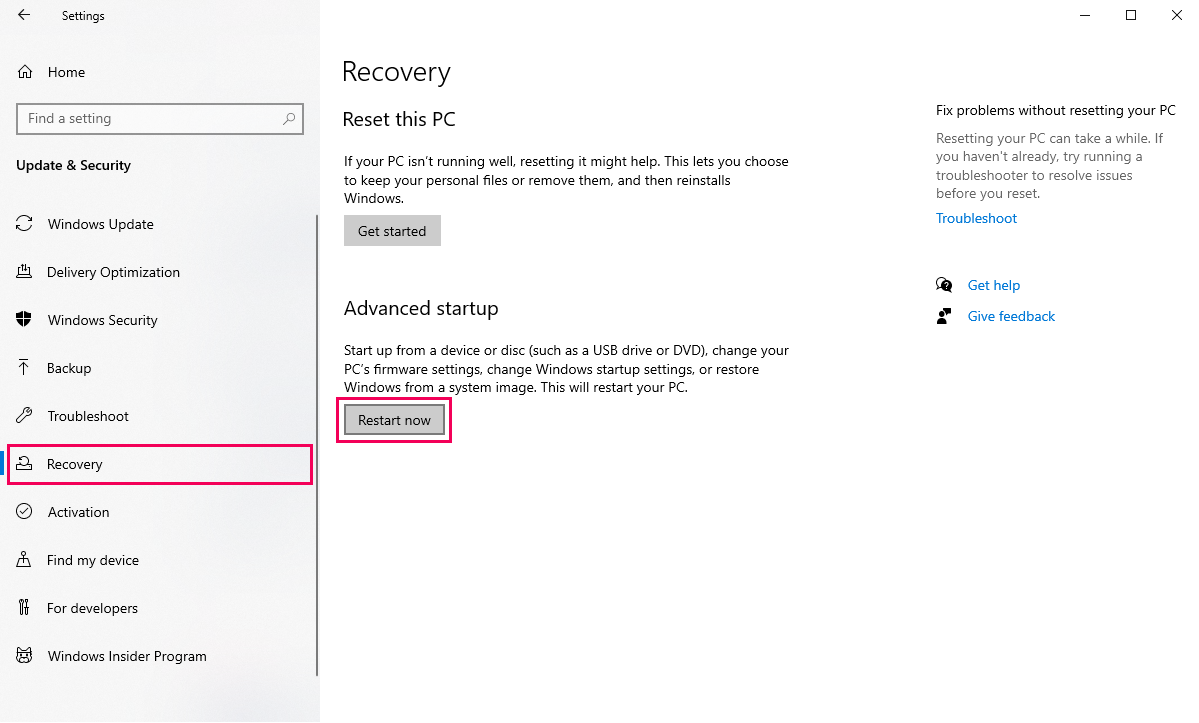
Click
Troubleshoot▸Advanced▸UEFI Firmware Settings.To continue, click
Restart.BIOS Settings will be displayed. Select Virtualization and enable it.
2. WSL2 installation is incomplete
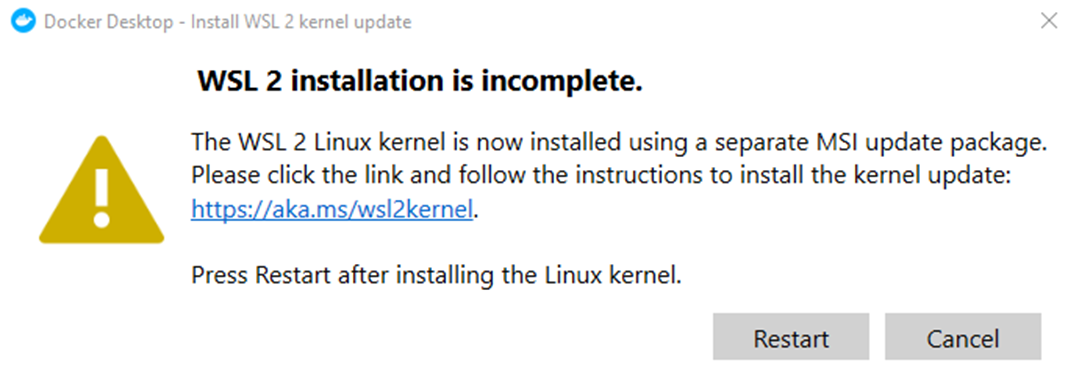
If the error “WSL 2 installation is incomplete” occurs in Docker Desktop, you should perform the following methods:
Step 1. Run
Command Prompt.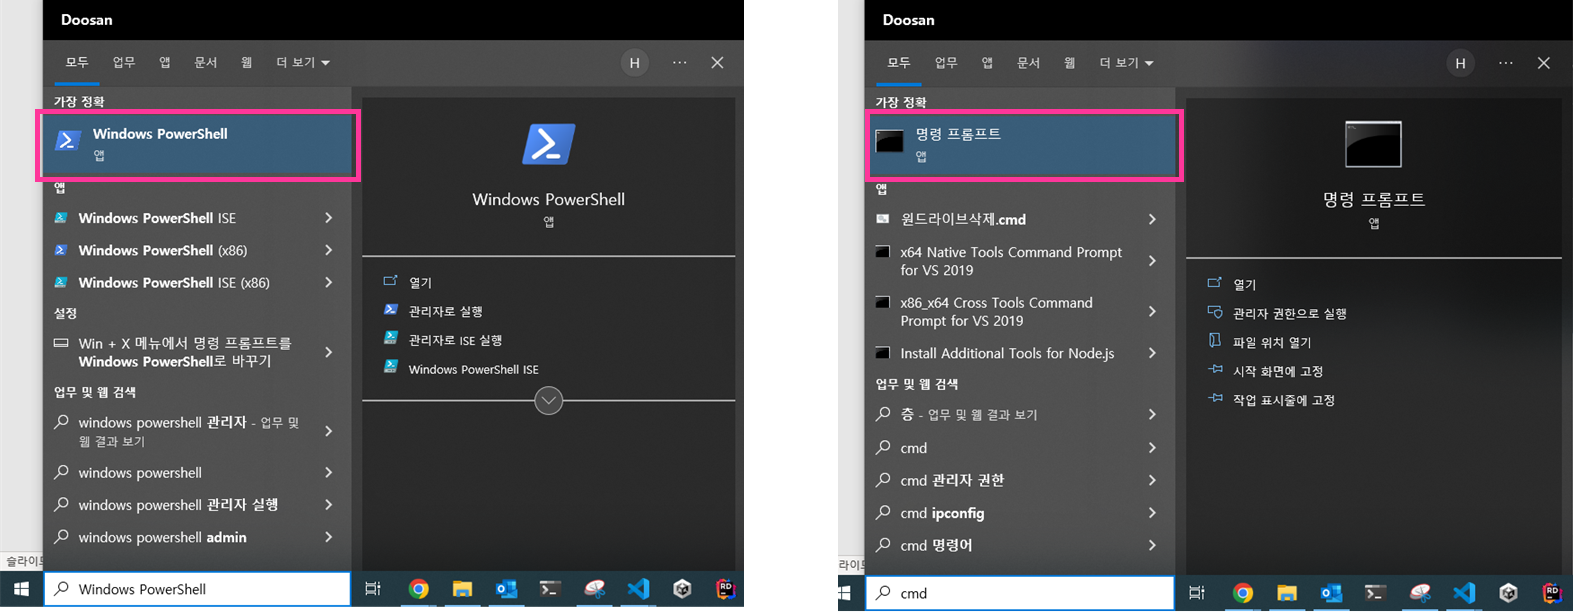
cmdorWindows PowerShellStep 2. Enter the command
wsl --update
3. How can I use USB Serial Ports in Dart-Service?
On Windows OS, you can establish a USB Serial connection using the Dart-Services simulator. Mac OS is not supported.
If you use Serial(USB), follow the guide below.
1) Download Serial Setup
Download dart_serial_setup_windows.zip for using USB port.
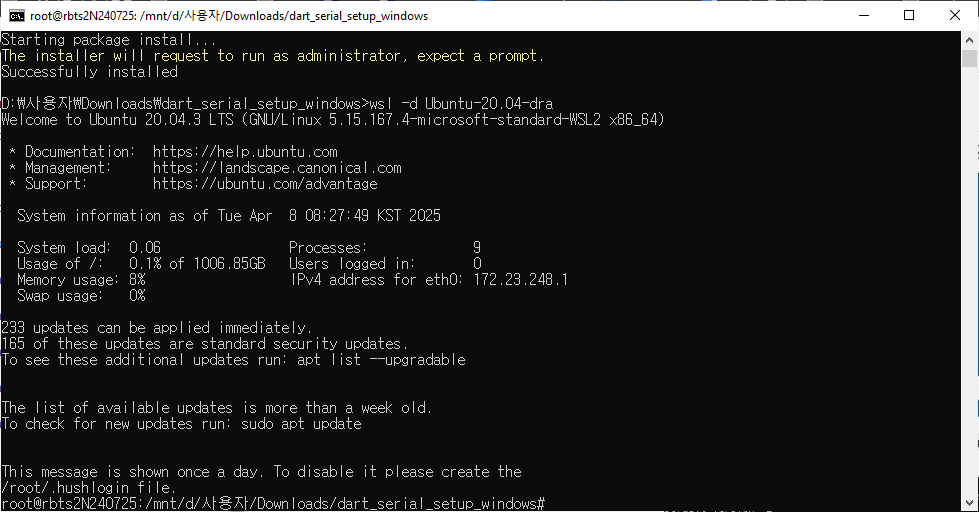
2) Install Ubuntu and usbipd
Unzip serial_setup_windows.zip
Execute
setup_win_env.batfile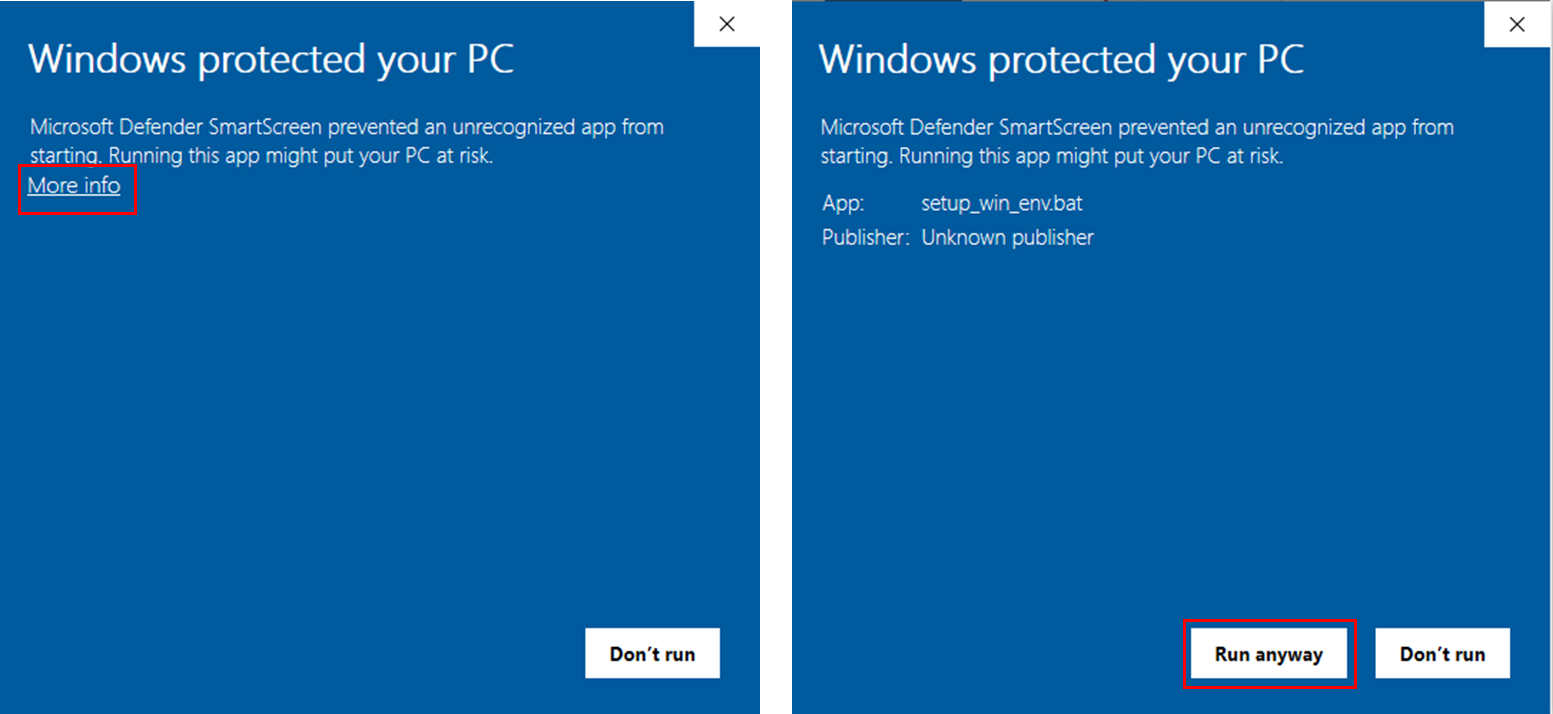
In the installation screen, input
Ykey andEnterkey to agree to the terms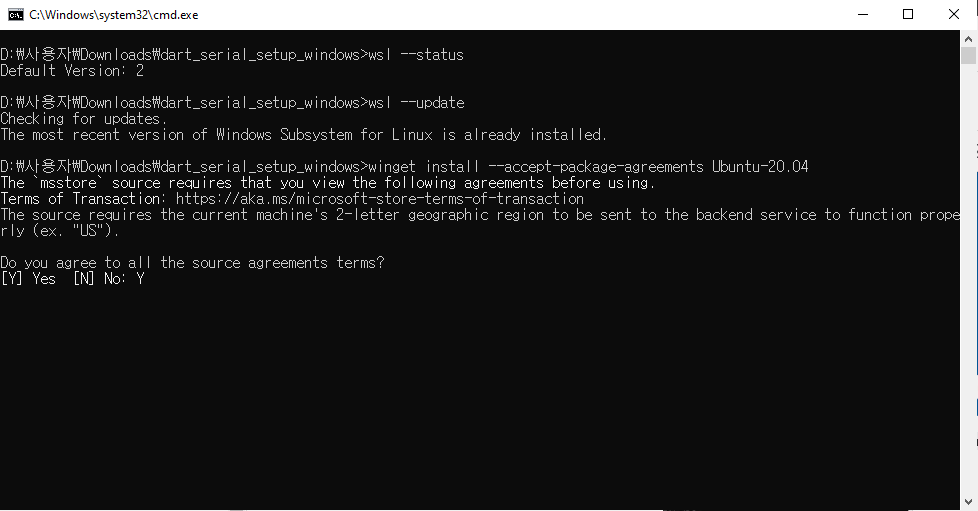
Wait for minutes while the package installation proceeds.
If you have 'winget' error
Please refer to https://www.techtutsonline.com/the-term-winget-is-not-recognized-as-the-name-of-a-cmdlet-function-script-file-or-operable-program/.
3) USB attach
If you need to use USB port for Serial or Modbus,
Reference to the official Microsoft documentation on WSL.
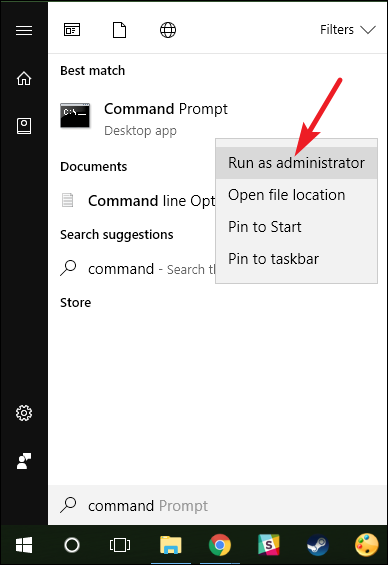
Open Command Prompt as Administrator
Enter command for checking the List all of the USB devices connected to Windows.
CODEusbipd wsl list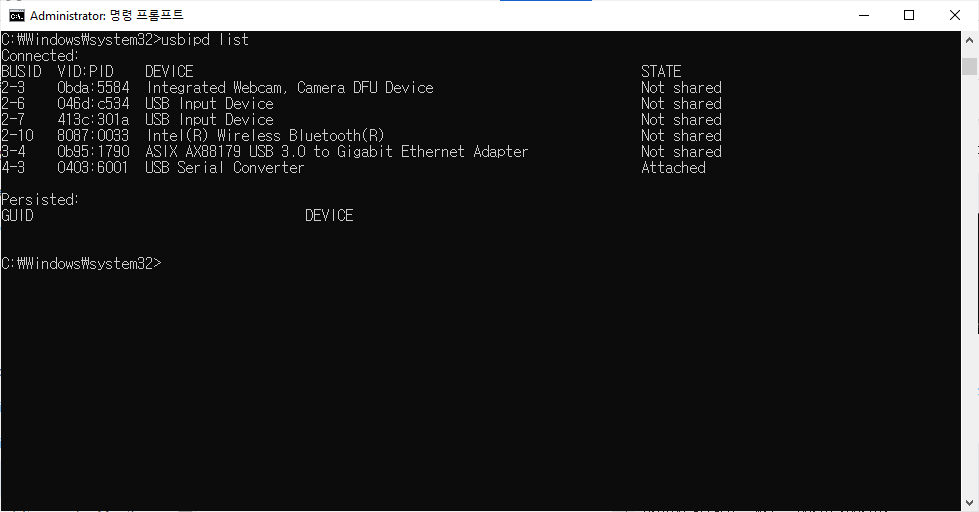
Enter command for selecting the bus ID of the device you’d like to attach to WSL and run this command.
CODEusbipd bind --busid <BUSID> usbipd attach --wsl --busid <busid>e.g.
usbipd bind --busid 4-3
usbipd attach --wsl --busid 4-3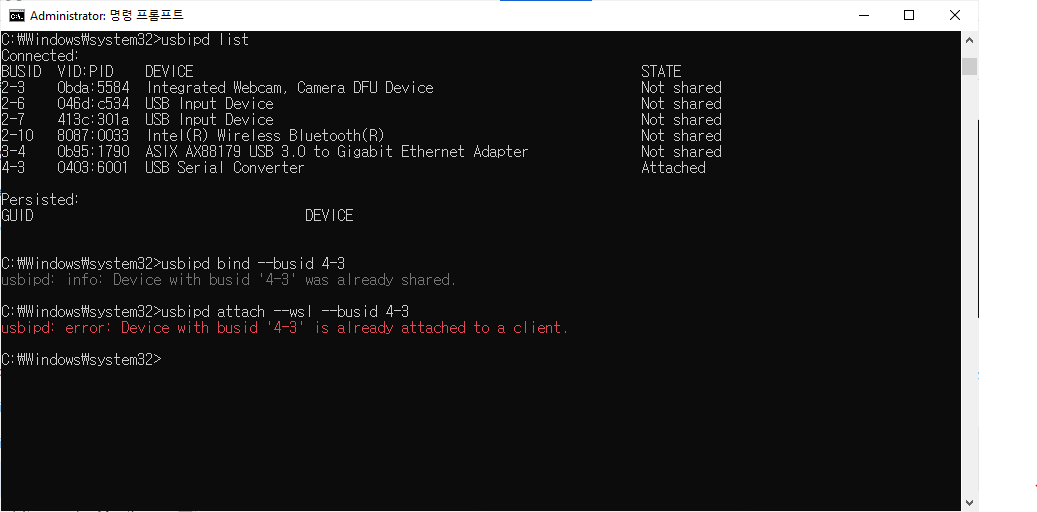
When using a USB hub to connect devices, there might be compatibility issues with WSL2.
If you have 'usbipd: error: There is no WSL 2 distribution running; keep a command prompt to a WSL 2 distribution open to leave it running.' error.
Enter the below commands
Open new Command Prompt as Administrator
Retry
usbipd attachcommand.
wsl -l -v
wsl --distribution Ubuntu-20.04-dra
Enter the WSL terminal (wsl --distribution Ubuntu-20.04-dra) and input the following command.
CODEwsl --distribution Ubuntu-20.04-draCODEsudo modprobe usbserial sudo modprobe ftdi_sio sudo modprobe cp210x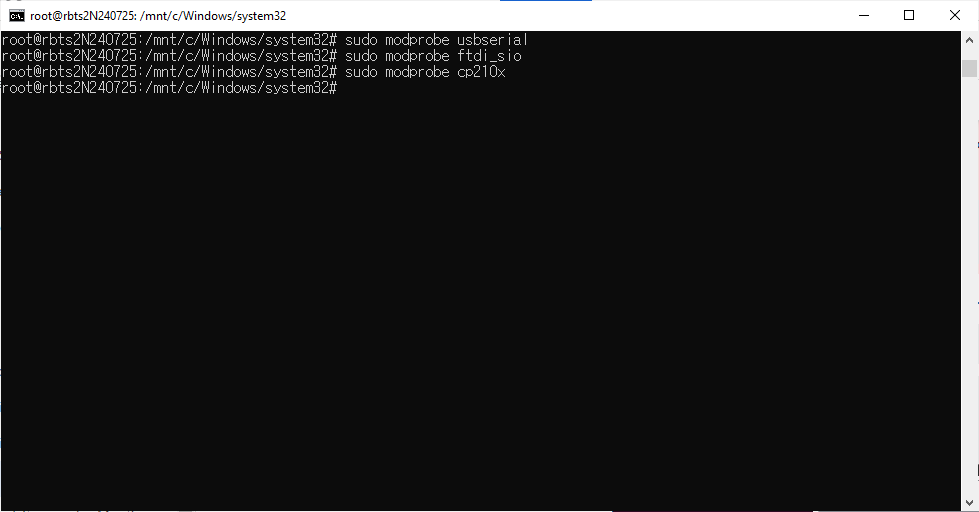
After verifying that ttyUSB0 has been created, adjust its permissions by entering the following command.
CODEls -l /dev/ttyUSB* chmod -R 777 /dev/ttyUSB0
If the USB port does not appear when executing the command ls -l /dev/ttyUSB*, you can try unplugging the USB device and plugging it back in, or using a different port. When switching to a different port, make sure to unbind and detach the existing device using the following steps.
usbipd: info: Device with busid '2-6' was already shared.
usbipd unbind --busid 2-6usbipd: info: Device with busid '2-6' was already not attached.
usbipd detach --busid 2-6If you have an error, please see the below.
Error 1. The selected WSL distribution is using WSL 1, but WSL 2 is required.
Step 1. Enter the following command into the terminal to select WSL2.
wsl --set-version Ubuntu-20.04 2Error 2. WSL ‘usbip’ client not correctly installed.

Step 1. From Terminal on Ubuntu 20.04 (Ubuntu Terminal is available from the Windows Store: https://apps.microsoft.com/store/detail/windows-terminal/9N0DX20HK701?hl=en-us&gl=kr)
Step 2. Enter the following commands sequentially
sudo apt-get update
sudo apt install linux-tools-virtual hwdata
sudo update-alternatives --install /usr/local/bin/usbip usbip `ls /usr/lib/linux-tools/*/usbip | tail -n1` 20
Error 3. When USB Port(e.g. ttyUSB0) is not visible on Ubuntu
This issue arises from changes in WSL and usbipd, which are beyond our control. While not a perfect solution, a user on Dart-Forum has shared that modifying the kernel settings as described in the following link can help address the issue.
Solution: https://askubuntu.com/questions/1373910/ch340-serial-device-doesnt-appear-in-dev-wsl/
Forum: https://forum.drdart.io/t/issue-usb-connection-dart-suite-v3-2/456/13
4. How can I use TCP/IP in Dart-Service?
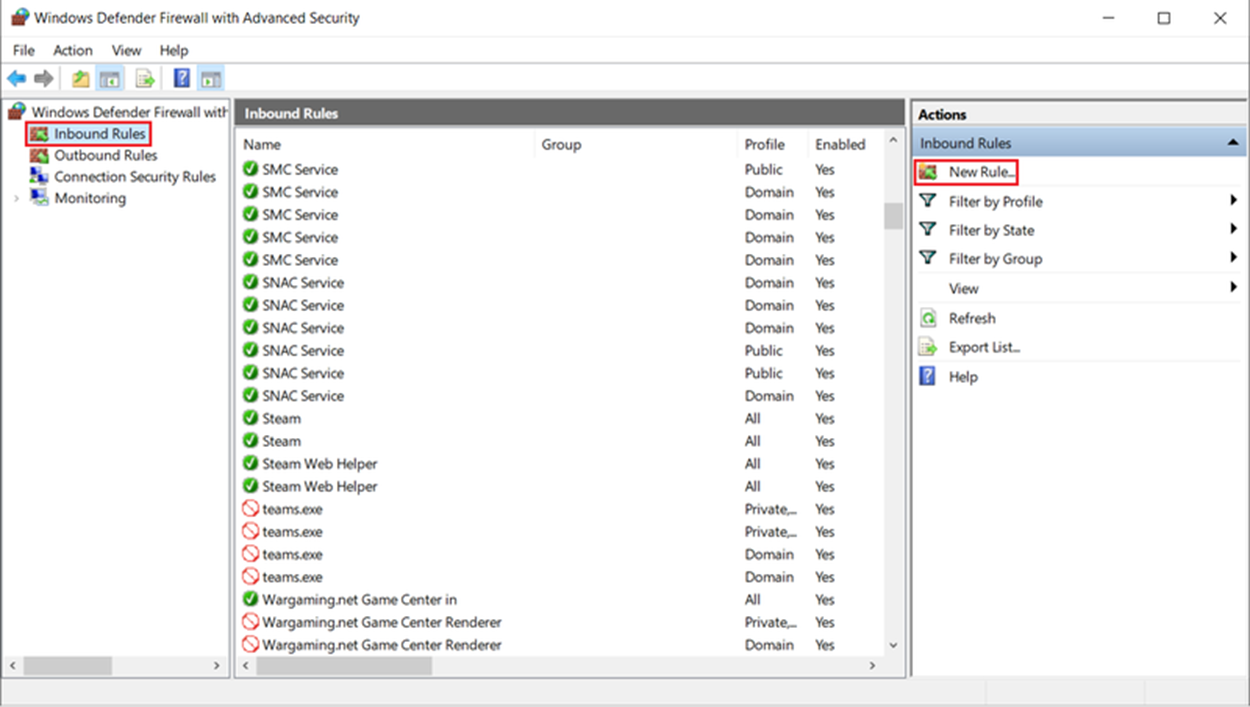
For TCP/IP communication with the host pc, firewall connection permission settings are required.
Step 1. Enter
Control Panel▸System and Security▸Windows Defender Firewall.Step 2. Go to
Advanced settingson the left.

Step 3. Add a new rule equally to the
Inbound Rulesand theOutbound Rules.
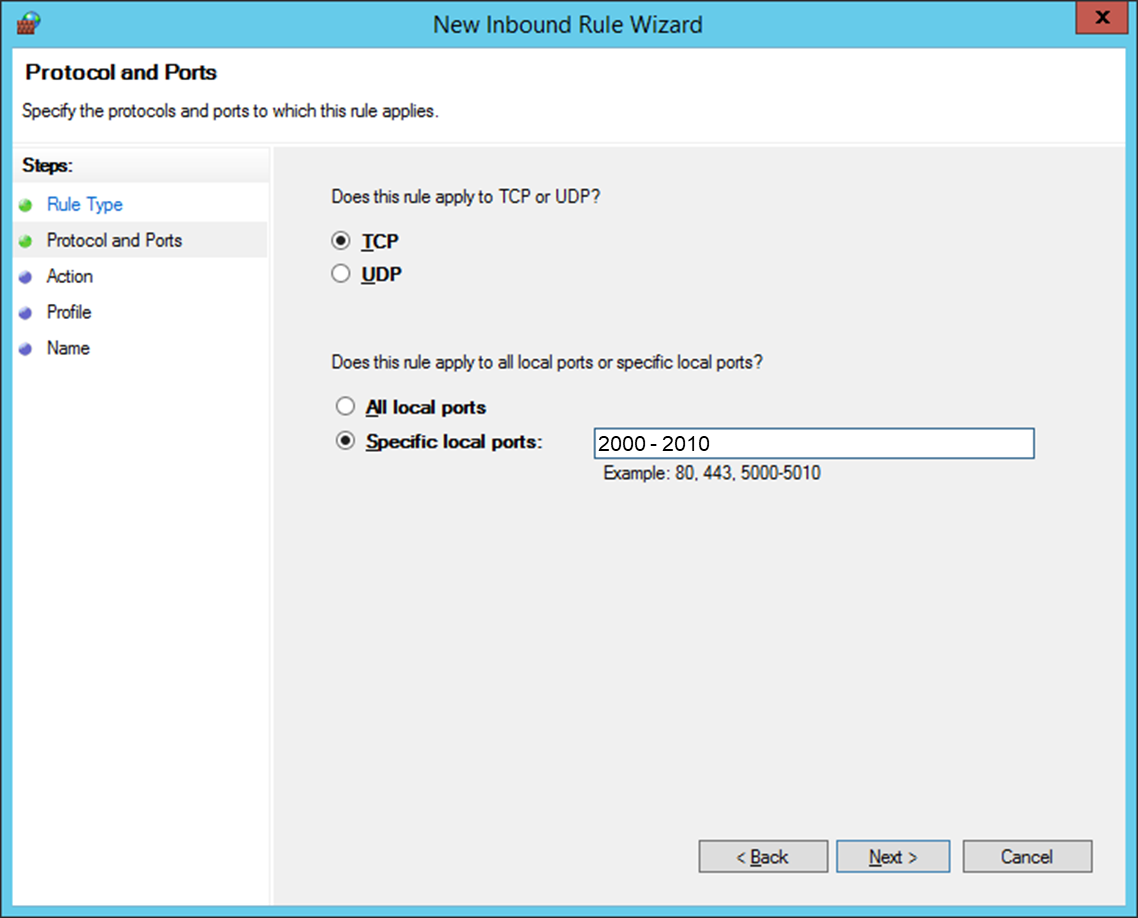
Step 4. Select Pule Type : Port

Step 5. Set the port number or range that you want to use.
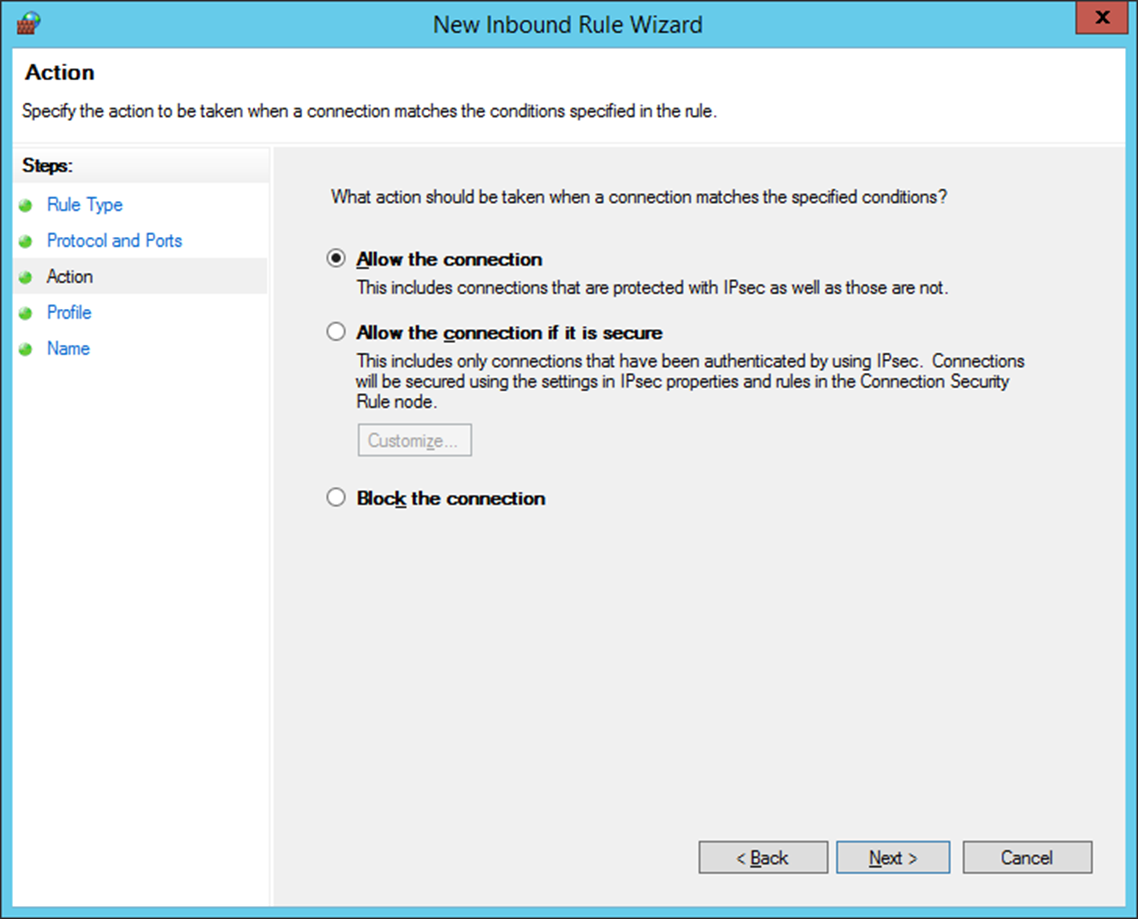
Step 6. Select Allow the connection.
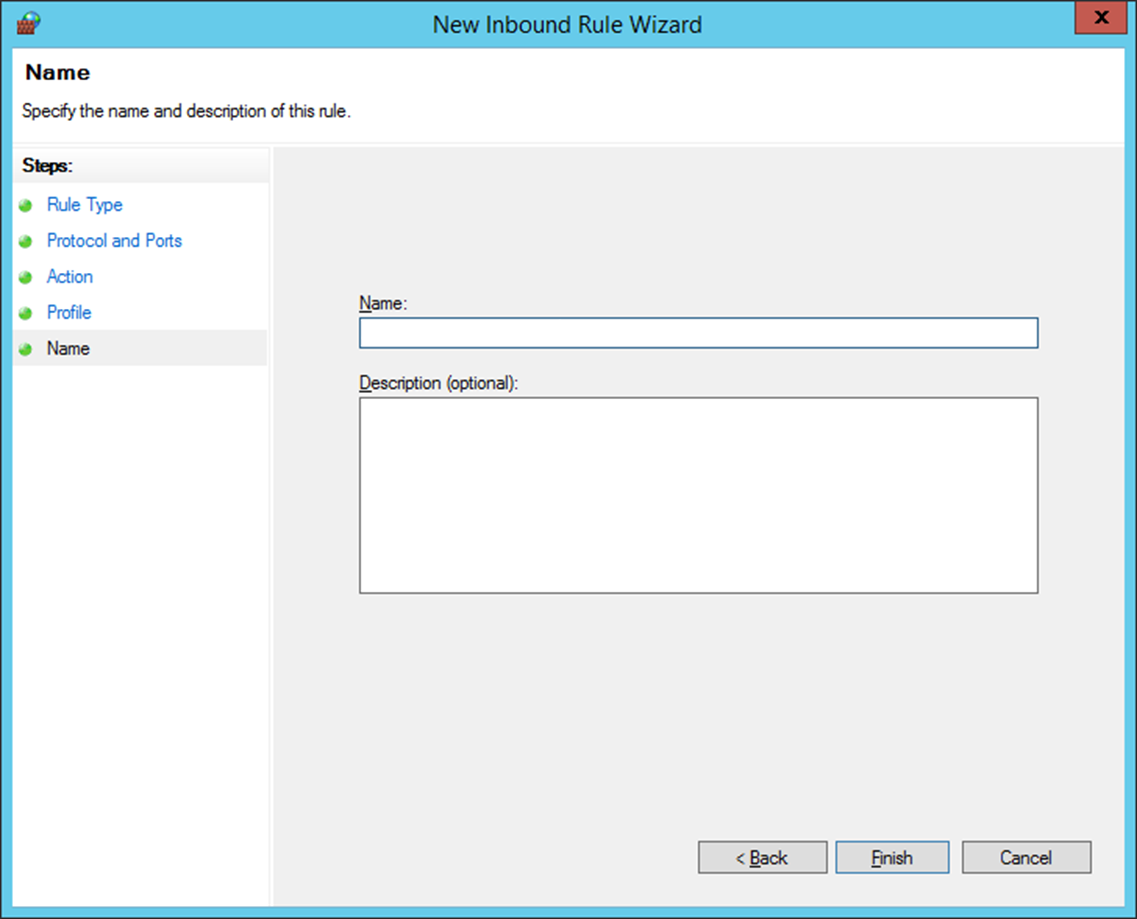
Step 7. Fill in the desired Name and Description, then click Finish button.
Note.
This guide does not have screenshot images to register outbound rules. Be sure to register outbound rules in the same way as inbound rules.