How to install without Dart-Services
You must install Docker Desktop and AWS CLI on your computer system to create a convenient building/running module environment. Therefore, follow these 3 steps:
Step 1: Install Docker
Step 2: Install AWS and implement a connection with AWS
Step 3: Get started with Docker
Installing a Build&Simulator Services without Dart-Services
To install a build environment, we need to set up Docker. Docker is an open-source virtualization platform based on the container. To use this function that builds the source code to a module in Dart-IDE, the program named Docker should be installed and implemented in the user’s PC. You can think of it as Docker being used to install and implement a virtualization environment in which various programs and settings for the build are installed at once.
Infor
To put it simply, Docker moves and runs various programs and implementation environments as they are on my PC.
The one that includes the program, file, and set value, etc. which are needed for service operation in Docker is called Docker image.
In other words, a Docker image is a copy of a computer with several programs needed. And Docker Desktop is what allows you to access to the computer.
When the Docker image runs, the Docker container runs the image in the isolated space.
1. Installing Docker.
Installing and using Docker are prerequisites for the build/run process. There are detailed installation instructions on the official Docker homepage, so you can refer to it below.
Docker desktop: Download here
Note.
Free Docker is a better option if your company is small (fewer than 250 employees and less than $10 million in annual revenue). It useshttps://docs.docker.com/engine/reference/commandline/cli/.
If not, you must choose paid Docker right here: https://www.docker.com/pricing/.
Info.
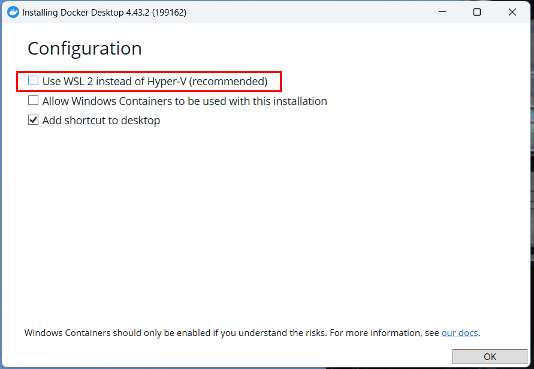
When setting the Docker, use Hyper V instead of WSL 2 although the program recommends the latter one.
2. Setting Docker
Step 1: After Docker’s installation, the interface screen will appear. Click the setting icon on the upper right part. (Refer to the red box below)
Step 2: Open the general section and make sure the items you check are correct, as shown below.
Don’t activate the WSL2 unless the computer requirement is adopted.

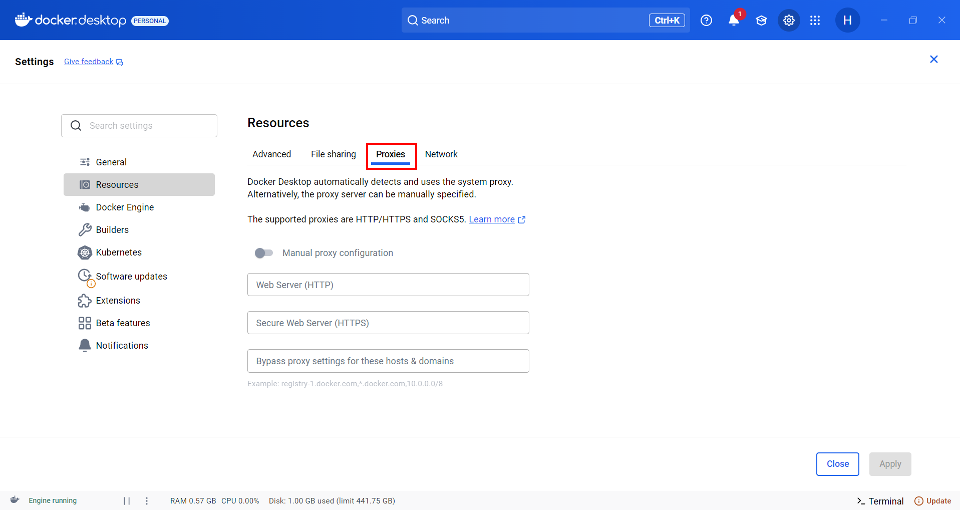
Step 3: Set proxy if needed.
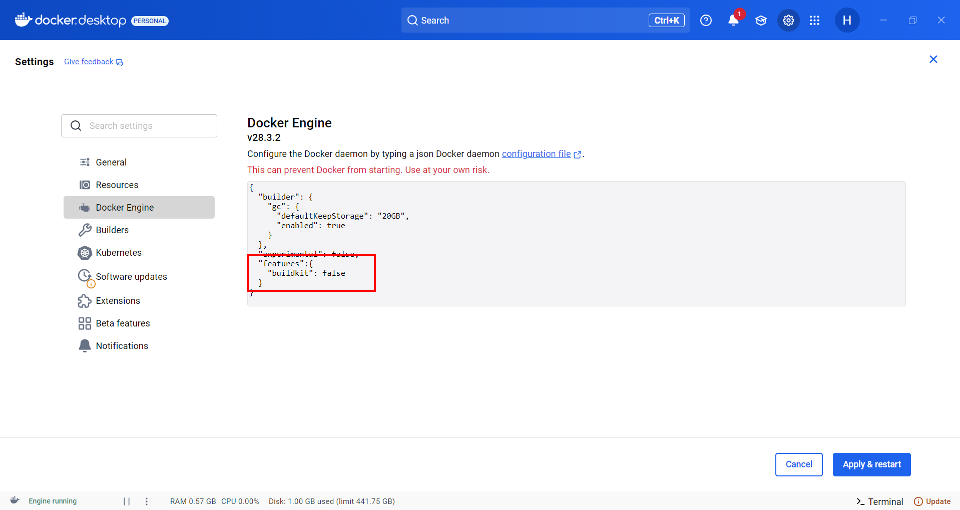
Step 4: Switch to the Docker engine section, and check out the last line of the code. If the sentence is
"buildkit": true, please fix it like"buildkit": false.
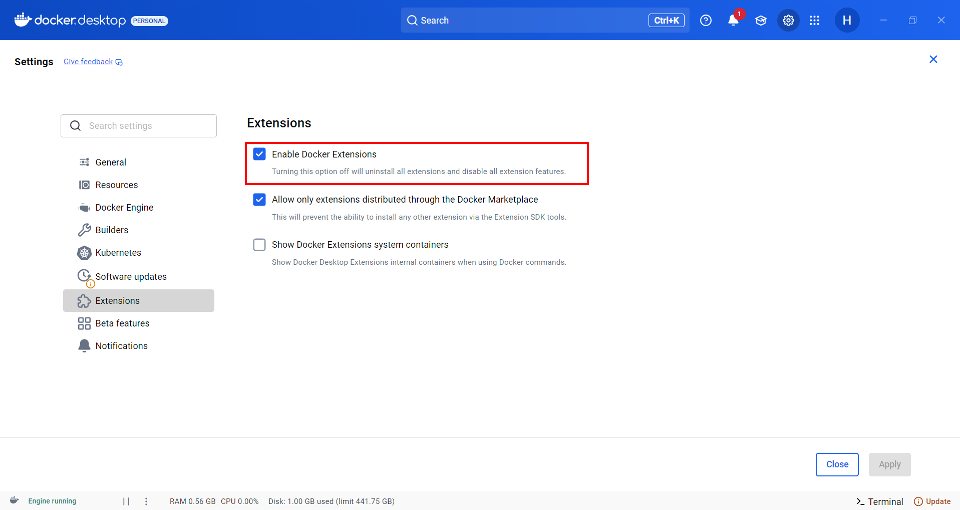
Step 5: Finally, check the Extensions section and enable docker extensions to see if it works. Afterward, click Apply & Restart to finish the Docker installation.
3. Install AWS CLI
You should install AWS CLI for download Docker container image that
Step 1: Install the AWS CLI.
Follow the Guides for installing & all operation systems (Explore more here).
Step 2: Run Command Prompt or Windows PowerShell as administrator, enter the command below.
msiexec.exe /i https://awscli.amazonaws.com/AWSCLIV2.msi /qn4. Implement a connection with AWS CLI
Step 1: After installing AWS CLI successfully, implement a connection with AWS service.
Open the Window PowerShell.
Enter the AWS Configure.
CODEaws configureAccess-key :
CODEAKIA4TIS27OCIYTMWJ6SSecret-access-key :
CODEezouX5BykVIMMwWmVzkgyUUpt7JyxvL2vbjCjDNpDefault Region name :
CODEap-northeast-2Default output format [None] :
CODEjson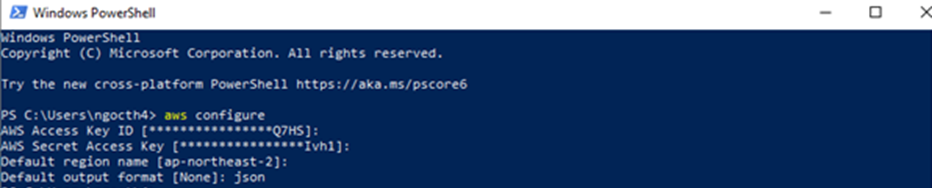
Login to AWS CLI: Docker login command to AWS connects to the repository.
CODEaws ecr get-login-password --region ap-northeast-2 | docker login --username AWS --password-stdin 866012298116.dkr.ecr.ap-northeast-2.amazonaws.com
If the following errors occur, please follow the instructions below.
Error 1. Failed with status: 400 Bad Request :
Solutions:
Make sure Docker is running.
If it still does not work, there might be an installation process that was skipped.
Error 2. An error occurred (AccessDeniedException) when calling the GetAuthorizationToken operation : …
Solutions:
Please send your public IP to the email address below. This problem is caused by the IP being blocked.
Error 3. Error response from daemon : …
Solutions:
Try with
cmdinstead.Run the program as administrator

Error 1. Failed with status: 400 Bad Request

Error 2. An error occurred (AccessDeniedException) when calling the GetAuthorizationToken operation : …

Error 3. Error response from daemon : …
5. Get started with Docker
You need to run two docker images(services) on docker desktop. One is a build service and one is a robot controller simulator service.
5.1. Download Build Service
Step 1: Pull the latest images from the repository.
docker pull 866012298116.dkr.ecr.ap-northeast-2.amazonaws.com/build-service-prod:latest
docker pull 866012298116.dkr.ecr.ap-northeast-2.amazonaws.com/build-fw-prod:latest
(Optional) Step 2: Shut down the running docker container.
docker kill $(docker ps -a -q --filter "ancestor=866012298116.dkr.ecr.ap-northeast-2.amazonaws.com/build-service-prod:latest")
docker kill $(docker ps -a -q --filter "ancestor=866012298116.dkr.ecr.ap-northeast-2.amazonaws.com/build-fw-prod:latest")
(Optional) Step 3: Delete the old docker container.
docker rm $(docker ps -a -q --filter "ancestor=866012298116.dkr.ecr.ap-northeast-2.amazonaws.com/build-service-prod:latest")
docker rm $(docker ps -a -q --filter "ancestor=866012298116.dkr.ecr.ap-northeast-2.amazonaws.com/build-fw-prod:latest")
Step 4: Create docker network.
docker network create --driver=bridge --subnet=172.28.0.0/16 br0Step 5: Run the docker container with newly pulled images.
docker run -p 5022:22 --log-driver none -itd --name bulid-fw --network br0 866012298116.dkr.ecr.ap-northeast-2.amazonaws.com/build-fw-prod:latest bash
docker run -d -p 3002:3000 -p 5023:22 --log-driver none -tid --name build-service --network br0 866012298116.dkr.ecr.ap-northeast-2.amazonaws.com/build-service-prod:latest
5.2. Download Simulator Service
Step 1: Pull the latest images from the repository.
You can change the SDK version by replacing
sdk4with your desiredsdk{version_name}in the image tag (e.g.,simulator-prod:sdk{version_name}).866012298116.dkr.ecr.ap-northeast-2.amazonaws.com/simulator-prod:sdk4866012298116.dkr.ecr.ap-northeast-2.amazonaws.com/simulator-prod:sdk3866012298116.dkr.ecr.ap-northeast-2.amazonaws.com/simulator-prod:sdk2
docker pull 866012298116.dkr.ecr.ap-northeast-2.amazonaws.com/simulator-prod:sdk4(Optional) Step 2: Shut down the running docker container.
docker kill $(docker ps -a -q --filter "ancestor=866012298116.dkr.ecr.ap-northeast-2.amazonaws.com/simulator-prod:sdk4")(Optional) Step 3: Delete the old docker container.
docker rm $(docker ps -a -q --filter "ancestor=866012298116.dkr.ecr.ap-northeast-2.amazonaws.com/simulator-prod:sdk4")Step 4: Run the docker container with newly pulled images.
robot model: You can change the robot model by setting the value of
--env=ROBOT_MODEL=to one of the following options:M0609M0617M1509A0509A0912H2017H2515E0509P3020: Supported onsdk4and higher.
docker run --env=ROBOT_MODEL=M1013 --log-driver none -itd --privileged -v ~/docker_userdata:/home/dra/etc/data -m 2g --name simulator --device=/dev/ttyUSB0 -p 12345:12345 -p 3601:3601 -p 1122:1122 -p 502:502 -p 12360:12360/udp 866012298116.dkr.ecr.ap-northeast-2.amazonaws.com/simulator-prod:sdk4Now the Dart-IDE is connected with your Dart-Platform, and you are ready to start Creating a module.
For more details, please read Build/Run.